GE PGS908SEPSS Use and Care Manual - Page 33
Safety Instructions, Operating Instructions, Troubleshooting Tips, Consumer Support
 |
UPC - 084691199786
View all GE PGS908SEPSS manuals
Add to My Manuals
Save this manual to your list of manuals |
Page 33 highlights
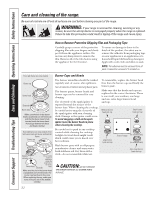
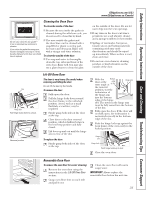
Oven rack GEAppliances.com (U.S.) www.GEAppliances.ca (Canada) Burner Grates and Vent Grille Porcelain enamel burner grates and the vent grille should be washed regularly and, of course, after spillovers. The grates may be washed either in the dishwasher or you may wash them in hot soapy water and rinse with clean water. You may also use abrasive cleaners and scouring pads to clean burner grates and the vent grille. Dry the grates and grille with a cloth-don't put them back on the cooktop wet. To get rid of burned-on food, place the grates and grille in a covered container. Add 1/4 cup (59 mL) ammonia and let them soak several hours or overnight. Wash, rinse well and dry. Although they're durable, the grates and grille will gradually lose their shine, regardless of the best care you can give them. This is due to their continual exposure to high temperatures. Do not operate a burner for an extended period of time without cookware on the grate. The finish on the grate may chip without cookware to absorb the heat. After cleaning, replace the center vent grille first. Replace the side grates so that the center extensions are oriented toward the center of the cooktop. The rear center extensions should slightly overlap the vent grille. Make sure the grates are positioned securely over the burners and that they are stable and level. Rubber Grate Feet For stability, your cooktop has rubber feet on the burner grates. If any of these rubber feet should become damaged or lost, replace them immediately. To order replacement rubber grate feet, please call our toll-free number: National Parts Center 800.626.2002 (U.S.) 800.661.1616 (Canada) GEAppliances.com (U.S.) www.GEAppliances.ca (Canada) Rubber Grate Feet WB02T10101 Cooktop Surface To avoid damaging the porcelain enamel surface of the cooktop and to prevent it from becoming dull, clean up spills right away. Foods with a lot of acid (tomatoes, sauerkraut, fruit juices, etc.) or foods with high sugar content could cause a dull spot if allowed to set. When the surface has cooled, wash and rinse. For other spills such as fat spatterings, etc., wash with soap and water once the surface has cooled. Then rinse and polish with a dry cloth. NOTE: Do not store flammable materials in an oven, drawer or near the cooktop. Do not store or use combustible materials, gasoline or other flammable vapors and liquids in the vicinity of this or any other appliance. NOTE: Do not lift the cooktop. Lifting the cooktop can lead to damage and improper operation of the range. NOTE: For stainless steel cooktops, refer to the Stainless steel surfaces section. Control Knobs The control knobs may be removed for easier cleaning. Make sure the knobs are in the OFF positions and pull them straight off the stems for cleaning. The knobs can be cleaned in a dishwasher or they may also be washed with soap and water. Make sure the insides of the knobs are dry before replacing. Replace the knobs in the OFF position to ensure proper placement. Oven Racks All oven racks may be cleaned by hand with an abrasive cleaner or steel wool. After cleaning, rinse the racks with clean water and dry with a clean cloth. Gray porcelain-coated oven racks may remain in the oven during the self-cleaning cycle without being damaged. The shiny, silvercolored oven racks may remain in the oven during the self-cleaning cycle, but they will lose their luster and become hard to slide. It will be necessary to grease all oven rack side edges with a light coating of vegetable oil after cleaning them by hand or in the oven. This will help maintain the ease of sliding the racks in and 33 out of the oven. Safety Instructions Operating Instructions Care and Cleaning Troubleshooting Tips Consumer Support
-
 1
1 -
2
-
3
-
4
-
5
-
6
-
7
-
8
-
9
-
10
-
11
-
12
-
13
-
14
-
15
-
16
-
17
-
18
-
19
-
20
-
21
-
22
-
23
-
24
-
25
-
26
-
27
-
 28
28 -
 29
29 -
 30
30 -
 31
31 -
 32
32 -
 33
33 -
 34
34 -
 35
35 -
 36
36 -
 37
37 -
 38
38 -
39
-
40
-
41
-
42
-
43
-
44
-
45
-
46
-
47
-
48
-
49
-
50
-
51
-
52
-
53
-
54
-
55
-
56
-
57
-
58
-
59
-
60
-
61
-
62
-
63
-
64
-
65
-
66
-
67
-
68
-
69
-
70
-
71
-
72
-
73
-
74
-
75
-
76
-
77
-
78
-
79
-
80
-
81
-
82
-
83
-
84
-
85
-
86
-
87
-
88
-
89
-
90
-
91
-
92
-
93
-
94
-
95
-
96
-
97
-
98
-
99
-
100
-
101
-
102
-
103
-
104
-
105
-
106
-
107
-
108
-
109
-
110
-
111
-
112
-
113
-
114
-
115
-
116
-
117
-
118
-
119
-
120
-
121
-
122
-
123
-
124
-
125
-
126
-
127
-
128
-
129
-
130
-
131
-
132
-
133
-
134
-
135
-
136
 |
 |
