Genie ScrewDrive Owner's Manual - Page 16
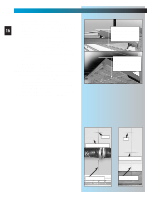
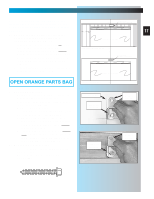
Installation - parts
 |
View all Genie ScrewDrive manuals
Add to My Manuals
Save this manual to your list of manuals |
Page 16 highlights
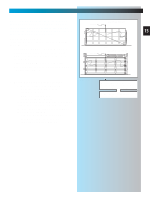
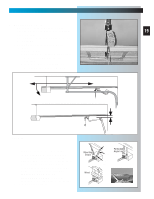
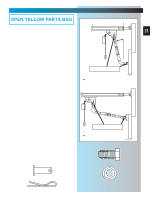
INSTALLATION FOR HELP-1.800.354.3643 OR GENIECOMPANY.COM 2. Finding highest point of travel. • While raising garage door manually, watch top edge of door to see where it reaches its 16 highest point. This is called "highest point of travel." Fig. 2-2. • A locking pliers can be used to hold the door in position by clamping it onto the rail. (A stool, chair, table or any object that can safely support door will also work.) - With door held partly open (at its "highest point"), measure distance from top edge to the floor. • Remove support and gently lower door. • Mark "highest point of travel" at centerline on wall above door. Fig. 2-3. NOTE: Following step depends on type of door. 3. Final header bracket mounting location. • For SECTIONAL DOORS- add 2-1/2 inches to "highest point of travel" and mark this height on centerline. Fig. 2-3. • For ONE-PIECE DOORS- add 6 inches to "highest point of travel" and mark this height on centerline. Fig. 2-4. SECTIONAL DOORS Highest point of travel. Measure from here to floor ONE-PIECE DOORS Highest point of travel. Measure from here to floor Fig. 2-2 +2-1/2" +6" Highest point of travel. Highest point of travel. centerline of door Fig. 2-3 centerline of door Fig. 2-4
-
 1
1 -
2
-
3
-
4
-
5
-
6
-
7
-
8
-
9
-
10
-
 11
11 -
 12
12 -
 13
13 -
 14
14 -
 15
15 -
 16
16 -
 17
17 -
 18
18 -
 19
19 -
 20
20 -
 21
21 -
22
-
23
-
24
-
25
-
26
-
27
-
28
-
29
-
30
-
31
-
32
-
33
-
34
-
35
 |
 |
