Genie ScrewDrive Owner's Manual - Page 21
Open Yellow Parts Bag - vehicles
 |
View all Genie ScrewDrive manuals
Add to My Manuals
Save this manual to your list of manuals |
Page 21 highlights
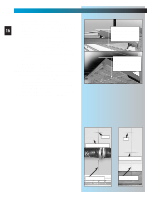
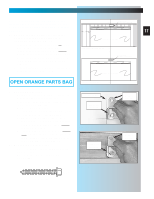
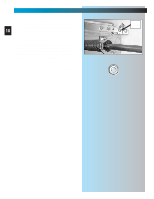
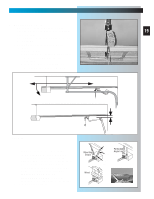
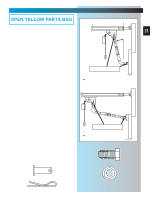
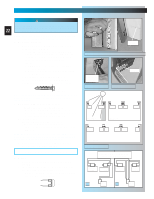
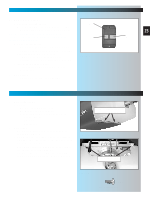
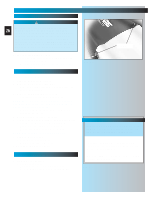
INSTALLATION OPEN YELLOW PARTS BAG 10. Attach door arms [23] and [26]. • For sectional doors. - Connect short leg of curved arm to door bracket. Fig. 2-14. - Use clevis pin [24] and cotter pin [25]. Fig. 2-14. - Connect straight arm to carriage. - Use clevis pin [24] and cotter pin [25]. - Overall length of arms together should be as short as possible, but must not be so short that they are vertical when the door is fully closed. Fig. 2-14. a. Move carriage as necessary to adjust length. b. Place bolts [27] and nuts [28] as far apart as possible. Fig. 2-14. c. Tighten bolts and nuts. • For 1-piece doors. - Connect short leg of curved arm to carriage. Fig. 2-14. - Use clevis pin [24] and cotter pin [25]. Fig. 2-14. - Connect straight arm to door bracket. - Use clevis pin [24] and cotter pin [25]. - Overall length of arms together should be as long as possible. Fig. 2-14. a. Move carriage as necessary to adjust length. b. Place bolts [27] and nuts [28] as close together as possible. Fig. 2-14. c. Tighten bolts and nuts. 11. Adjust emergency release knob height. • Knob should hang approximately 6 feet from the floor. - adjust as necessary to clear vehicles yet maintain height where it can be easily reached. • Pull cord through lever until knob is at desired height. • Tie a new knot at the lever. • Cut off excess cord. Clevis pin Cotter pin [24] [25] FOR HELP-1.800.354.3643 OR GENIECOMPANY.COM SECTIONAL DOOR must be 21 some angle off vertical. clevis & cotter pin -bolts/nuts (far apart as possible) 1-PIECE DOOR clevis & cotter pin -bolts/nuts (close as possible) Fig. 2-14 [27] 3/8" Hex head bolt [28] 3/8" Nut
-
 1
1 -
2
-
3
-
4
-
5
-
6
-
7
-
8
-
9
-
10
-
11
-
12
-
13
-
14
-
15
-
 16
16 -
 17
17 -
 18
18 -
 19
19 -
 20
20 -
 21
21 -
 22
22 -
 23
23 -
 24
24 -
 25
25 -
 26
26 -
27
-
28
-
29
-
30
-
31
-
32
-
33
-
34
-
35
 |
 |
