Gigabyte GA-6KIEH2-RH Manual - Page 21
ATX1 Auxuliary power connector, IDE1 IDE cable connector
 |
View all Gigabyte GA-6KIEH2-RH manuals
Add to My Manuals
Save this manual to your list of manuals |
Page 21 highlights
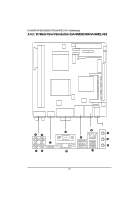
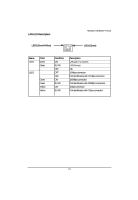
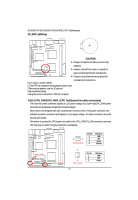
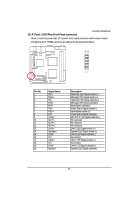
1) ATX1 (Auxuliary power connector) Connector Introduction AC power cord should only be connected to your power supply unit after ATX power cable and other related devices are firmly connected to the mainboard. 20 10 1 11 Pin No. 1 2 3 4 5 6 7 8 9 10 11 12 13 14 15 16 17 18 19 20 Definition 3.3V 3.3V GND VCC GND VCC GND Power Good 5V SB(stand by +5V) +12V 3.3V -12V GND PS_ON(softOn/Off) GND GND GND -5V VCC VCC 2 ) IDE1 (IDE cable connector) An IDE device connects to the computer via an IDE connector. One IDE connector can connect to one IDE cable, and the single IDE cable can then connect to two IDE devices (hard drive or optical drive). If you want to connect two IDE devices, please set the jumper on one IDE device as Master and the other as Slave (for information, please refer to the instructions located on the IDE device). Before attaching the IDE cable, please take note of the foolproof groove in IDE connector. 39 1 40 2 21
-
 1
1 -
2
-
3
-
4
-
5
-
6
-
7
-
8
-
9
-
10
-
11
-
12
-
13
-
14
-
15
-
 16
16 -
 17
17 -
 18
18 -
 19
19 -
 20
20 -
 21
21 -
 22
22 -
 23
23 -
 24
24 -
 25
25 -
 26
26 -
27
-
28
-
29
-
30
-
31
-
32
-
33
-
34
-
35
-
36
-
37
-
38
-
39
-
40
-
41
-
42
-
43
-
44
-
45
-
46
-
47
-
48
-
49
-
50
-
51
-
52
-
53
-
54
-
55
-
56
-
57
-
58
 |
 |
