Gigabyte GA-965P-DS3P Manual - Page 61
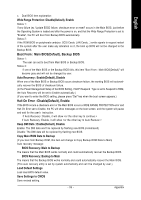
Do not turn off or restart the system when the system is reading/updating the BIOS.
 |
View all Gigabyte GA-965P-DS3P manuals
Add to My Manuals
Save this manual to your list of manuals |
Page 61 highlights
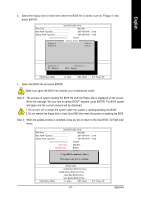
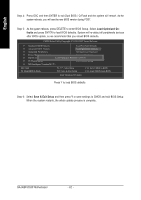
English b. Select the floppy drive or hard drive where the BIOS file is saved, such as "Floppy A" and press ENTER. Dual BIOS Utility V2.02 Boot From Main Bios Main ROM Type/Size SST 49LF004A 512K Backup ROM Type/Size SST 49LF004A 512K Wide Range Protection Disable Boot From0 file(s) fMoauindBios Floppy AAuto Recovery HDD 0-0 Halt On Error Enable Disable Keep DMI Data Enable Copy Main ROM Data to Backup Load Default Settings Save Settings to CMOS Q-Flash Utility Total size : 0 Update Main BFIOreSefsroizme D: r0ive F5 : Refresh Update BDaEckLup: DBIeOleStefrom Drive Save Main BIOS to Drive Save Backup BIOS to Drive PgDn/PgUp: Modify : Move ESC: Reset F10: Power Off c. Select the BIOS file and press ENTER. Make sure again the BIOS file matches your motherboard model. Step 2: The process of system reading the BIOS file from the floppy disk is displayed on the screen. When the message "Are you sure to update BIOS?" appears, press ENTER. The BIOS update will begin and the current process will be displayed. 1. Do not turn off or restart the system when the system is reading/updating the BIOS. 2. Do not remove the floppy disk or hard drive/USB drive when the system is updating the BIOS. Step 3: When the update process is complete, press any key to return to the Dual BIOS / Q-Flash main menu. Dual BIOS Utility V2.02 Boot From Main Bios Main ROM Type/Size SST 49LF004A Backup ROM Type/Size SST 49LF004A Wide Range Protection Disable Boot From Main Bios Auto Recovery Enable Halt On Error Disable Keep D!!MCI DopaytaBIOS cEonmapblleeted - Pass !! Copy Main ROM Data to Backup PleasLeopadreDssefaanuylt kSeeyttitnogscontinue Save Settings to CMOS Q-Flash Utility Update Main BIOS from Drive Update Backup BIOS from Drive Save Main BIOS to Drive Save Backup BIOS to Drive PgDn/PgUp: Modify : Move ESC: Reset 512K 512K F10: Power Off - 61 - Appendix
-
 1
1 -
2
-
3
-
4
-
5
-
6
-
7
-
8
-
9
-
10
-
11
-
12
-
13
-
14
-
15
-
16
-
17
-
18
-
19
-
20
-
21
-
22
-
23
-
24
-
25
-
26
-
27
-
28
-
29
-
30
-
31
-
32
-
33
-
34
-
35
-
36
-
37
-
38
-
39
-
40
-
41
-
42
-
43
-
44
-
45
-
46
-
47
-
48
-
49
-
50
-
51
-
52
-
53
-
54
-
55
-
 56
56 -
 57
57 -
 58
58 -
 59
59 -
 60
60 -
 61
61 -
 62
62 -
 63
63 -
 64
64 -
 65
65 -
 66
66 -
67
-
68
-
69
-
70
-
71
-
72
-
73
-
74
-
75
-
76
-
77
-
78
-
79
-
80
-
81
-
82
-
83
-
84
-
85
-
86
-
87
-
88
-
89
-
90
-
91
-
92
-
93
-
94
-
95
-
96
 |
 |
