Gigabyte GA-965P-DS3P Manual - Page 79
A. Create Array
 |
View all Gigabyte GA-965P-DS3P manuals
Add to My Manuals
Save this manual to your list of manuals |
Page 79 highlights
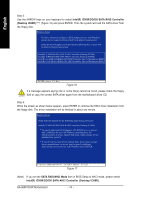
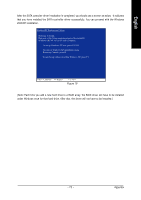
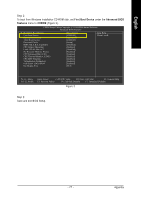
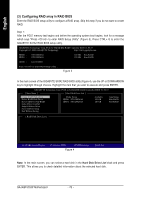
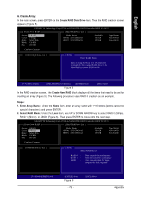
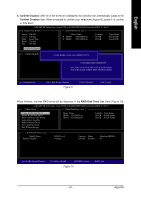
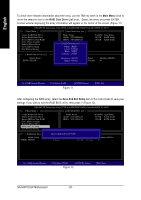
English A. Create Array: In the main screen, press ENTER on the Create RAID Disk Drive item. Then the RAID creation screen appears (Figure 5). GIGABYTE Technology Corp. PCIE-to-SATAII/IDE RAID Controller BIOS V1.06.53 [ Create New RAID ] [ Hard Disk Drive List ] Name: Level: Disks: Block: Size: GRAID_ 0-Stripe Select Disk 128 KB 240 GB Mode Name HDD0: ST3120026AS HDD1: ST3120026AS Available 120 GB 120 GB Type/Status Non-RAID Non-RAID Confirm Creation [ RAID Disk Drive List ] [ Help ] Enter RAID Name Enter a string between 1 to 16 characters in length for the created RAID drive to be identified by system BIOS or OS. [ ]-Move Cursor [DEL,BS]-Delete Character [ENTER]-Next Figure 5 [ESC]-Abort In the RAID creation screen, the Create New RAID block displays all the items that need to be set for creating an array (Figure 5). The following procedure uses RAID 0 creation as an example. Steps: 1. Enter Array Name: Under the Name item, enter an array name with 1~16 letters (letters cannot be special characters) and press ENTER. 2. Select RAID Mode: Under the Level item, use UP or DOWN ARROW key to select RAID 0 (Stripe), RAID 1 (Mirror), or JBOD (Figure 6). Then press ENTER to move onto the next step. GIGABYTE Technology Corp. PCIE-to-SATAII/IDE RAID Controller BIOS V1.06.53 [ Create New RAID ] [ Hard Disk Drive List ] Name: Level: Disks: Block: Size: GRAID 0-Stripe Select Disk 128 KB 240 GB Mode Name HDD0: ST3120026AS HDD1: ST3120026AS Available 120 GB 120 GB Type/Status Non-RAID Non-RAID Confirm Creation [ RAID Disk Drive List ] [ Help ] Select RAID Level RAID 0 RAID 1 JBOD - Data striped for performance Data mirrored for redundancy Data concatenated for huge temporarily disk required [ ]-Switch RAID Level [ENTER]-Next Figure 6 - 79 - [ESC]-Abort Appendix
-
 1
1 -
2
-
3
-
4
-
5
-
6
-
7
-
8
-
9
-
10
-
11
-
12
-
13
-
14
-
15
-
16
-
17
-
18
-
19
-
20
-
21
-
22
-
23
-
24
-
25
-
26
-
27
-
28
-
29
-
30
-
31
-
32
-
33
-
34
-
35
-
36
-
37
-
38
-
39
-
40
-
41
-
42
-
43
-
44
-
45
-
46
-
47
-
48
-
49
-
50
-
51
-
52
-
53
-
54
-
55
-
56
-
57
-
58
-
59
-
60
-
61
-
62
-
63
-
64
-
65
-
66
-
67
-
68
-
69
-
70
-
71
-
72
-
73
-
 74
74 -
 75
75 -
 76
76 -
 77
77 -
 78
78 -
 79
79 -
 80
80 -
 81
81 -
 82
82 -
 83
83 -
 84
84 -
85
-
86
-
87
-
88
-
89
-
90
-
91
-
92
-
93
-
94
-
95
-
96
 |
 |