Gigabyte GA-965P-DS3P Manual - Page 68
Configuring RAID set in RAID BIOS
 |
View all Gigabyte GA-965P-DS3P manuals
Add to My Manuals
Save this manual to your list of manuals |
Page 68 highlights
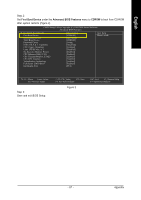
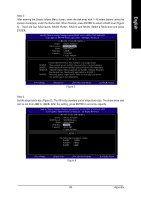
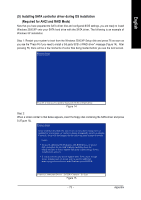
English (3) Configuring RAID set in RAID BIOS Enter the RAID BIOS setup utility to configure a RAID array. Skip this step and proceed to Section 4 if you do not want to create RAID. Step 1: After the POST memory test begins and before the operating system boot begins, look for a message which says "Press to enter Configuration utility" (Figure 3). Press CTRL+ I to enter the RAID BIOS setup utility. Intel(R) Matrix Storage Manager option ROM V6.0.0.1022 ICH8R wRAID5 Copyright(C) 2003-06 Intel Corporation. All Rights Reversed. RAID Volumes : None Defined. Physical Disks : Port Driver Model 0 ST3120026AS 1 ST3120026AS Serial # 3JT354CP 3JT329JX Press to enter Configuration Utility Size Type/Status(Vol ID) 111.7GB Non-RAID Disk 111.7GB Non-RAID Disk Figure 3 Step 2: After you press CTRL+ I, the Create RAID Volume screen will appear (Figure 4). Create RAID Volume If you want to create RAID array, select Create RAID Volume in Main Menu and press ENTER. Intel(R) Matrix Storage Manager option ROM V6.0.0.1022 ICH8R wRAID5 Copyright(C) 2003-06 Intel Corporation. All Rights Reversed. [ MAIN MENU ] 1.Create RAID Volume 2. Delete RAID Volume 3. Reset Disks to Non-RAID 4. Exit RAID Volumes : None Defined. [ DISK/VOLUME INFORMATION ] Physical Disks : Port Driver Model 0 ST3120026AS 1 ST3120026AS Serial # 3JT354CP 3JT329JX Size Type/Status(Vol ID) 111.7GB Non-RAID Disk 111.7GB Non-RAID Disk [ ]-Select [ESC]-Exit Figure 4 [ENTER]-Select Menu GA-965P-DS3P Motherboard - 68 -
-
 1
1 -
2
-
3
-
4
-
5
-
6
-
7
-
8
-
9
-
10
-
11
-
12
-
13
-
14
-
15
-
16
-
17
-
18
-
19
-
20
-
21
-
22
-
23
-
24
-
25
-
26
-
27
-
28
-
29
-
30
-
31
-
32
-
33
-
34
-
35
-
36
-
37
-
38
-
39
-
40
-
41
-
42
-
43
-
44
-
45
-
46
-
47
-
48
-
49
-
50
-
51
-
52
-
53
-
54
-
55
-
56
-
57
-
58
-
59
-
60
-
61
-
62
-
 63
63 -
 64
64 -
 65
65 -
 66
66 -
 67
67 -
 68
68 -
 69
69 -
 70
70 -
 71
71 -
 72
72 -
 73
73 -
74
-
75
-
76
-
77
-
78
-
79
-
80
-
81
-
82
-
83
-
84
-
85
-
86
-
87
-
88
-
89
-
90
-
91
-
92
-
93
-
94
-
95
-
96
 |
 |