Gigabyte GA-965P-DS3P Manual - Page 70
After setting all the items above, select Create Volume and press ENTER to begin
 |
View all Gigabyte GA-965P-DS3P manuals
Add to My Manuals
Save this manual to your list of manuals |
Page 70 highlights
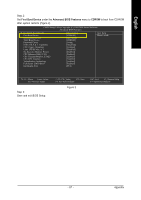
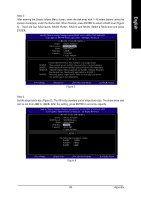
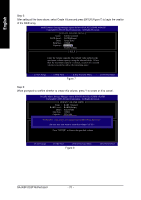
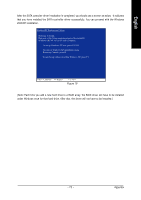
English Step 5: After setting all the items above, select Create Volume and press ENTER (Figure 7) to begin the creation of the RAID array. Intel(R) Matrix Storage Manager option ROM V6.0.0.1022 ICH8R wRAID5 Copyright(C) 2003-06 Intel Corporation. All Rights Reversed. [ CREATE VOLUME MENU ] Name : RAID Level : Disks : Strip Size : Capacity : RAID_Volume0 RAID0(Stripe) Select Disks 128KB 223.6 GB Create Volume [ HELP ] Enter the volume capacity. The default value indicates the maximum volume capacity using the selected disks. If less than the maximum capacity is chosen, creation of a second volume is needed to utilize the remaining space. [ ]-Change [TAB]-Next [ESC]-Previous Menu Figure 7 [ENTER]-Select Step 6: When prompted to confirm whether to create this volume, press Y to create or N to cancel. Intel(R) Matrix Storage Manager option ROM V6.0.0.1022 ICH8R wRAID5 Copyright(C) 2003-06 Intel Corporation. All Rights Reversed. [ CREATE VOLUME MENU ] Name : RAID Level : Disks : Strip Size : Capacity : RAID_Volume0 RAID0(Stripe) Select Disks 128KB 223.6 GB Create Volume WARNING : ALL DATA ON[SHEELLEPCT]ED DISKS WILL BE LOST. Are you sure you want to creat this volume? (Y/N) : Press "ENTER" to Create the specified volume [ ]-Change [TAB]-Next [ESC]-Previous Menu Figure 8 [ENTER]-Select GA-965P-DS3P Motherboard - 70 -
-
 1
1 -
2
-
3
-
4
-
5
-
6
-
7
-
8
-
9
-
10
-
11
-
12
-
13
-
14
-
15
-
16
-
17
-
18
-
19
-
20
-
21
-
22
-
23
-
24
-
25
-
26
-
27
-
28
-
29
-
30
-
31
-
32
-
33
-
34
-
35
-
36
-
37
-
38
-
39
-
40
-
41
-
42
-
43
-
44
-
45
-
46
-
47
-
48
-
49
-
50
-
51
-
52
-
53
-
54
-
55
-
56
-
57
-
58
-
59
-
60
-
61
-
62
-
63
-
64
-
 65
65 -
 66
66 -
 67
67 -
 68
68 -
 69
69 -
 70
70 -
 71
71 -
 72
72 -
 73
73 -
 74
74 -
 75
75 -
76
-
77
-
78
-
79
-
80
-
81
-
82
-
83
-
84
-
85
-
86
-
87
-
88
-
89
-
90
-
91
-
92
-
93
-
94
-
95
-
96
 |
 |