HP 1606 Fabric Watch Administrator's Guide v6.4.0 (53-1001770-01, June 2010) - Page 129
Configuring port fencing using the fwCon command
 |
View all HP 1606 manuals
Add to My Manuals
Save this manual to your list of manuals |
Page 129 highlights
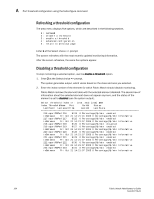
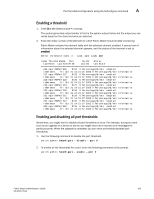
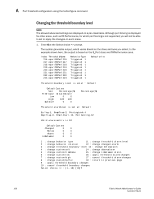
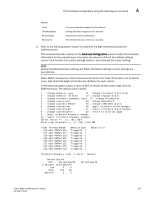
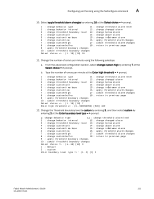
Configuring port fencing using the fwConfigure command A Configuring port fencing using the fwConfigure command The following is an example of selecting the Port class with Invalid CRCs. With the exception of step 1, the same steps are required to enable the E_Port or FOP_Port class, as well as each available area for the selected class (described in step 4). 1. Enter fwalarmsfilterset 1 to enable Fabric Watch alarms. 2. Navigate to a specific class and area with the fwConfigure command. switch:admin> fwconfigure 1 : Environment class 2 : SFP class 3 : Port class 4 : Fabric class 5 : E-Port class 6 : F/FL Port (Optical) class 7 : Alpa Performance Monitor class 8 : EE Performance Monitor class 9 : Filter Performance Monitor class 10 : Security class 11 : Resource class 12 : Quit Select a class => : (1..12) [12] 5 3. Enter the number from the list that corresponds to the class that you want to configure. Select 3 for Port class, 5 for E_Port class, or 6 for F/FL Port (Optical) class. For each class that you select, Fabric Watch provides a list of the areas of the class available for configuration. 4. Select an area (areas 1 - 2 and 4 - 6 are available for port fencing). 1 : Link loss (E-port) 2 : Sync loss (E-port) 3 : Signal loss (E-port) 4 : Protocol error (E-port) 5 : Invalid words (E-port) 6 : Invalid CRCS (E-port) 7 : RXPerformance(E-port) 8 : TXPerformance (E-port) 9 : State Changes (E/VE-port) 10 : Link reset (E-port) 11 : Utilization (VE-port) 12 : Packet loss (VE-port) 13 : C3TX_TO 14 : return to previous page Select an area => : (1..2) (4..6) [10] 1 In this example, if you enter 1, the menu corresponding to the Link loss displays. See Chapter 3, "Fabric Watch Threshold Components," for more details about classes and areas. Fabric Watch Administrator's Guide 109 53-1001770-01
-
 1
1 -
2
-
3
-
4
-
5
-
6
-
7
-
8
-
9
-
10
-
11
-
12
-
13
-
14
-
15
-
16
-
17
-
18
-
19
-
20
-
21
-
22
-
23
-
24
-
25
-
26
-
27
-
28
-
29
-
30
-
31
-
32
-
33
-
34
-
35
-
36
-
37
-
38
-
39
-
40
-
41
-
42
-
43
-
44
-
45
-
46
-
47
-
48
-
49
-
50
-
51
-
52
-
53
-
54
-
55
-
56
-
57
-
58
-
59
-
60
-
61
-
62
-
63
-
64
-
65
-
66
-
67
-
68
-
69
-
70
-
71
-
72
-
73
-
74
-
75
-
76
-
77
-
78
-
79
-
80
-
81
-
82
-
83
-
84
-
85
-
86
-
87
-
88
-
89
-
90
-
91
-
92
-
93
-
94
-
95
-
96
-
97
-
98
-
99
-
100
-
101
-
102
-
103
-
104
-
105
-
106
-
107
-
108
-
109
-
110
-
111
-
112
-
113
-
114
-
115
-
116
-
117
-
118
-
119
-
120
-
121
-
122
-
123
-
 124
124 -
 125
125 -
 126
126 -
 127
127 -
 128
128 -
 129
129 -
 130
130 -
 131
131 -
 132
132 -
 133
133 -
 134
134 -
135
-
136
-
137
-
138
-
139
-
140
-
141
-
142
-
143
-
144
 |
 |
