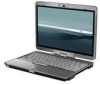
HP 2710p HP Compaq 2710p Notebook PC - Maintenance and Service Guide
HP 2710p - Compaq Business Notebook Manual
 |
UPC - 884420088295
View all HP 2710p manuals
Add to My Manuals
Save this manual to your list of manuals |
HP 2710p manual content summary:
- HP 2710p | HP Compaq 2710p Notebook PC - Maintenance and Service Guide - Page 1
HP Compaq 2710p Notebook PC Maintenance and Service Guide - HP 2710p | HP Compaq 2710p Notebook PC - Maintenance and Service Guide - Page 2
Bluetooth Inc. Microsoft, Windows, and Windows Vista are either services. Nothing herein should be construed as constituting an additional warranty. HP shall not be liable for technical or editorial errors or omissions contained herein. Third Edition: July 2008 First Edition: July 2007 Document Part - HP 2710p | HP Compaq 2710p Notebook PC - Maintenance and Service Guide - Page 3
surface. Do not allow another hard surface, such as an adjoining optional printer, or a soft surface, such as pillows or rugs or clothing, to block airflow. Also, do not allow the AC adapter to contact the skin or a soft surface, such as pillows or rugs or clothing, during operation. The computer - HP 2710p | HP Compaq 2710p Notebook PC - Maintenance and Service Guide - Page 4
iv Safety warning notice - HP 2710p | HP Compaq 2710p Notebook PC - Maintenance and Service Guide - Page 5
17 Plastics Kit ...23 Miscellaneous parts ...23 Sequential part number listing ...25 4 Removal and replacement procedures Preliminary replacement requirements 31 Tools required ...31 Service considerations ...31 Plastic parts ...31 Cables and connectors 32 Drive handling 32 Grounding guidelines - HP 2710p | HP Compaq 2710p Notebook PC - Maintenance and Service Guide - Page 6
37 Serial number ...37 Computer feet ...37 Battery ...38 SIM ...39 Hard drive ...40 WLAN module ...42 WWAN module ...46 Memory module ...48 Keyboard ...49 Rear plastic bezel ...51 Top cover ...53 RTC battery ...56 Audio connector board ...57 Bluetooth module ...58 Speaker ...59 Display assembly - HP 2710p | HP Compaq 2710p Notebook PC - Maintenance and Service Guide - Page 7
from the hard drive 104 Initiating a recovery in Windows 105 Initiating a recovery from the hard drive recovery partition 105 Backup and recovery in Windows XP 106 Creating recovery discs 106 Backing up your information 106 When to back up 107 Backup suggestions 107 Backing up specific files - HP 2710p | HP Compaq 2710p Notebook PC - Maintenance and Service Guide - Page 8
) ...112 External monitor ...113 RJ-11 (modem) ...114 RJ-45 (network) ...114 Universal Serial Bus ...115 10 Power cord set requirements Requirements for all countries and regions 116 Requirements for specific countries and regions 117 11 Recycling Battery ...118 Display ...118 Index ...124 viii - HP 2710p | HP Compaq 2710p Notebook PC - Maintenance and Service Guide - Page 9
1 Product description Category Branding Processors Chipsets Graphics Panels Memory Description HP Compaq 2710p Notebook PC Intel® Core™ Duo Ultra-Low-Voltage (ULV) processors: ● U7700 1.33-GHz processor with 533-MHz Front Side Bus (FSB) and 2-MB L2 cache ● U7600 1.20-GHz processor with 533-MHz - HP 2710p | HP Compaq 2710p Notebook PC - Maintenance and Service Guide - Page 10
the HP 3-in-1 NAS Docking Station, HP Advanced Docking Station, HP Docking Station, and HP External USB 2.0 MultiBay II Cradle (all required software is preinstalled on the computer) ● Supports an external Universal Serial Bus (USB) diskette drive only ● Supports boot from USB device ● Azalia - HP 2710p | HP Compaq 2710p Notebook PC - Maintenance and Service Guide - Page 11
port (Dsub 15-pin) supporting 1600 × 1200 external resolution @ 75 Hz, hot plug/unplug, and auto detect Docking Keyboard/pointing devices Docking support through HP Compaq 2710p-specific expansion base ● Spill-resistant keyboard with embedded numeric keypad, pointing stick, and fingerprint reader - HP 2710p | HP Compaq 2710p Notebook PC - Maintenance and Service Guide - Page 12
docked) 65-watt Smart AC adapter with localized cable plug support and 3-wire plug ● Support for Kensington security lock ● Optional integrated active smart card reader (installed in the ExpressCard slot) ● Integrated Infineon TPM 1.2 chip (soldered to PCB) ● Integrated USB-based fingerprint reader - HP 2710p | HP Compaq 2710p Notebook PC - Maintenance and Service Guide - Page 13
Vista Business (64-bit) ● Windows XP Tablet PC Edition 2005 ● DRDVD XP ● DRDVD Vista Web support: Windows Vista Enterprise 32 and Windows Vista Enterprise 64 Certified: Linux End-user replaceable parts: ● AC adapter ● Battery ● Hard drive ● Memory module ● Power cord ● SIM ● Wireless modules 5 - HP 2710p | HP Compaq 2710p Notebook PC - Maintenance and Service Guide - Page 14
identification Top components Display components Item (1) Component Integrated camera (select models only) (2) Camera light (select models only) (3) Camera mode switch (4) Keyboard light (5) Keyboard light button (6) HP Fingerprint Sensor (fingerprint reader) (7) Internal microphones - HP 2710p | HP Compaq 2710p Notebook PC - Maintenance and Service Guide - Page 15
hinge (9) Ambient light sensor Description Swivels the display and converts the computer from traditional notebook mode into tablet mode or vice versa. Automatically adjusts the display brightness based on the lighting conditions in your environment. Buttons, switches, and pointing devices - HP 2710p | HP Compaq 2710p Notebook PC - Maintenance and Service Guide - Page 16
light turns off when all batteries in the computer are fully charged. If the computer is not plugged into an external power source, the light stays off until the battery reaches a low battery level. ● Blinking green: The hard drive is being accessed. ● Amber: HP 3D DriveGuard has temporarily parked - HP 2710p | HP Compaq 2710p Notebook PC - Maintenance and Service Guide - Page 17
Item (7) Component Volume up light (8) Num lock light Function Blinking: The volume scroll zone is being used to increase speaker volume. On: Num lock is on or the embedded numeric keypad is enabled. Top components 9 - HP 2710p | HP Compaq 2710p Notebook PC - Maintenance and Service Guide - Page 18
information when pressed in combination with the fn key. Executes frequently used system functions when pressed in combination with a function key or the esc key. Displays the Windows Start menu. Displays a shortcut menu for items beneath the pointer. Can be used like the keys on an external numeric - HP 2710p | HP Compaq 2710p Notebook PC - Maintenance and Service Guide - Page 19
(1) Component Camera light (select models only) (2) Camera mode switch (3) Keyboard light button (4) External WWAN antenna button (5) External WWAN antenna (6) Power switch (7) Display release latch (8) Bluetooth® compartment Function On: The camera is recording or streaming video or - HP 2710p | HP Compaq 2710p Notebook PC - Maintenance and Service Guide - Page 20
External monitor port (6) Power connector Connects a network cable. Connects an external VGA monitor or projector. Connects an AC adapter. *To protect your work and the system, the ctrl+alt+delete command cannot be entered using the ctrl, alt, and del keys on the on-screen keyboard. 12 Chapter - HP 2710p | HP Compaq 2710p Notebook PC - Maintenance and Service Guide - Page 21
(5) Media Card Reader (6) USB port (7) Security cable slot Function Allows a fingerprint logon to Windows instead of a password logon. Connects an optional IEEE 1394 or 1394a device, such as a camcorder. Produces computer sound when connected to optional powered stereo speakers, headphones - HP 2710p | HP Compaq 2710p Notebook PC - Maintenance and Service Guide - Page 22
slot Vent (3) ExpressCard slot (select models only) Smart card reader (select models only) (4) Wireless light (5) Wireless switch (6) Info button (7) Powered USB port Description Stores the pen. Enables airflow to cool internal components. NOTE: The computer fan starts up automatically - HP 2710p | HP Compaq 2710p Notebook PC - Maintenance and Service Guide - Page 23
. If you replace the module and then receive a warning message, remove the module to restore computer functionality, and then contact technical support through Help and Support. Connects an optional docking device. Displays the approximate remaining battery charge. Releases the battery from the - HP 2710p | HP Compaq 2710p Notebook PC - Maintenance and Service Guide - Page 24
3 Illustrated parts catalog Serial number location When ordering parts or requesting information, provide the computer serial number and model number located on the bottom of the computer. 16 Chapter 3 Illustrated parts catalog - HP 2710p | HP Compaq 2710p Notebook PC - Maintenance and Service Guide - Page 25
(1) (2) Description Spare part number 12.1-inch, WXGA, WVA display assemblies (include ambient light sensor, fingerprint reader, inverter board, microphones, WLAN antenna cables, and WWAN antenna cables) Display assembly with camera and keyboard light 454679-001 Display assembly with camera - HP 2710p | HP Compaq 2710p Notebook PC - Maintenance and Service Guide - Page 26
Plastics Kit (see Plastics Kit on page 23 for more Plastics Kit spare part information): Rear plastic bezel ExpressCard slot bezel Hard drive compartment cover (includes 6 captive screws, secured by C-clips) Spare part number 454696-A41 454696-201 454696-221 454696-081 454696-041 454696-121 454696 - HP 2710p | HP Compaq 2710p Notebook PC - Maintenance and Service Guide - Page 27
Item (4) (5) (6) (7) (8) (9) (10) (11) (12) (13) (14) Description Spare part number Bluetooth module cover (not illustrated) Top cover (includes LED board and cable and display alignment guides) 454683-001 RTC battery (includes double-sided tape) 454689-001 Audio connector board (includes - HP 2710p | HP Compaq 2710p Notebook PC - Maintenance and Service Guide - Page 28
Item Description Spare part number Portugal, Puerto Rico, the Republic of Moldova, Romania, Russia, Rwanda, Samoa, San Marino, Sao Tome & Tonga, Trinidad and Tobago, Tunisia, Turkey, Turkmenistan, Tuvalu, Uganda, Ukraine, the United Arab Emirates, the 20 Chapter 3 Illustrated parts catalog - HP 2710p | HP Compaq 2710p Notebook PC - Maintenance and Service Guide - Page 29
Item (15) Description Spare part number United Kingdom, Uruguay, Uzbekistan, Vanuatu, Venezuela, Vietnam, Yemen, Zaire, Zambia, and Zimbabwe ● For use in Japan 441075-291 Intel 802.11a/b/g WLAN modules: ● For - HP 2710p | HP Compaq 2710p Notebook PC - Maintenance and Service Guide - Page 30
, Brazil, Canada, Chile, Mexico, the United States, and Venezuela 459351-001 Memory modules (PC2-5300, 667-MHz, DDR2) 2048-MB 454673-001 1024-MB 454672-001 512-MB 454674-001 Hard drives (include isolator and connector cable) 120-GB, 5400-rpm 488588-001 120-GB, 4200-rpm 488587-001 100 - HP 2710p | HP Compaq 2710p Notebook PC - Maintenance and Service Guide - Page 31
(4) Bluetooth module cover Miscellaneous parts Description 65-watt AC adapter, slim (HP Smart AC Adapter) External MultiBay II External MultiBay II power cable and stand HP 2700 Ultra-Slim Expansion Base MultiBay 8X DVD-ROM Drive MultiBay 24X DVD/CD-RW Combo Drive Nylon carrying case Stylus pen with - HP 2710p | HP Compaq 2710p Notebook PC - Maintenance and Service Guide - Page 32
screw ● Phillips PM2.0×5.0 captive screw ● Phillips PM2.0×5.0 screw ● Phillips PM2.0×4.0 screw ● Phillips PM2.0×3.0 screw ● Torx T8M2.0×8.0 screw ● Torx T8M2.0×5.0 screw Spare part number 383496-D61 383496-BB1 383496-061 383496-291 383496-AA1 383496-AR1 383496-AD1 383496-111 383496-281 383496-031 - HP 2710p | HP Compaq 2710p Notebook PC - Maintenance and Service Guide - Page 33
the People's Republic of China 383496-AD1 Power cord for use in South Korea 383496-AR1 Power cord for use in South Africa 383496-BB1 Power cord for use in Israel 383496-D61 Power cord for use in India 391172-001 65-watt AC adapter, slim (HP Smart AC Adapter) 409407-001 Intel 802.11a/b/g WLAN - HP 2710p | HP Compaq 2710p Notebook PC - Maintenance and Service Guide - Page 34
Spare part number 441075-001 441075-002 441075-291 441082-001 441082-002 441082-003 441082-291 441086-001 Description Germany, Ghana , Indonesia, Malaysia, Mexico, Panama, Paraguay, Peru, Saudi Arabia, Taiwan, Uruguay, the United States, Venezuela, and Vietnam 26 Chapter 3 Illustrated parts catalog - HP 2710p | HP Compaq 2710p Notebook PC - Maintenance and Service Guide - Page 35
module Sprint EV-DO WWAN module 6-cell, 4.4-Wh battery 60-GB, 4200-rpm hard drive (includes isolator and connector cable) 80-GB, 4200-rpm hard drive (includes isolator and connector cable) 100-GB, 4200-rpm hard drive (includes isolator and connector cable) 1024-MB memory module (PC2-5300, 667-MHz - HP 2710p | HP Compaq 2710p Notebook PC - Maintenance and Service Guide - Page 36
, and 2 display alignment guides) Screw Kit External WWAN antenna RTC battery (includes double-sided tape) Audio connector board (includes cable) Bluetooth module (includes cable) Fan/heat sink assembly (includes replacement thermal material) Fingerprint reader Microphone Speaker Keyboard for use in - HP 2710p | HP Compaq 2710p Notebook PC - Maintenance and Service Guide - Page 37
-DJ1 Keyboard for use in Greece 455080-001 Base enclosure (includes display release latch and rubber feet) 455082-001 System board equipped with Intel Core 2 Duo U7500 1.06-MHz processor (includes replacement thermal material) 455083-001 System board equipped with Intel Core 2 Duo U7600 1.20 - HP 2710p | HP Compaq 2710p Notebook PC - Maintenance and Service Guide - Page 38
Spare part number 469492-001 486565-001 488587-001 488588-001 Description System board equipped with Intel Core 2 Duo U7700 1.33-MHz processor (includes replacement thermal material) Pointing stick cap, black rubber (20 pieces) 120-GB, 4200-rpm hard drive (includes isolator and connector cable) 120 - HP 2710p | HP Compaq 2710p Notebook PC - Maintenance and Service Guide - Page 39
) away from the work area to prevent damage. Plastic parts Using excessive force during disassembly and reassembly can damage plastic parts. Use care when handling the plastic parts. Apply pressure only at the points designated in the maintenance instructions. Preliminary replacement requirements 31 - HP 2710p | HP Compaq 2710p Notebook PC - Maintenance and Service Guide - Page 40
. In all cases, avoid bending, twisting, or tearing cables. Be sure that cables are routed in such a way that they cannot be caught or snagged by parts being removed or replaced. Handle flex cables with extreme care; these cables tear easily. Drive handling CAUTION: Drives are fragile components - HP 2710p | HP Compaq 2710p Notebook PC - Maintenance and Service Guide - Page 41
but in many cases, ESD contains enough power to alter device parameters or melt Or the device may function normally for a while, then degrade in the internal layers, reducing its life expectancy. CAUTION 000 V 400 V 400 V 2,000 V 3,500 V 7,000 V 5,000 V Preliminary replacement requirements 33 - HP 2710p | HP Compaq 2710p Notebook PC - Maintenance and Service Guide - Page 42
Keep the work area free of nonconductive materials, such as ordinary plastic assembly aids and Styrofoam. ● Handle ESD-sensitive components, parts, and assemblies by the case or PCM laminate. Handle these items only at static-free workstations. ● Avoid contact with pins, leads, or circuitry. ● Turn - HP 2710p | HP Compaq 2710p Notebook PC - Maintenance and Service Guide - Page 43
, wear a wrist strap connected to a grounded system. Wrist straps are flexible straps with a minimum , or boot straps) can be used at standing workstations and are compatible with most types of shoes or boots. On mats with hard ties to the ground ● Field service kits ● replacement requirements 35 - HP 2710p | HP Compaq 2710p Notebook PC - Maintenance and Service Guide - Page 44
shut it down through the operating system. 2. Disconnect all external devices connected to the computer. 3. Disconnect the power from the computer by first unplugging the power cord from the AC outlet and then unplugging the AC adapter from the computer. 4. Remove the battery (see Battery on page 38 - HP 2710p | HP Compaq 2710p Notebook PC - Maintenance and Service Guide - Page 45
, that must be removed, replaced, or loosened when servicing the computer. Make special note of each screw size and location during removal and replacement. Serial number Report the computer serial number to HP when requesting information or ordering spare parts. The serial number is located on the - HP 2710p | HP Compaq 2710p Notebook PC - Maintenance and Service Guide - Page 46
it down through the operating system. 2. Disconnect all external devices connected to the computer. 3. Disconnect the power from the computer by first unplugging the power cord from the AC outlet and then unplugging the AC adapter from the computer. Remove the battery: 1. Turn the computer upside - HP 2710p | HP Compaq 2710p Notebook PC - Maintenance and Service Guide - Page 47
be removed before disassembling the computer. system. 2. Disconnect all external devices connected to the computer. 3. Disconnect the power from the computer by first unplugging the power cord from the AC outlet and then unplugging the AC adapter from the computer. 4. Remove the battery (see Battery - HP 2710p | HP Compaq 2710p Notebook PC - Maintenance and Service Guide - Page 48
operating system. 2. Disconnect all external devices connected to the computer. 3. Disconnect the power from the computer by first unplugging the power cord from the AC outlet and then unplugging the AC adapter from the computer. 4. Remove the battery (see Battery on page 38). Remove the hard drive - HP 2710p | HP Compaq 2710p Notebook PC - Maintenance and Service Guide - Page 49
drive bracket (2). 5. Disconnect the hard drive connector (1) from the system board. 6. Release the hard drive (2) by sliding it to the right. 7. Lift the hard drive (3) straight up to remove it from the hard drive compartment. Reverse this procedure to install the hard drive. Component replacement - HP 2710p | HP Compaq 2710p Notebook PC - Maintenance and Service Guide - Page 50
module CAUTION: The WLAN module and the WWAN module are not interchangeable. Description Spare part number Broadcom 802.11a/b/g/n WLAN modules: ● For use in Canada, the Cayman , Belize, Benin, Bermuda, Bhutan, Bolivia, Bosnia and Herzegovina, 42 Chapter 4 Removal and replacement procedures - HP 2710p | HP Compaq 2710p Notebook PC - Maintenance and Service Guide - Page 51
Description Spare part number Botswana, Brazil, the British Virgin Islands, Brunei, Bulgaria, Burkina Faso, Burundi, Cameroon Malta, the Marshall Islands, Martinique, Mauritania, Mauritius, Mexico, Micronesia, Monaco, Mongolia, Montenegro, Morocco, Mozambique, Component replacement procedures 43 - HP 2710p | HP Compaq 2710p Notebook PC - Maintenance and Service Guide - Page 52
system. 2. Disconnect all external devices connected to the computer. 3. Disconnect the power from the computer by first unplugging the power cord from the AC outlet and then unplugging the AC adapter from the computer. 4. Remove the battery (see Battery on page 38). 5. Remove the hard drive - HP 2710p | HP Compaq 2710p Notebook PC - Maintenance and Service Guide - Page 53
3. Remove the WLAN module (4) by pulling the module away from the slot at an angle. NOTE: WLAN modules are designed with a notch (5) to prevent incorrect installation. Reverse this procedure to install the WLAN module. Component replacement procedures 45 - HP 2710p | HP Compaq 2710p Notebook PC - Maintenance and Service Guide - Page 54
system. 2. Disconnect all external devices connected to the computer. 3. Disconnect the power from the computer by first unplugging the power cord from the AC outlet and then unplugging the AC adapter from the computer. 4. Remove the battery (see Battery on page 38). 5. Remove the hard drive - HP 2710p | HP Compaq 2710p Notebook PC - Maintenance and Service Guide - Page 55
3. Remove the WWAN module (3) by pulling the module away from the slot at an angle. NOTE: WWAN modules are designed with a notch (4) to prevent incorrect installation. Reverse this procedure to install the WWAN module. Component replacement procedures 47 - HP 2710p | HP Compaq 2710p Notebook PC - Maintenance and Service Guide - Page 56
system. 2. Disconnect all external devices connected to the computer. 3. Disconnect the power from the computer by first unplugging the power cord from the AC outlet and then unplugging the AC adapter from the computer. 4. Remove the battery (see Battery on page 38). 5. Remove the hard drive - HP 2710p | HP Compaq 2710p Notebook PC - Maintenance and Service Guide - Page 57
system. 2. Disconnect all external devices connected to the computer. 3. Disconnect the power from the computer by first unplugging the power cord from the AC outlet and then unplugging the AC adapter from the computer. 4. Remove the battery (see Battery on page 38). 5. Remove the hard drive - HP 2710p | HP Compaq 2710p Notebook PC - Maintenance and Service Guide - Page 58
spare part number 454686-001. (2) One medium Mylar screw cover. (3) Six Torx T8M2.0×8.0 screws. 2. Turn the computer display-side up, with the front toward you. 3. Open the computer as far as possible. 4. Lift the rear edge of the keyboard (1) and slide it (2) back until the pointing stick cable is - HP 2710p | HP Compaq 2710p Notebook PC - Maintenance and Service Guide - Page 59
system. 2. Disconnect all external devices connected to the computer. 3. Disconnect the power from the computer by first unplugging the power cord from the AC outlet and then unplugging the AC adapter from the computer. 4. Remove the battery (see Battery on page 38). 5. Remove the hard drive - HP 2710p | HP Compaq 2710p Notebook PC - Maintenance and Service Guide - Page 60
. 5. Remove the rear plastic bezel by pulling it away from the computer. Reverse this procedure to install the rear plastic bezel. 52 Chapter 4 Removal and replacement procedures - HP 2710p | HP Compaq 2710p Notebook PC - Maintenance and Service Guide - Page 61
cable and display alignment guides) Spare part power cord from the AC outlet and then unplugging the AC adapter from the computer. 4. Remove the battery (see Battery on page 38). 5. Remove the following components: a. Hard drive compartment cover (see Hard drive on page 40) b. Keyboard (see Keyboard - HP 2710p | HP Compaq 2710p Notebook PC - Maintenance and Service Guide - Page 62
are included in the Rubber Kit, spare part number 454686-001. (2) Three Torx T8M2.0×8.0 this section are included in the Rubber Kit, spare part number 454686-001. (4) Two Torx T8M2.0×4.0 screws. which the LED board cable is connected and disconnect the LED board cable from the system board. 6. Remove - HP 2710p | HP Compaq 2710p Notebook PC - Maintenance and Service Guide - Page 63
8. Remove the top cover (4) by pulling it away from the computer at an angle. Reverse this procedure to install the top cover. Component replacement procedures 55 - HP 2710p | HP Compaq 2710p Notebook PC - Maintenance and Service Guide - Page 64
by first unplugging the power cord from the AC outlet and then unplugging the AC adapter from the computer. 4. Remove the battery (see Battery on page 38). 5. Remove the following components: a. Hard drive compartment cover (see Hard drive on page 40) b. Keyboard (see Keyboard on page 49) c. Rear - HP 2710p | HP Compaq 2710p Notebook PC - Maintenance and Service Guide - Page 65
by first unplugging the power cord from the AC outlet and then unplugging the AC adapter from the computer. 4. Remove the battery (see Battery on page 38). 5. Remove the following components: a. Hard drive compartment cover (see Hard drive on page 40) b. Keyboard (see Keyboard on page 49) c. Rear - HP 2710p | HP Compaq 2710p Notebook PC - Maintenance and Service Guide - Page 66
by first unplugging the power cord from the AC outlet and then unplugging the AC adapter from the computer. 4. Remove the battery (see Battery on page 38). 5. Remove the following components: a. Hard drive compartment cover (see Hard drive on page 40) b. Keyboard (see Keyboard on page 49) c. Rear - HP 2710p | HP Compaq 2710p Notebook PC - Maintenance and Service Guide - Page 67
by first unplugging the power cord from the AC outlet and then unplugging the AC adapter from the computer. 4. Remove the battery (see Battery on page 38). 5. Remove the following components: a. Hard drive compartment cover (see Hard drive on page 40) b. Keyboard (see Keyboard on page 49) c. Rear - HP 2710p | HP Compaq 2710p Notebook PC - Maintenance and Service Guide - Page 68
1. Disconnect the speaker cable (1) from the system board. 2. Remove the speaker cable (2) from the clip built into the base enclosure. 3. Remove the Phillips PM2.0×6.0 screw (3) that secures the speaker to the base enclosure. 4. Remove the speaker (4) from the base enclosure. Reverse this procedure - HP 2710p | HP Compaq 2710p Notebook PC - Maintenance and Service Guide - Page 69
on page 51) d. Top cover (see Top cover on page 53) Remove the display assembly: 1. Place the display into an upright position. 2. Disconnect the following cables from the system board: (1) Fingerprint reader board cable (2) Camera cable (3) Keyboard light cable Component replacement procedures 61 - HP 2710p | HP Compaq 2710p Notebook PC - Maintenance and Service Guide - Page 70
(3) that secures the display converter cable to the system board. 7. Disconnect the display converter cable (4) from the system board. CAUTION: The display assembly will be unsupported when the following screws are removed. To prevent damage to the display assembly, support it before removing the - HP 2710p | HP Compaq 2710p Notebook PC - Maintenance and Service Guide - Page 71
9. Lift the display assembly straight up and remove it (2). Reverse this procedure to install the display assembly. Component replacement procedures 63 - HP 2710p | HP Compaq 2710p Notebook PC - Maintenance and Service Guide - Page 72
by first unplugging the power cord from the AC outlet and then unplugging the AC adapter from the computer. 4. Remove the battery (see Battery on page 38). 5. Remove the following components: a. Hard drive compartment cover (see Hard drive on page 40) b. Keyboard (see Keyboard on page 49) c. Rear - HP 2710p | HP Compaq 2710p Notebook PC - Maintenance and Service Guide - Page 73
. 5. Remove the Phillips PM2.0×5.0 screw that secures the system board to the base enclosure. 6. Position the computer with the rear panel toward you. 7. Use the optical drive connector (1) to lift the front edge of the system board (2) until it rests at an angle. Component replacement procedures 65 - HP 2710p | HP Compaq 2710p Notebook PC - Maintenance and Service Guide - Page 74
sliding it away from the base enclosure at an angle. You can replace the heat shield that sits atop the system board using spare part number 458406-001. Reverse the preceding procedure to install the system board. When installing the system board, you may need to replace the two shields listed below - HP 2710p | HP Compaq 2710p Notebook PC - Maintenance and Service Guide - Page 75
by first unplugging the power cord from the AC outlet and then unplugging the AC adapter from the computer. 4. Remove the battery (see Battery on page 38). 5. Remove the following components: a. Hard drive compartment cover (see Hard drive on page 40) b. Keyboard (see Keyboard on page 49) c. Rear - HP 2710p | HP Compaq 2710p Notebook PC - Maintenance and Service Guide - Page 76
must be thoroughly cleaned from the surfaces of the heat sink (1) and (2), the processor (3), and graphics system component (4) each time the heat sink is removed. Replacement thermal material is included with all system board and fan/heat sink assembly spare part kits. 68 Chapter 4 Removal and - HP 2710p | HP Compaq 2710p Notebook PC - Maintenance and Service Guide - Page 77
when high temperature conditions exist. These conditions are affected by high external temperatures, system power consumption, power management/battery conservation configurations, battery fast charging, and software requirements. Exhaust air is displaced through the ventilation grill located on the - HP 2710p | HP Compaq 2710p Notebook PC - Maintenance and Service Guide - Page 78
by first unplugging the power cord from the AC outlet and then unplugging the AC adapter from the computer. 4. Remove the battery (see Battery on page 38). 5. Remove the following components: a. Hard drive compartment cover (see Hard drive on page 40) b. Keyboard (see Keyboard on page 49) c. Rear - HP 2710p | HP Compaq 2710p Notebook PC - Maintenance and Service Guide - Page 79
4. Disconnect the modem module cable (3) from the modem module. Reverse this procedure to install the modem module. Component replacement procedures 71 - HP 2710p | HP Compaq 2710p Notebook PC - Maintenance and Service Guide - Page 80
. NOTE: An external keyboard connected by USB can be used with Computer Setup only if USB legacy support is enabled. To start Computer Setup, follow these steps: 1. Turn on or restart the computer. 2. Before Windows® opens and while the "F10 = ROM Based Setup" message is displayed in the lower-left - HP 2710p | HP Compaq 2710p Notebook PC - Maintenance and Service Guide - Page 81
, and System Configuration menus. 1. Open Computer Setup by turning on or restarting the computer, and then pressing f10 while the "F10 = ROM Based Setup" message is displayed in the lower-left corner of the screen. Because Computer Setup is not Windows-based, it does not support the TouchPad - HP 2710p | HP Compaq 2710p Notebook PC - Maintenance and Service Guide - Page 82
do this ● View identification information for the computer and the batteries in the system. ● View specification information for the processor, cache and memory size, system ROM, video revision, and keyboard controller version. Replace the configuration settings in Computer Setup with the original - HP 2710p | HP Compaq 2710p Notebook PC - Maintenance and Service Guide - Page 83
run Disk Sanitizer, the data on the primary hard drive is destroyed permanently. Diagnostics menu Select Hard Drive Self-Test options Memory Check Startup Check (select models only) To do this Run a comprehensive self-test on any hard drive in the system or on any optional MultiBay hard drive. Run - HP 2710p | HP Compaq 2710p Notebook PC - Maintenance and Service Guide - Page 84
When enabled, USB legacy support allows the following: ◦ Use of a USB keyboard, mouse, and hub in Computer Setup even when a Windows operating system is not running. ◦ Startup from bootable USB devices, including a hard drive, diskette drive, or optical drive connected by a USB port to the computer - HP 2710p | HP Compaq 2710p Notebook PC - Maintenance and Service Guide - Page 85
light sensor. ● Enable/disable the serial port. ● Enable/disable the parallel port. ● Enable/disable the flash media reader. ● Enable/disable the USB port. CAUTION: Disabling the USB port also disables MultiBay devices and ExpressCard devices on the advanced port replicator. ● Enable/disable the - HP 2710p | HP Compaq 2710p Notebook PC - Maintenance and Service Guide - Page 86
6 Specifications Computer specifications Metric U.S. Dimensions Length 21.21 cm 8.35 in Width 29.01 cm Height (front to rear) 2.82 cm Weight (equipped with 512-MB memory module, hard 1.63 kg drive, 6-cell battery, WLAN module, and modem module) Input power 11.42 in 1.11 in 3.6 lbs - HP 2710p | HP Compaq 2710p Notebook PC - Maintenance and Service Guide - Page 87
well within this range of temperatures. 12.1-inch, WXGA display specifications Dimensions Height Width Diagonal Number of colors Contrast ratio Brightness Pixel resolution Pitch Format Configuration Backlight Character display Total power consumption Viewing angle Metric U.S. 16.9 cm 26.2 cm 30 - HP 2710p | HP Compaq 2710p Notebook PC - Maintenance and Service Guide - Page 88
,280,320 117,210,240 Disc rotational speed 4200 rpm 4200 rpm 4200 rpm Operating temperature 5°C to 55°C (41°F to 131°F) *1 GB = 1 billion bytes when referring to hard drive storage capacity. Actual accessible capacity is less. Actual drive specifications may differ slightly. NOTE: Certain - HP 2710p | HP Compaq 2710p Notebook PC - Maintenance and Service Guide - Page 89
DMA System function DMA0 Not applicable DMA1* Not applicable DMA2* Not applicable DMA3 Not applicable DMA4 Direct memory access controller DMA5* Available for PC Card DMA6 Not assigned DMA7 Not assigned *PC Card controller can use DMA 1, 2, or 5. System DMA specifications 81 - HP 2710p | HP Compaq 2710p Notebook PC - Maintenance and Service Guide - Page 90
Fax Modem with SmartCP Diskette drive Parallel port System CMOS/real-time clock IRQ9* IRQ10* Microsoft ACPI-compliant system Intel USB UHCI controller-24C2 Intel 82852/82855 GM/GME Graphic Controller IRQ11 Realtek RTL8139 Family PCI Fast Ethernet Controller Intel USB EHCI controller-24CD Intel - HP 2710p | HP Compaq 2710p Notebook PC - Maintenance and Service Guide - Page 91
controller Port B Unused Keyboard controller Unused NMI enable/RTC Unused DMA page registers Unused Port A Unused Interrupt controller no. 2 System function (shipping configuration) Unused DMA controller no. 2 Unused Coprocessor busy clear/reset Unused Unused Secondary fixed disk controller Unused - HP 2710p | HP Compaq 2710p Notebook PC - Maintenance and Service Guide - Page 92
serial port Unused Infrared port Unused Unused Secondary diskette drive controller Parallel port (LPT1/default) Unused FM synthesizer-OPL3 Unused VGA Reserved (parallel port/no EPP support) VGA PC Card controller in CPU Unused Internal modem "A" diskette controller Serial port (COM1/default) PCI - HP 2710p | HP Compaq 2710p Notebook PC - Maintenance and Service Guide - Page 93
00FFFFFF 04800000-07FFFFFF 04800000-07FFFFFF 08000000-080FFFFF 08200000-FFFEFFFF FFFF0000-FFFFFFFF System function Base memory Video memory Video BIOS Unused System BIOS Extended memory Super extended memory Unused Video memory (direct access) Unused System BIOS System memory map specifications 85 - HP 2710p | HP Compaq 2710p Notebook PC - Maintenance and Service Guide - Page 94
7 Screw listing This section provides specification and reference information for the screws and screw locks used in the computer. All screws listed in this section are available in the Screw Kit, spare part number 454687-001. 86 Chapter 7 Screw listing - HP 2710p | HP Compaq 2710p Notebook PC - Maintenance and Service Guide - Page 95
Phillips PM2.0×5.0 captive screw Color Black Quantity 6 Length 5.0 mm Thread 2.0 mm Head diameter 5.0 mm Where used: 6 captive screws that secure the hard drive compartment cover to the computer (screws are captured on the cover by C-clips) Phillips PM2.0×5.0 captive screw 87 - HP 2710p | HP Compaq 2710p Notebook PC - Maintenance and Service Guide - Page 96
Phillips PM2.0×3.0 screw Color Black Quantity 2 Length 3.0 mm Thread 2.0 mm Head diameter 4.5 mm Where used: 2 screws that secure the hard drive bracket to the system board 88 Chapter 7 Screw listing - HP 2710p | HP Compaq 2710p Notebook PC - Maintenance and Service Guide - Page 97
Phillips PM2.5×4.0 screw Color Black Quantity 6 Length 4.0 mm Thread 2.5 mm Head diameter 5.0 mm Where used: (1) Two screws that secure the WLAN module to the system board (2) Two screws that secure the WWAN module to the system board Phillips PM2.5×4.0 screw 89 - HP 2710p | HP Compaq 2710p Notebook PC - Maintenance and Service Guide - Page 98
Where used: 2 screws that secure the modem module to the system board 90 Chapter 7 Screw listing - HP 2710p | HP Compaq 2710p Notebook PC - Maintenance and Service Guide - Page 99
Torx T8M2.0×8.0 screw Color Black Quantity 9 Length 8.0 mm Thread 2.0 mm Head diameter 5.0 mm Where used: (1) Six screws that secure the keyboard to the computer (2) Three screws that secure the top cover to the base enclosure Torx T8M2.0×8.0 screw 91 - HP 2710p | HP Compaq 2710p Notebook PC - Maintenance and Service Guide - Page 100
Torx T8M2.0×5.0 screw Color Black Quantity 4 Length 5.0 mm Thread 2.0 mm Head diameter 5.0 mm Where used: (1) Two screws that secure the rear plastic bezel to the base enclosure (2) Two screws that secure the top cover to the base enclosure 92 Chapter 7 Screw listing - HP 2710p | HP Compaq 2710p Notebook PC - Maintenance and Service Guide - Page 101
Phillips PM2.0×5.0 screw Color Black Quantity 5 Length 5.0 mm Thread 2.0 mm Head diameter 5.0 mm Where used: 2 screws that secure the top cover to the base enclosure Where used: One screw that secures the audio connector board to the base enclosure Phillips PM2.0×5.0 screw 93 - HP 2710p | HP Compaq 2710p Notebook PC - Maintenance and Service Guide - Page 102
Where used: One screw that secures the Bluetooth module to the base enclosure Where used: One screw that secures the system board to the base enclosure 94 Chapter 7 Screw listing - HP 2710p | HP Compaq 2710p Notebook PC - Maintenance and Service Guide - Page 103
Black Phillips PM2.0×6.0 screw Color Black Quantity 1 Length 6.0 mm Thread 2.0 mm Head diameter 5.0 mm Where used: One screw that secures the speaker to the base enclosure Black Phillips PM2.0×6.0 screw 95 - HP 2710p | HP Compaq 2710p Notebook PC - Maintenance and Service Guide - Page 104
Silver Phillips PM2.0×6.0 screw Color Silver Quantity 2 Length 6.0 mm Thread 2.0 mm Head diameter 5.0 mm Where used: 2 screws that secure the display panel cable to the system board 96 Chapter 7 Screw listing - HP 2710p | HP Compaq 2710p Notebook PC - Maintenance and Service Guide - Page 105
Phillips PM2.0×4.0 screw Color Black Quantity 1 Length 4.0 mm Thread 2.0 mm Head diameter 4.5 mm Where used: One screw that secures the display converter cable to the system board Phillips PM2.0×4.0 screw 97 - HP 2710p | HP Compaq 2710p Notebook PC - Maintenance and Service Guide - Page 106
Phillips PM2.5×7.0 screw Color Silver Quantity 4 Length 7.0 mm Thread 2.5 mm Heat width 5.0 mm Where used: 4 screws that secure the display assembly to the base enclosure 98 Chapter 7 Screw listing - HP 2710p | HP Compaq 2710p Notebook PC - Maintenance and Service Guide - Page 107
Phillips PM2.5×7.0 captive screw Color Silver Quantity 6 Length 7.0 mm Thread 2.5mm Head diameter 5.0 mm Where used: 6 captive screws that secure the fan/heat sink assembly to the system board (screws are captured on the fan/heat sink assembly by C-clips) Phillips PM2.5×7.0 captive screw 99 - HP 2710p | HP Compaq 2710p Notebook PC - Maintenance and Service Guide - Page 108
discs are used to start up (boot) the computer and recover the operating system and software to factory settings in case of system instability or failure. Note the following guidelines before creating recovery discs: ● Use any of the following types of discs: CD-R, DVD+R, DVD+R DL, DVD-R, or DVD - HP 2710p | HP Compaq 2710p Notebook PC - Maintenance and Service Guide - Page 109
external power. NOTE: Drivers, utilities, and software installed by HP can be copied to a CD or to a DVD using HP Backup & Recovery Manager. Backing up specific files or folders You can back up specific files or folders to the recovery partition on the hard drive, to an optional external hard drive - HP 2710p | HP Compaq 2710p Notebook PC - Maintenance and Service Guide - Page 110
and folders, and then click Next. 5. Follow the on-screen instructions. Backing up the entire hard drive When you perform a complete backup of the hard drive, you are saving the full factory image, including the Windows® operating system, software, and all personal files and folders. NOTE: A copy of - HP 2710p | HP Compaq 2710p Notebook PC - Maintenance and Service Guide - Page 111
monthly) or at specific events, such as at system restart or when you dock to an optional docking station (select models only). To schedule backups: 1. Select Start > All Programs > HP Backup & Recovery > HP Backup Scheduler. 2. Follow the on-screen instructions. Performing a recovery NOTE: You can - HP 2710p | HP Compaq 2710p Notebook PC - Maintenance and Service Guide - Page 112
. 2. Insert the first recovery disc into the optical drive and restart the computer. 3. Follow the on-screen instructions. Performing a recovery from the hard drive There are 2 ways to initiate a recovery from the hard drive: ● From within Windows ● From the recovery partition 104 Chapter 8 Backup - HP 2710p | HP Compaq 2710p Notebook PC - Maintenance and Service Guide - Page 113
the on-screen instructions. Initiating a recovery from the hard drive recovery partition To initiate a recovery from the hard drive recovery partition, follow these steps: 1. Back up all personal files. 2. Restart the computer, and then press f11 before the Windows operating system loads. 3. Click - HP 2710p | HP Compaq 2710p Notebook PC - Maintenance and Service Guide - Page 114
, DVDs and DVDs with double-layer (DL) support reduce the number of discs required. NOTE: Read-write discs, such as CD-RW, DVD+RW, and DVD-RW, are not compatible with the HP Backup and Recovery Manager software. ● The computer must be connected to AC power during the process. ● Only one set of the - HP 2710p | HP Compaq 2710p Notebook PC - Maintenance and Service Guide - Page 115
power. NOTE: Drivers, utilities, and software installed by HP can be copied to a CD or to a DVD using HP Backup and Recovery Manager. Backing up specific files or folders You can back up specific files or folders to the recovery partition on the hard drive, to an optional external hard drive - HP 2710p | HP Compaq 2710p Notebook PC - Maintenance and Service Guide - Page 116
hard drive: 1. Select Start > All Programs > HP Backup & Recovery > HP Backup and Recovery Manager. 2. Click Next. 3. Click Back up to protect system settings and important data files, and then click Next. 4. Click Back up entire hard drive, and then click Next. 5. Follow the on-screen instructions - HP 2710p | HP Compaq 2710p Notebook PC - Maintenance and Service Guide - Page 117
monthly) or at specific events, such as at system restart or when you dock to an optional docking station (select models only). To schedule backups: 1. Select Start > All Programs > HP Backup & Recovery > HP Backup Scheduler. 2. Follow the on-screen instructions. Performing a recovery NOTE: You can - HP 2710p | HP Compaq 2710p Notebook PC - Maintenance and Service Guide - Page 118
. 2. Insert the first recovery disc into the optical drive and restart the computer. 3. Follow the on-screen instructions. Performing a recovery from the hard drive There are 2 ways to initiate a recovery from the hard drive: ● From within Windows ● From the recovery partition 110 Chapter 8 Backup - HP 2710p | HP Compaq 2710p Notebook PC - Maintenance and Service Guide - Page 119
the on-screen instructions. Initiating a recovery from the hard drive recovery partition To initiate a recovery from the hard drive recovery partition, follow these steps: 1. Back up all personal files. 2. Restart the computer, and then press f11 before the Windows operating system loads. 3. Click - HP 2710p | HP Compaq 2710p Notebook PC - Maintenance and Service Guide - Page 120
9 Connector pin assignments Audio-out (headphone) Pin Signal 1 Audio out, left channel 2 Audio out, right channel 3 Ground Audio-in (microphone) Pin Signal 1 Audio signal in 2 Audio signal in 3 Ground 112 Chapter 9 Connector pin assignments - HP 2710p | HP Compaq 2710p Notebook PC - Maintenance and Service Guide - Page 121
External monitor Pin Signal 1 Red analog 2 Green analog 3 Blue analog 4 Not connected 5 Ground 6 Ground analog 7 Ground analog 8 Ground analog 9 +5 VDC 10 Ground 11 Monitor detect 12 DDC 2B data 13 Horizontal sync 14 Vertical sync 15 DDC 2B clock External monitor 113 - HP 2710p | HP Compaq 2710p Notebook PC - Maintenance and Service Guide - Page 122
RJ-11 (modem) Pin 1 2 3 4 5 6 RJ-45 (network) Signal Unused Tip Ring Unused Unused Unused Pin Signal 1 Transmit + 2 Transmit - 3 Receive + 4 Unused 5 Unused 6 Receive - 7 Unused 8 Unused 114 Chapter 9 Connector pin assignments - HP 2710p | HP Compaq 2710p Notebook PC - Maintenance and Service Guide - Page 123
Universal Serial Bus Pin Signal 1 +5 VDC 2 Data - 3 Data + 4 Ground Universal Serial Bus 115 - HP 2710p | HP Compaq 2710p Notebook PC - Maintenance and Service Guide - Page 124
use in the country or region where the equipment is purchased. Power cord sets for use in other countries and regions must meet the a nominal voltage rating of 125 or 250 V AC, as required by the power system of each country or region. ● The appliance coupler must meet the mechanical configuration - HP 2710p | HP Compaq 2710p Notebook PC - Maintenance and Service Guide - Page 125
Requirements for specific countries and regions Country/region Accredited agency Applicable note number Australia EANSW 1 where it will be used. 5. The flexible cord must be Type VCTF, 3-conductor, 0.75-mm² conductor size. Power cord set fittings (appliance coupler and wall plug) must bear the - HP 2710p | HP Compaq 2710p Notebook PC - Maintenance and Service Guide - Page 126
This section provides disassembly instructions for the display assembly. The display assembly must be disassembled to gain access to the backlight (1) and the liquid crystal display (LCD) panel (2). NOTE: The procedures provided in this appendix are general disassembly instructions. Specific details - HP 2710p | HP Compaq 2710p Notebook PC - Maintenance and Service Guide - Page 127
Perform the following steps to disassemble the display assembly: 1. Remove all screw covers (1) and screws (2) that secure the display bezel to the display assembly. 2. Lift up and out on the left and right inside edges (1) and the top and bottom inside edges (2) of the display bezel until the bezel - HP 2710p | HP Compaq 2710p Notebook PC - Maintenance and Service Guide - Page 128
4. Disconnect all display panel cables (1) from the display inverter and remove the inverter (2). 5. Remove all screws (1) that secure the display panel assembly to the display enclosure. 6. Remove the display panel assembly (2) from the display enclosure. 7. Turn the display panel assembly upside - HP 2710p | HP Compaq 2710p Notebook PC - Maintenance and Service Guide - Page 129
10. Remove the display panel frame (2) from the display panel. 11. Remove the screws (1) that secure the backlight cover to the display panel. 12. Lift the top edge of the backlight cover (2) and swing it outward. 13. Remove the backlight cover. 14. Turn the display panel right-side up. Display 121 - HP 2710p | HP Compaq 2710p Notebook PC - Maintenance and Service Guide - Page 130
15. Remove the backlight cables (1) from the clip (2) in the display panel. 16. Turn the display panel upside down. WARNING! The backlight contains mercury. Exercise caution when removing and handling the backlight to avoid damaging this component and causing exposure to - HP 2710p | HP Compaq 2710p Notebook PC - Maintenance and Service Guide - Page 131
18. Remove the backlight from the backlight frame. 19. Disconnect the display panel cable (1) from the LCD panel. 20. Remove the screws (2) that secure the LCD panel to the display rear panel. 21. Release the LCD panel (3) from the display rear panel. 22. Release the tape (4) that secures the LCD - HP 2710p | HP Compaq 2710p Notebook PC - Maintenance and Service Guide - Page 132
restoring factory settings 73 Security menu 75 System Configuration menu 76 using 73 computer specifications 78 connectors accessory battery 15 docking 15 power 12 service considerations 32 convertible hinge 7 creating recovery points 103, 109 D Diagnostics menu 75 Disk Sanitizer 75 diskette drive - HP 2710p | HP Compaq 2710p Notebook PC - Maintenance and Service Guide - Page 133
11 display specifications 79 display switch 7 docking connector 15 docking station, spare part number 23, 29 docking support, product description 3 drive light 8 DriveLock password 75 drives boot order 76 preventing damage 32 DVD-ROM Drive, spare part number 23 DVD/CD-RW Combo Drive, spare part - HP 2710p | HP Compaq 2710p Notebook PC - Maintenance and Service Guide - Page 134
11 power-on password 75 powered USB port 14 presentation button 7 processor, product description 1 product description audio 2 chipset 1 diskette drive 2 docking support 3 Ethernet 2 external media cards 3 graphics 1 hard drives 2 keyboard 3 memory module 1 modem module 2 operating system 5 optical - HP 2710p | HP Compaq 2710p Notebook PC - Maintenance and Service Guide - Page 135
59 spare part number 19, 28, 59 specifications computer 78 display 79 hard drive 80 I/O addresses 83 interrupts 82 memory map 85 system DMA 81 startup check 75 static-shielding materials 35 stringent security 75 switch components 7 switches camera mode 6, 11 power 11 wireless 14 system backup 102 - HP 2710p | HP Compaq 2710p Notebook PC - Maintenance and Service Guide - Page 136
-
 1
1 -
 2
2 -
 3
3 -
 4
4 -
 5
5 -
 6
6 -
 7
7 -
8
-
9
-
10
-
11
-
12
-
13
-
14
-
15
-
16
-
17
-
18
-
19
-
20
-
21
-
22
-
23
-
24
-
25
-
26
-
27
-
28
-
29
-
30
-
31
-
32
-
33
-
34
-
35
-
36
-
37
-
38
-
39
-
40
-
41
-
42
-
43
-
44
-
45
-
46
-
47
-
48
-
49
-
50
-
51
-
52
-
53
-
54
-
55
-
56
-
57
-
58
-
59
-
60
-
61
-
62
-
63
-
64
-
65
-
66
-
67
-
68
-
69
-
70
-
71
-
72
-
73
-
74
-
75
-
76
-
77
-
78
-
79
-
80
-
81
-
82
-
83
-
84
-
85
-
86
-
87
-
88
-
89
-
90
-
91
-
92
-
93
-
94
-
95
-
96
-
97
-
98
-
99
-
100
-
101
-
102
-
103
-
104
-
105
-
106
-
107
-
108
-
109
-
110
-
111
-
112
-
113
-
114
-
115
-
116
-
117
-
118
-
119
-
120
-
121
-
122
-
123
-
124
-
125
-
126
-
127
-
128
-
129
-
130
-
131
-
132
-
133
-
134
-
135
-
136
 |
 |

HP Compaq 2710p Notebook PC
Maintenance and Service Guide