HP 2710p HP Compaq 2710p Notebook PC - Maintenance and Service Guide - Page 63
Reverse this procedure to install the rear plastic bezel.
 |
UPC - 884420088295
View all HP 2710p manuals
Add to My Manuals
Save this manual to your list of manuals |
Page 63 highlights
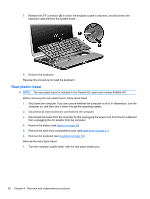
2. Remove the two Torx T8M2.0×5.0 screws that secure the rear plastic bezel to the computer. 3. Turn the computer right-side up, with the rear panel toward you. 4. Open the computer to an upright position. 5. Remove the rear plastic bezel by pulling it away from the computer. Reverse this procedure to install the rear plastic bezel. Component replacement procedures 53
-
 1
1 -
2
-
3
-
4
-
5
-
6
-
7
-
8
-
9
-
10
-
11
-
12
-
13
-
14
-
15
-
16
-
17
-
18
-
19
-
20
-
21
-
22
-
23
-
24
-
25
-
26
-
27
-
28
-
29
-
30
-
31
-
32
-
33
-
34
-
35
-
36
-
37
-
38
-
39
-
40
-
41
-
42
-
43
-
44
-
45
-
46
-
47
-
48
-
49
-
50
-
51
-
52
-
53
-
54
-
55
-
56
-
57
-
 58
58 -
 59
59 -
 60
60 -
 61
61 -
 62
62 -
 63
63 -
 64
64 -
 65
65 -
 66
66 -
 67
67 -
 68
68 -
69
-
70
-
71
-
72
-
73
-
74
-
75
-
76
-
77
-
78
-
79
-
80
-
81
-
82
-
83
-
84
-
85
-
86
-
87
-
88
-
89
-
90
-
91
-
92
-
93
-
94
-
95
-
96
-
97
-
98
-
99
-
100
-
101
-
102
-
103
-
104
-
105
-
106
-
107
-
108
-
109
-
110
-
111
-
112
-
113
-
114
-
115
-
116
-
117
-
118
-
119
-
120
-
121
-
122
-
123
-
124
-
125
-
126
-
127
-
128
-
129
-
130
-
131
-
132
-
133
-
134
-
135
-
136
-
137
-
138
-
139
 |
 |
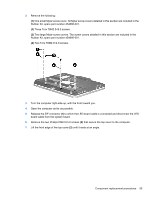
2.
Remove the two Torx T8M2.0×5.0 screws that secure the rear plastic bezel to the computer.
3.
Turn the computer right-side up, with the rear panel toward you.
4.
Open the computer to an upright position.
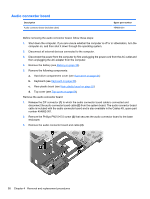
5.
Remove the rear plastic bezel by pulling it away from the computer.
Reverse this procedure to install the rear plastic bezel.
Component replacement procedures
53