HP 381513-B21 HP Smart Array P800 Controller for Integrity Servers Installatio - Page 7
HP-UX Installation, Installation Overview, Installation Prerequisites - controller firmware
 |
UPC - 882780622029
View all HP 381513-B21 manuals
Add to My Manuals
Save this manual to your list of manuals |
Page 7 highlights
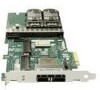
1 HP-UX Installation This chapter describes the installation process for the HP Smart Array P800 Controllers on HP-UX servers. This chapter addresses the following topics: "Installation Overview" (page 7) "Installation Prerequisites" (page 7) "Downloading Software" (page 8) "Installing Software" (page 8) "Installing the Controller Offline" (page 8) "Replacing a Smart Array P800 Controller Online" (page 9) "Connecting External Devices" (page 10) "Verifying and Updating Controller Firmware Offline" (page 11) "Verifying and Updating Enclosure Firmware Offline" (page 14) "Verifying the Installation" (page 17) "Confirming and Updating Physical Disk Firmware" (page 18) "Configuring a Smart Array Series Controller as a Boot Device " (page 21) Installation Overview To install your Smart Array Series Controller, follow these steps: 1. Plan your disk configurations. For more information on supported RAID levels, see the HP Smart Array P400 and P800 Controller for Integrity Servers Support Guide at: http://docs.hp.com/en/netcom.html 2. Check the installation prerequisites. See "Installation Prerequisites" (page 7). 3. Install the software. See "Downloading Software" (page 8) and "Installing Software" (page 8). 4. Install the controller and connect internal disks. See "Installing the Controller Offline" (page 8). 5. Connect external disks. See "Connecting External Devices" (page 10). 6. Verify the controller firmware version and upgrade the controller firmware if necessary. See "Verifying and Updating Controller Firmware Offline" (page 11). 7. Verify the enclosure firmware version and upgrade the enclosure firmware if necessary. See "Verifying and Updating Enclosure Firmware Offline" (page 14). 8. Verify the disk firmware versions and upgrade the disk firmware if necessary. See "Confirming and Updating Physical Disk Firmware" (page 18). 9. Verify the installation. See "Verifying the Installation" (page 17). 10. Configure the controller for boot support, if necessary. See "Configuring a Smart Array Series Controller as a Boot Device " (page 21). Installation Prerequisites Before installing the Smart Array Series Controller, be sure the following hardware and software prerequisites are met: 1. Confirm that your server and HP-UX operating system version are supported by the controller. Use the swlist command to determine the HP-UX version you are using. For example: # swlist | grep OE HPUX11i-OE-MC Environment B.11.31.0709 HP-UX Mission Critical Operating Table 1-1 lists the minimum HP-UX version requirements for each controller: Installation Overview 7
-
 1
1 -
 2
2 -
 3
3 -
 4
4 -
 5
5 -
 6
6 -
 7
7 -
 8
8 -
 9
9 -
 10
10 -
 11
11 -
 12
12 -
13
-
14
-
15
-
16
-
17
-
18
-
19
-
20
-
21
-
22
-
23
-
24
-
25
-
26
-
27
-
28
-
29
-
30
-
31
-
32
-
33
-
34
-
35
-
36
-
37
-
38
 |
 |
