HP 418800-B21 HP StorageWorks 70 Modular Smart Array Enclosure maintenance and - Page 26
Access panel
 |
UPC - 882780564640
View all HP 418800-B21 manuals
Add to My Manuals
Save this manual to your list of manuals |
Page 26 highlights
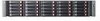
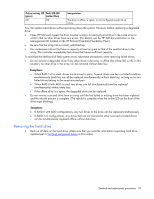
1. Complete server hardware installation and cabling. See the server documentation. 2. Connect the SAS cables and power cords to the enclosure. 3. Press and hold the Power On/Standby button on the enclosure. Wait and observe the system power LED and fan modules. When the enclosure powers up, the system power LED illuminates solid green and the fans spin to a high speed, and then spin down to a low speed. 4. Power up the servers. See the server documentation. Powering down To power down the enclosure: 1. Power down any attached servers. See the server documentation. 2. Press the Power On/Standby button on the enclosure. 3. Wait for the system power LED to go from green to amber. 4. Disconnect the power cords. The system is now without power. Access panel Removing the access panel 1. Power down the enclosure: a. Power down any attached servers. See the server documentation. b. Press the Power On/Standby button on the enclosure. c. Wait for the system power LED to go from green to amber. d. Disconnect the power cords. 2. Extend or remove the enclosure from the rack in which it may be installed: a. Loosen the front panel thumbscrews that secure the enclosure faceplate to the front of the rack. b. Disconnect the cabling and extend or remove the enclosure from the rack. 3. Lift the access panel latch on top of the enclosure (1) and slide the access panel to the rear (2). 4. Remove the access panel. Removal and replacement procedures 26
-
 1
1 -
2
-
3
-
4
-
5
-
6
-
7
-
8
-
9
-
10
-
11
-
12
-
13
-
14
-
15
-
16
-
17
-
18
-
19
-
20
-
 21
21 -
 22
22 -
 23
23 -
 24
24 -
 25
25 -
 26
26 -
 27
27 -
 28
28 -
 29
29 -
 30
30 -
 31
31 -
32
-
33
-
34
-
35
-
36
-
37
-
38
-
39
-
40
-
41
-
42
-
43
-
44
-
45
-
46
-
47
-
48
-
49
-
50
-
51
-
52
-
53
-
54
-
55
-
56
-
57
-
58
-
59
-
60
-
61
-
62
-
63
 |
 |
