HP 418800-B21 HP StorageWorks 70 Modular Smart Array Enclosure maintenance and - Page 27
Hard drive blank
 |
UPC - 882780564640
View all HP 418800-B21 manuals
Add to My Manuals
Save this manual to your list of manuals |
Page 27 highlights
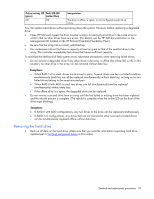
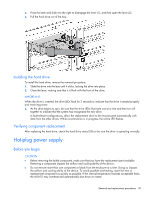
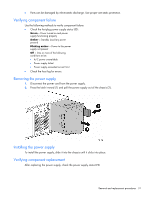
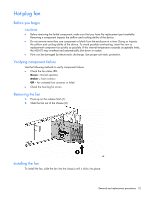
WARNING! To reduce the risk of personal injury from hot surfaces, allow the drives and the internal system components to cool before touching them. CAUTION: To prevent damage to electrical components, properly ground the enclosure before beginning any installation procedure. Improper grounding can cause ESD. Installing the access panel To install the access panel, reverse the removal procedure: 1. Slide the access panel into place on the chassis. 2. Press down the access panel latch on top of the enclosure to secure the panel. Hard drive blank CAUTION: To prevent improper cooling and thermal damage, do not operate the enclosure unless all bays are populated with either a component or a blank. Removing the hard drive blank 1. Press in the release latches (1). 2. Pull the hard drive blank out of the bay (2). Installing the hard drive blank To install the blank, slide the blank into the bay until it locks into place. Removal and replacement procedures 27
-
 1
1 -
2
-
3
-
4
-
5
-
6
-
7
-
8
-
9
-
10
-
11
-
12
-
13
-
14
-
15
-
16
-
17
-
18
-
19
-
20
-
21
-
 22
22 -
 23
23 -
 24
24 -
 25
25 -
 26
26 -
 27
27 -
 28
28 -
 29
29 -
 30
30 -
 31
31 -
 32
32 -
33
-
34
-
35
-
36
-
37
-
38
-
39
-
40
-
41
-
42
-
43
-
44
-
45
-
46
-
47
-
48
-
49
-
50
-
51
-
52
-
53
-
54
-
55
-
56
-
57
-
58
-
59
-
60
-
61
-
62
-
63
 |
 |
