HP 418800-B21 HP StorageWorks 70 Modular Smart Array Enclosure maintenance and - Page 40
CAUTION, Installing the power UID module, Verifying component replacement
 |
UPC - 882780564640
View all HP 418800-B21 manuals
Add to My Manuals
Save this manual to your list of manuals |
Page 40 highlights
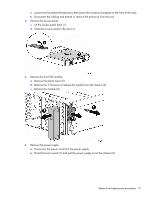
4. Disconnect the cable from the midplane (1). 5. Remove the T-15 screw securing the module to the chassis (2) and lift the module out of the chassis (3). CAUTION: Be careful not to accidentally drop the screw into the chassis when removing it from the module. Installing the power UID module To install the power UID module, reverse the removal procedure: 1. Insert the module into the chassis and secure it with a T-15 screw. 2. Connect the cable to the midplane. 3. Install the access panel. 4. Insert the enclosure into the rack and power up the enclosure. Verifying component replacement After replacing the power UID module, check the power UID module status LED. Removal and replacement procedures 40
-
 1
1 -
2
-
3
-
4
-
5
-
6
-
7
-
8
-
9
-
10
-
11
-
12
-
13
-
14
-
15
-
16
-
17
-
18
-
19
-
20
-
21
-
22
-
23
-
24
-
25
-
26
-
27
-
28
-
29
-
30
-
31
-
32
-
33
-
34
-
 35
35 -
 36
36 -
 37
37 -
 38
38 -
 39
39 -
 40
40 -
 41
41 -
 42
42 -
 43
43 -
 44
44 -
 45
45 -
46
-
47
-
48
-
49
-
50
-
51
-
52
-
53
-
54
-
55
-
56
-
57
-
58
-
59
-
60
-
61
-
62
-
63
 |
 |

Removal and replacement procedures
40
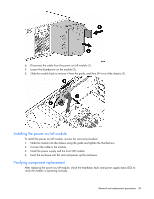
4.
Disconnect the cable from the midplane (1).
5.
Remove the T-15 screw securing the module to the chassis (2) and lift the module out of the chassis
(3).
CAUTION:
Be careful not to accidentally drop the screw into the chassis when removing it from the module.
Installing the power UID module
To install the power UID module, reverse the removal procedure:
1.
Insert the module into the chassis and secure it with a T-15 screw.
2.
Connect the cable to the midplane.
3.
Install the access panel.
4.
Insert the enclosure into the rack and power up the enclosure.
Verifying component replacement
After replacing the power UID module, check the power UID module status LED.