HP Business Inkjet 2200/2250 HP Business InkJet 2200/2250 Printer - (English) - Page 12
Setting Up, Install Tray 2 optional.
 |
View all HP Business Inkjet 2200/2250 manuals
Add to My Manuals
Save this manual to your list of manuals |
Page 12 highlights
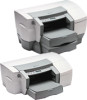
Setting Up 1 Unpack the printer and remove the packing tape and any shipping foam inside the paper trays. 2 Install Tray 2 (optional). Note: Tray 2 (C3398A/C3398C) is a standard feature of the HP Business Inkjet 2250TN. It can be ordered separately for other HP Business Inkjet 2200/2250 printers. 1. Position Tray 2 in the location where you want to place the printer. The printer is designed to rest directly on top of the tray. 2. Lift the printer and align the printer's base with the paper tray. 3. Set the printer on top of the paper tray. There is a small gap between the base of the printer and Tray 2. 2-4
-
 1
1 -
2
-
3
-
4
-
5
-
6
-
 7
7 -
 8
8 -
 9
9 -
 10
10 -
 11
11 -
 12
12 -
 13
13 -
 14
14 -
 15
15 -
 16
16 -
 17
17 -
18
-
19
-
20
-
21
-
22
-
23
-
24
-
25
-
26
-
27
-
28
-
29
-
30
-
31
-
32
-
33
-
34
-
35
-
36
-
37
-
38
-
39
-
40
-
41
-
42
-
43
-
44
-
45
-
46
-
47
-
48
-
49
-
50
-
51
-
52
-
53
-
54
-
55
-
56
-
57
-
58
-
59
-
60
-
61
-
62
-
63
-
64
-
65
-
66
-
67
-
68
-
69
-
70
-
71
-
72
-
73
-
74
-
75
-
76
-
77
-
78
-
79
-
80
-
81
 |
 |

2-4
Setting Up
1
Unpack the printer and remove the packing tape and any shipping foam
inside the paper trays.
2
Install Tray 2 (optional).
Note: Tray 2 (
C3398A/C3398C
) is a standard feature of the HP Business Inkjet 2250TN.
It can be
ordered separately for other HP Business Inkjet 2200/2250 printers.
1.
Position Tray 2 in the location where you want to place the printer.
The printer is designed to rest directly on top of the tray.
2.
Lift the printer and align the printer’s base with the paper tray.
3.
Set the printer on top of the paper tray. There is a small gap
between the base of the printer and Tray 2.