HP Color LaserJet Pro MFP M476 User Guide - Page 63
Step 2: Set up the fax, Dedicated phone line
 |
View all HP Color LaserJet Pro MFP M476 manuals
Add to My Manuals
Save this manual to your list of manuals |
Page 63 highlights
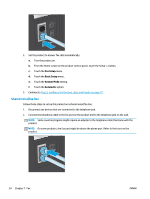
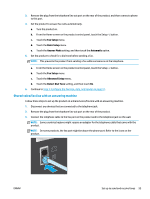
● PBX or ISDN phone system: A private branch exchange (PBX) phone system or an integrated services digital network (ISDN) system ● VoIP phone system: Voice over Internet protocol (VoIP) through an Internet provider Step 2: Set up the fax Click the link below that best describes the environment in which the product will be sending and receiving faxes, and follow the setup instructions. ● Dedicated phone line on page 53 ● Shared voice/fax line on page 54 ● Shared voice/fax line with an answering machine on page 55 NOTE: Instructions for only three of the connection types are included here. For more information about connecting the product with other connection types, go to the support Web site for this product: ● In the US, go to www.hp.com/support/colorljMFPM476. ● Outside the US, go to www.hp.com/support. Select your country/region. Click Troubleshooting. Enter the product name, and then select Search. NOTE: This product is an analog fax device. HP recommends using the product on a dedicated analog telephone line. For a digital environment, such as DSL, PBX, ISDN, or VoIP, make sure to use the correct filters and configure the digital settings correctly. For more information, contact the digital service provider. NOTE: Do not connect more than three devices to the telephone line. NOTE: Voice mail is not supported with this product. Dedicated phone line Follow these steps to set up the product on a dedicated phone line with no additional services. 1. Connect the telephone cable to the fax port on the product and to the telephone jack on the wall. NOTE: Some countries/regions might require an adapter for the telephone cable that came with the product. NOTE: On some products, the fax port might be above the phone port. Refer to the icons on the product. ENWW Set up to send and receive faxes 53
-
 1
1 -
2
-
3
-
4
-
5
-
6
-
7
-
8
-
9
-
10
-
11
-
12
-
13
-
14
-
15
-
16
-
17
-
18
-
19
-
20
-
21
-
22
-
23
-
24
-
25
-
26
-
27
-
28
-
29
-
30
-
31
-
32
-
33
-
34
-
35
-
36
-
37
-
38
-
39
-
40
-
41
-
42
-
43
-
44
-
45
-
46
-
47
-
48
-
49
-
50
-
51
-
52
-
53
-
54
-
55
-
56
-
57
-
 58
58 -
 59
59 -
 60
60 -
 61
61 -
 62
62 -
 63
63 -
 64
64 -
 65
65 -
 66
66 -
 67
67 -
 68
68 -
69
-
70
-
71
-
72
-
73
-
74
-
75
-
76
-
77
-
78
-
79
-
80
-
81
-
82
-
83
-
84
-
85
-
86
-
87
-
88
-
89
-
90
-
91
-
92
-
93
-
94
-
95
-
96
-
97
-
98
-
99
-
100
-
101
-
102
-
103
-
104
-
105
-
106
-
107
-
108
-
109
-
110
-
111
-
112
-
113
-
114
-
115
-
116
-
117
-
118
-
119
-
120
-
121
-
122
-
123
-
124
-
125
-
126
-
127
-
128
-
129
-
130
-
131
-
132
-
133
-
134
-
135
-
136
-
137
-
138
-
139
-
140
-
141
-
142
-
143
-
144
 |
 |
