HP Color LaserJet Pro MFP M476 User Guide - Page 68
HP Device Toolbox, HP Embedded Web Server, Step 4: Run a fax test
 |
View all HP Color LaserJet Pro MFP M476 manuals
Add to My Manuals
Save this manual to your list of manuals |
Page 68 highlights
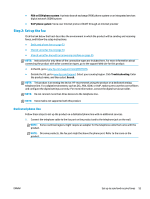
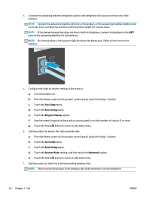
10. Use the keypad to enter the fax number, and then touch the OK button. NOTE: The maximum number of characters for the fax number is 20. 11. Use the keypad to enter the company name or header, and then touch the OK button. NOTE: The maximum number of characters for the fax header is 25. 12. Continue to Step 4: Run a fax test on page 58. HP Device Toolbox 1. Click the Start button, and then click the Programs item. 2. Click your HP product group, and then click the HP Device Toolbox item. 3. Click the Fax tab. 4. Follow the on-screen instructions to configure the fax settings. 5. Continue to Step 4: Run a fax test on page 58. HP Embedded Web Server 1. Open the HP Embedded Web Server (EWS): a. From the Home screen on the product control panel, touch the Network button to display the IP address or host name. b. Open a Web browser, and in the address line, type the IP address or host name exactly as it displays on the product control panel. Press the Enter key on the computer keyboard. The EWS opens. 2. Click the Fax tab. 3. Follow the on-screen instructions to configure the fax settings. 4. Continue to Step 4: Run a fax test on page 58. Step 4: Run a fax test Run a fax test to make sure that the fax is set up correctly. 1. From the Home screen, touch the Setup button. 2. Scroll to and touch the Service menu. 3. Touch the Fax Service menu. 4. Touch the Run Fax Test option. The product prints a test report. 5. Review the report. 58 Chapter 7 Fax ENWW
-
 1
1 -
2
-
3
-
4
-
5
-
6
-
7
-
8
-
9
-
10
-
11
-
12
-
13
-
14
-
15
-
16
-
17
-
18
-
19
-
20
-
21
-
22
-
23
-
24
-
25
-
26
-
27
-
28
-
29
-
30
-
31
-
32
-
33
-
34
-
35
-
36
-
37
-
38
-
39
-
40
-
41
-
42
-
43
-
44
-
45
-
46
-
47
-
48
-
49
-
50
-
51
-
52
-
53
-
54
-
55
-
56
-
57
-
58
-
59
-
60
-
61
-
62
-
 63
63 -
 64
64 -
 65
65 -
 66
66 -
 67
67 -
 68
68 -
 69
69 -
 70
70 -
 71
71 -
 72
72 -
 73
73 -
74
-
75
-
76
-
77
-
78
-
79
-
80
-
81
-
82
-
83
-
84
-
85
-
86
-
87
-
88
-
89
-
90
-
91
-
92
-
93
-
94
-
95
-
96
-
97
-
98
-
99
-
100
-
101
-
102
-
103
-
104
-
105
-
106
-
107
-
108
-
109
-
110
-
111
-
112
-
113
-
114
-
115
-
116
-
117
-
118
-
119
-
120
-
121
-
122
-
123
-
124
-
125
-
126
-
127
-
128
-
129
-
130
-
131
-
132
-
133
-
134
-
135
-
136
-
137
-
138
-
139
-
140
-
141
-
142
-
143
-
144
 |
 |
