HP Dc7100 Hardware Reference Guide -- HP Compaq Business Desktops dc7100 Conve - Page 42
Installing a SATA Hard Drive into a 3.5-inch Drive Bay, Install four 6-32 standard guide screws
 |
UPC - 829160356877
View all HP Dc7100 manuals
Add to My Manuals
Save this manual to your list of manuals |
Page 42 highlights
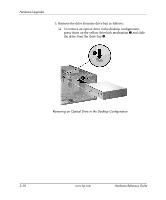
Hardware Upgrades Installing a SATA Hard Drive into a 3.5-inch Drive Bay ✎ Make sure to back up the data on the old hard drive before removing it so that you can install the data onto the new hard drive. To install a hard drive in a 3.5-inch drive bay: 1. IIf you have locked the Smart Cover Lock, restart the computer and enter Computer Setup to unlock the lock. 2. Turn off the computer properly through the operating system and turn off any external devices. Disconnect the power cord from the power outlet and remove the computer access panel. 3. Install four 6-32 standard guide screws, two on each side of the drive. Installing the Hard Drive Guide Screws ✎ The hard drive uses 6-32 standard guide screws. Four extra guide screws are installed on the hard drive bracket under the access panel. The HP-supplied standard screws are silver. 2-26 www.hp.com Hardware Reference Guide
-
 1
1 -
2
-
3
-
4
-
5
-
6
-
7
-
8
-
9
-
10
-
11
-
12
-
13
-
14
-
15
-
16
-
17
-
18
-
19
-
20
-
21
-
22
-
23
-
24
-
25
-
26
-
27
-
28
-
29
-
30
-
31
-
32
-
33
-
34
-
35
-
36
-
 37
37 -
 38
38 -
 39
39 -
 40
40 -
 41
41 -
 42
42 -
 43
43 -
 44
44 -
 45
45 -
 46
46 -
 47
47 -
48
-
49
-
50
-
51
-
52
-
53
-
54
-
55
-
56
-
57
-
58
-
59
-
60
-
61
-
62
-
63
-
64
-
65
-
66
-
67
-
68
-
69
-
70
-
71
-
72
-
73
-
74
-
75
-
76
 |
 |
