HP Dc7700 Quick Setup and Getting Started Guide - Page 22
Helpful Hints, Access the Business Support Center BSC
 |
UPC - 882780715318
View all HP Dc7700 manuals
Add to My Manuals
Save this manual to your list of manuals |
Page 22 highlights
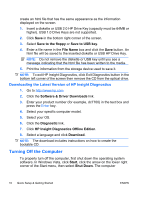
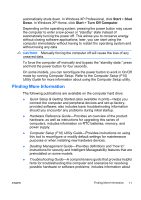
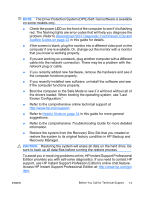
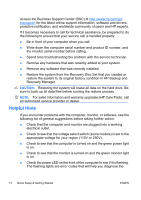
Access the Business Support Center (BSC) at http://www.hp.com/go/ bizsupport for the latest online support information, software and drivers, proactive notification, and worldwide community of peers and HP experts. If it becomes necessary to call for technical assistance, be prepared to do the following to ensure that your service call is handled properly: ● Be in front of your computer when you call. ● Write down the computer serial number and product ID number, and the monitor serial number before calling. ● Spend time troubleshooting the problem with the service technician. ● Remove any hardware that was recently added to your system. ● Remove any software that was recently installed. ● Restore the system from the Recovery Disc Set that you created or restore the system to its original factory condition in HP Backup and Recovery Manager. CAUTION: Restoring the system will erase all data on the hard drive. Be sure to back up all data files before running the restore process. NOTE: For sales information and warranty upgrades (HP Care Pack), call an authorized service provider or dealer. Helpful Hints If you encounter problems with the computer, monitor, or software, see the following list of general suggestions before taking further action: ● Check that the computer and monitor are plugged into a working electrical outlet. ● Check to see that the voltage select switch (some models) is set to the appropriate voltage for your region (115V or 230V). ● Check to see that the computer is turned on and the green power light is on. ● Check to see that the monitor is turned on and the green monitor light is on. ● Check the power LED on the front of the computer to see if it is flashing. The flashing lights are error codes that will help you diagnose the 14 Quick Setup & Getting Started ENWW
-
 1
1 -
2
-
3
-
4
-
5
-
6
-
7
-
8
-
9
-
10
-
11
-
12
-
13
-
14
-
15
-
16
-
 17
17 -
 18
18 -
 19
19 -
 20
20 -
 21
21 -
 22
22 -
 23
23 -
 24
24 -
 25
25 -
 26
26 -
 27
27 -
28
-
29
-
30
-
31
 |
 |
