HP Dc7700 Quick Setup and Getting Started Guide - Page 9
Quick Setup & Getting Started, Installing and Customizing the Software - windows 10
 |
UPC - 882780715318
View all HP Dc7700 manuals
Add to My Manuals
Save this manual to your list of manuals |
Page 9 highlights
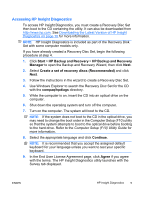
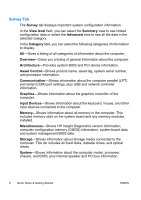
Quick Setup & Getting Started Installing and Customizing the Software NOTE: If the computer was shipped with Windows Vista loaded, you will be prompted to register the computer with HP Total Care before installing the operating system. You will see a brief movie followed by an online registration form. Fill out the form, click the Begin button, and follow the instructions on the screen. CAUTION: Do not add optional hardware or third-party devices to the computer until the operating system is successfully installed. Doing so may cause errors and prevent the operating system from installing properly. NOTE: Be sure there is a 10.2-cm (4-inch) clearance at the back of the unit and above the monitor to permit the required airflow. Installing the Operating System The first time you turn on the computer, the operating system is installed automatically. This process takes about 5 to 10 minutes, depending on which operating system is being installed. Carefully read and follow the instructions on the screen to complete the installation. CAUTION: Once the automatic installation has begun, DO NOT TURN OFF THE COMPUTER UNTIL THE PROCESS IS COMPLETE. Turning off the computer during the installation process may damage the software that runs the computer or prevent its proper installation. NOTE: If the computer shipped with more than one operating system language on the hard drive, the installation process could take up to 60 minutes. If your computer was not shipped with a Microsoft operating system, some portions of this documentation do not apply. Additional information is available in online help after you install the operating system. Downloading Microsoft Windows Updates 1. To set up your Internet connection, click Start > Internet Explorer and follow the instructions on the screen. 2. Once an Internet connection has been established, click the Start button. ENWW Installing and Customizing the Software 1
-
 1
1 -
2
-
3
-
 4
4 -
 5
5 -
 6
6 -
 7
7 -
 8
8 -
 9
9 -
 10
10 -
 11
11 -
 12
12 -
 13
13 -
 14
14 -
15
-
16
-
17
-
18
-
19
-
20
-
21
-
22
-
23
-
24
-
25
-
26
-
27
-
28
-
29
-
30
-
31
 |
 |