HP DeskJet Ink Advantage Ultra 5730 User Guide - Page 177
Case I: Shared voice/fax line with answering machine, Rings to, Answer
 |
View all HP DeskJet Ink Advantage Ultra 5730 manuals
Add to My Manuals
Save this manual to your list of manuals |
Page 177 highlights
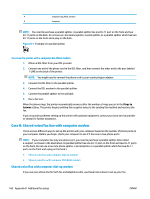
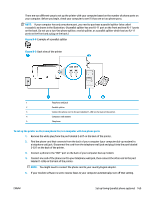
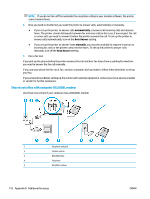
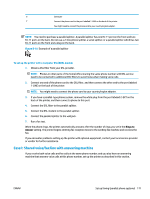
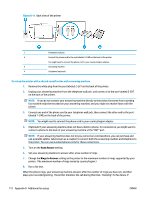
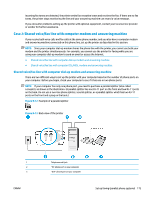
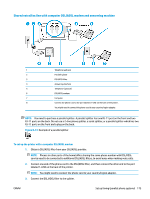
6 Computer 7 Connect the phone cord to the port labelled 1-LINE on the back of the printer. You might need to connect the phone cord to your country/region adapter. NOTE: You need to purchase a parallel splitter. A parallel splitter has one RJ-11 port on the front and two RJ-11 ports on the back. Do not use a 2-line phone splitter, a serial splitter, or a parallel splitter which has two RJ-11 ports on the front and a plug on the back. Figure B-10 Example of a parallel splitter To set up the printer with a computer DSL/ADSL modem 1. Obtain a DSL filter from your DSL provider. NOTE: Phones in other parts of the home/office sharing the same phone number with DSL service need to be connected to additional DSL filters to avoid noise when making voice calls. 2. Connect one end of the phone cord to the DSL filter, and then connect the other end to the port labeled 1-LINE on the back of the printer. NOTE: You might need to connect the phone cord to your country/region adapter. 3. If you have a parallel-type phone system, remove the white plug from the port labeled 2-EXT on the back of the printer, and then connect a phone to this port. 4. Connect the DSL filter to the parallel splitter. 5. Connect the DSL modem to the parallel splitter. 6. Connect the parallel splitter to the wall jack. 7. Run a fax test. When the phone rings, the printer automatically answers after the number of rings you set in the Rings to Answer setting. The printer begins emitting fax reception tones to the sending fax machine and receives the fax. If you encounter problems setting up the printer with optional equipment, contact your local service provider or vendor for further assistance. Case I: Shared voice/fax line with answering machine If you receive both voice calls and fax calls at the same phone number, and you also have an answering machine that answers voice calls at this phone number, set up the printer as described in this section. ENWW Set up faxing (parallel phone systems) 171
-
 1
1 -
2
-
3
-
4
-
5
-
6
-
7
-
8
-
9
-
10
-
11
-
12
-
13
-
14
-
15
-
16
-
17
-
18
-
19
-
20
-
21
-
22
-
23
-
24
-
25
-
26
-
27
-
28
-
29
-
30
-
31
-
32
-
33
-
34
-
35
-
36
-
37
-
38
-
39
-
40
-
41
-
42
-
43
-
44
-
45
-
46
-
47
-
48
-
49
-
50
-
51
-
52
-
53
-
54
-
55
-
56
-
57
-
58
-
59
-
60
-
61
-
62
-
63
-
64
-
65
-
66
-
67
-
68
-
69
-
70
-
71
-
72
-
73
-
74
-
75
-
76
-
77
-
78
-
79
-
80
-
81
-
82
-
83
-
84
-
85
-
86
-
87
-
88
-
89
-
90
-
91
-
92
-
93
-
94
-
95
-
96
-
97
-
98
-
99
-
100
-
101
-
102
-
103
-
104
-
105
-
106
-
107
-
108
-
109
-
110
-
111
-
112
-
113
-
114
-
115
-
116
-
117
-
118
-
119
-
120
-
121
-
122
-
123
-
124
-
125
-
126
-
127
-
128
-
129
-
130
-
131
-
132
-
133
-
134
-
135
-
136
-
137
-
138
-
139
-
140
-
141
-
142
-
143
-
144
-
145
-
146
-
147
-
148
-
149
-
150
-
151
-
152
-
153
-
154
-
155
-
156
-
157
-
158
-
159
-
160
-
161
-
162
-
163
-
164
-
165
-
166
-
167
-
168
-
169
-
170
-
171
-
 172
172 -
 173
173 -
 174
174 -
 175
175 -
 176
176 -
 177
177 -
 178
178 -
 179
179 -
 180
180 -
 181
181 -
 182
182 -
183
-
184
-
185
-
186
-
187
-
188
 |
 |
