HP EliteBook 8460p RAID - Windows 7 - Page 15
RAID volume setup - bios
 |
View all HP EliteBook 8460p manuals
Add to My Manuals
Save this manual to your list of manuals |
Page 15 highlights
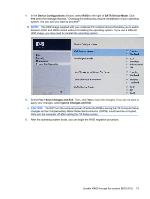
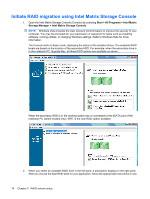
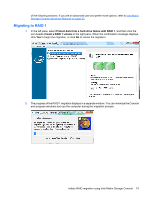
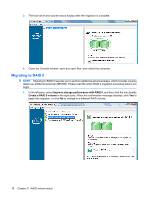
5 RAID volume setup The following instructions assume that a supported HDD is installed in the computer Upgrade Bay, in the SATA swappable bay of the docking station, or connected to the eSATA port of the notebook PC (see Devices supported on page 6). The basic RAID migration steps are as follows: ● Enable RAID through the system BIOS. ● Initiate RAID migration using the Intel® Matrix Storage Console. CAUTION: Make sure that the notebook PC is connected to AC power before initiating the following procedures. The loss of power during RAID migration can result in the loss of data. 11
-
 1
1 -
2
-
3
-
4
-
5
-
6
-
7
-
8
-
9
-
 10
10 -
 11
11 -
 12
12 -
 13
13 -
 14
14 -
 15
15 -
 16
16 -
 17
17 -
 18
18 -
 19
19 -
 20
20 -
21
-
22
-
23
-
24
-
25
-
26
-
27
-
28
-
29
-
30
-
31
-
32
-
33
-
34
-
35
 |
 |

5
RAID volume setup
The following instructions assume that a supported HDD is installed in the computer Upgrade Bay, in
the SATA swappable bay of the docking station, or connected to the eSATA port of the notebook PC
(see
Devices supported
on page
6
).
The basic RAID migration steps are as follows:
●
Enable RAID through the system BIOS.
●
Initiate RAID migration using the Intel® Matrix Storage Console.
CAUTION:
Make sure that the notebook PC is connected to AC power before initiating the following
procedures. The loss of power during RAID migration can result in the loss of data.
11