HP EliteBook 8460p RAID - Windows 7 - Page 30
Modify Volume Update Policy, Enable Continuous Updates, in the right pane.
 |
View all HP EliteBook 8460p manuals
Add to My Manuals
Save this manual to your list of manuals |
Page 30 highlights
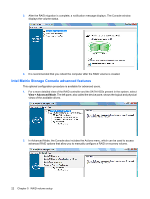
2. Click OK to confirm access to the recovery drive files. You can now open Windows Explorer to view the files. The update policy changes to on-request and the recovery volume flashes red in the Console window. 3. After you are finished viewing the files in Explorer, select Modify Volume Update Policy in the left pane, and then select the icon beside Enable Continuous Updates in the right pane. 26 Chapter 5 RAID volume setup
-
 1
1 -
2
-
3
-
4
-
5
-
6
-
7
-
8
-
9
-
10
-
11
-
12
-
13
-
14
-
15
-
16
-
17
-
18
-
19
-
20
-
21
-
22
-
23
-
24
-
 25
25 -
 26
26 -
 27
27 -
 28
28 -
 29
29 -
 30
30 -
 31
31 -
 32
32 -
 33
33 -
 34
34 -
 35
35
 |
 |

2.
Click
OK
to confirm access to the recovery drive files. You can now open Windows Explorer to
view the files. The update policy changes to on-request and the recovery volume flashes red in the
Console window.
3.
After you are finished viewing the files in Explorer, select
Modify Volume Update Policy
in the
left pane, and then select the icon beside
Enable Continuous Updates
in the right pane.
26
Chapter 5
RAID volume setup