HP EliteBook 8460p RAID - Windows 7 - Page 20
Migrating to RAID 0, Improve storage performance with RAID 0, Create a RAID 0 volume - usb 3 0
 |
View all HP EliteBook 8460p manuals
Add to My Manuals
Save this manual to your list of manuals |
Page 20 highlights
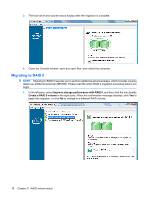
3. The hard drive and volume status display after the migration is complete. 4. Close the Console window, save any open files, and reboot the computer. Migrating to RAID 0 NOTE: Migrating to RAID 0 requires you to perform additional advanced steps, which includes copying data to an additional external USB HDD. Please read the entire RAID 0 migration procedure before you begin. 1. In the left pane, select Improve storage performance with RAID 0, and then click the icon beside Create a RAID 0 volume in the right pane. When the confirmation message displays, click Yes to begin the migration, or click No to change to a different RAID volume. 16 Chapter 5 RAID volume setup
-
 1
1 -
2
-
3
-
4
-
5
-
6
-
7
-
8
-
9
-
10
-
11
-
12
-
13
-
14
-
 15
15 -
 16
16 -
 17
17 -
 18
18 -
 19
19 -
 20
20 -
 21
21 -
 22
22 -
 23
23 -
 24
24 -
 25
25 -
26
-
27
-
28
-
29
-
30
-
31
-
32
-
33
-
34
-
35
 |
 |

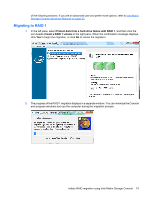
3.
The hard drive and volume status display after the migration is complete.
4.
Close the Console window, save any open files, and reboot the computer.
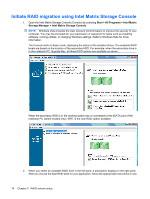
Migrating to RAID 0
NOTE:
Migrating to RAID 0 requires you to perform additional advanced steps, which includes copying
data to an additional external USB HDD. Please read the entire RAID 0 migration procedure before you
begin.
1.
In the left pane, select
Improve storage performance with RAID 0
, and then click the icon beside
Create a RAID 0 volume
in the right pane. When the confirmation message displays, click
Yes
to
begin the migration, or click
No
to change to a different RAID volume.
16
Chapter 5
RAID volume setup