HP EliteBook 8460p RAID - Windows 7 - Page 19
Migrating to RAID 1, Protect data from a hard drive failure with RAID 1, Create a RAID 1 volume
 |
View all HP EliteBook 8460p manuals
Add to My Manuals
Save this manual to your list of manuals |
Page 19 highlights
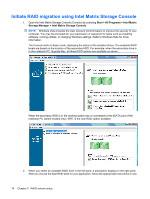
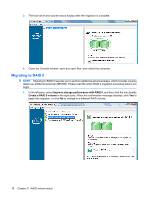
of the following sections. If you are an advanced user and prefer more options, refer to Intel Matrix Storage Console advanced features on page 22. Migrating to RAID 1 1. In the left pane, select Protect data from a hard drive failure with RAID 1, and then click the icon beside Create a RAID 1 volume in the right pane. When the confirmation message displays, click Yes to begin the migration, or click No to cancel the migration. 2. The progress of the RAID 1 migration displays in a separate window. You can minimize the Console and progress windows and use the computer during the migration process. Initiate RAID migration using Intel Matrix Storage Console 15
-
 1
1 -
2
-
3
-
4
-
5
-
6
-
7
-
8
-
9
-
10
-
11
-
12
-
13
-
 14
14 -
 15
15 -
 16
16 -
 17
17 -
 18
18 -
 19
19 -
 20
20 -
 21
21 -
 22
22 -
 23
23 -
 24
24 -
25
-
26
-
27
-
28
-
29
-
30
-
31
-
32
-
33
-
34
-
35
 |
 |

of the following sections. If you are an advanced user and prefer more options, refer to
Intel Matrix
Storage Console advanced features
on page
22
.
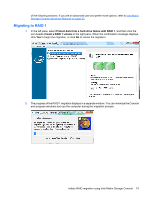
Migrating to RAID 1
1.
In the left pane, select
Protect data from a hard drive failure with RAID 1
, and then click the
icon beside
Create a RAID 1 volume
in the right pane. When the confirmation message displays,
click
Yes
to begin the migration, or click
No
to cancel the migration.
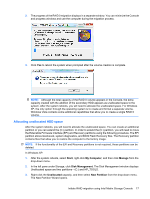
2.
The progress of the RAID 1 migration displays in a separate window. You can minimize the Console
and progress windows and use the computer during the migration process.
Initiate RAID migration using Intel Matrix Storage Console
15