HP EliteBook 8460p RAID - Windows 7 - Page 23
Select the amount of space in MB, Finish, Unallocated, New Simple Volume, FAT32
 |
View all HP EliteBook 8460p manuals
Add to My Manuals
Save this manual to your list of manuals |
Page 23 highlights
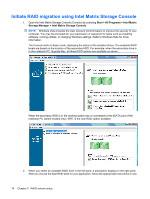
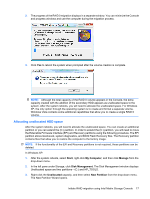
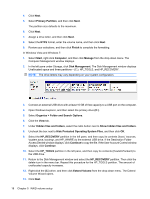
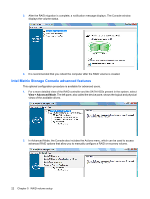
14. The amount of unallocated capacity (in MB) available to extend the (C:) drive is displayed next to Select the amount of space in MB. Subtract 10240 MB, which is equivalent to 10 GB, from the number displayed. For example, if 67584 MB (or 66 GB) is displayed, subtract 10240 MB to calculate 57344 MB (or 56 GB). Then replace the display capacity with the calculated capacity or press the down arrow until the calculated number appears. 15. Click Next, and then click Finish. The new RAID 0 volume capacity and 10 GB of unallocated capacity displays in the Disk Management window. 16. Create the HP_TOOLS partition as follows: a. Right-click the Unallocated capacity, and then click New Simple Volume from the drop-down menu. The New Simple Volume Wizard opens. b. Click Next. c. Enter 1024 MB in the space provided, and then click Next. d. Select the drive letter (E:), and then click Next. e. Select FAT32 as the File System. To the right of Volume label, enter the name HP_TOOLS. f. Click Next, and then click Finish. 17. Repeat the previous step to assign the drive letter (D:) to the remaining 9 GB of Unallocated capacity. Then format the partition as NTFS and name it HP_RECOVERY. 18. In Windows Explorer, copy the contents of the HP_TOOLS and HP_RECOVERY from the USB drive to the respective partitions. 19. In order for the HP Recovery functionality to work correctly (F11 during POST), the Boot Configuration Data (BCD) needs to be updated. The following commands need to be run in Administrator mode. It is recommended that a batch file (*.bat) is created with these commands and run rather than typing them in individually. NOTE: The commands assume the HP_RECOVERY partition is drive (D:). If it is different, replace D with the correct drive letter. BCDEDIT.EXE -store D:\Boot\BCD -create {ramdiskoptions} -d "Ramdisk Options" BCDEDIT.EXE -store D:\Boot\BCD -set {ramdiskoptions} ramdisksdidevice partition=D: BCDEDIT.EXE -store D:\Boot\BCD -set {ramdiskoptions} ramdisksdipath \boot\boot.sdi BCDEDIT.EXE -store D:\Boot\BCD -create {572bcd55-ffa7-11d9-aae0-0007e994107d} -d "HP Recovery Environment" -application OSLOADER BCDEDIT.EXE -store D:\Boot\BCD -set {572bcd55-ffa7-11d9-aae0-0007e994107d} device ramdisk=[D:]\sources\winre.wim,{ramdiskoptions} BCDEDIT.EXE -store D:\Boot\BCD -set {572bcd55-ffa7-11d9-aae0-0007e994107d} path \windows\system32\boot\winload.exe Initiate RAID migration using Intel Matrix Storage Console 19
-
 1
1 -
2
-
3
-
4
-
5
-
6
-
7
-
8
-
9
-
10
-
11
-
12
-
13
-
14
-
15
-
16
-
17
-
 18
18 -
 19
19 -
 20
20 -
 21
21 -
 22
22 -
 23
23 -
 24
24 -
 25
25 -
 26
26 -
 27
27 -
 28
28 -
29
-
30
-
31
-
32
-
33
-
34
-
35
 |
 |
