HP HP-380467-003 Getting Started Guide - Page 44
Click this tab to create backup discs of all the images
 |
UPC - 846084030171
View all HP HP-380467-003 manuals
Add to My Manuals
Save this manual to your list of manuals |
Page 44 highlights
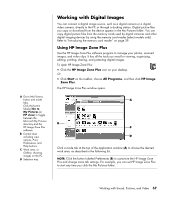
My Images Click this tab to find, view, manage, and print single or multiple photos or video clips. At the top of the control area (B), click All by date to view all your images, or choose Folders to browse for images. To select the images that you want to print or use, simply click the image (or images) in the gallery (C) and it appears in the selection tray (D). The selection tray images appear under every tab. For more information, see manage your images in Help. Edit Click this tab to make changes, such as crop and red eye removal, to the images and video clips you placed in the selection tray. For more information, see edit your images in Help. Projects Click this tab to create or to print a project using the images in the selection tray. Projects include photo album pages, cards, and flyers. For more information, see create projects in Help. HP Instant Share™ Click this tab to share photos with family and friends. Using HP Instant Share, you can create an e-mail, select the pictures to include, and then send your message. HP Instant Share creates thumbnails of your images that the recipients can view immediately in the message instead of opening a large e-mail attachment. To view the original photo, they can click on a thumbnail in their message, which links them to a secure Web page. On the Web page, they can see the photos, order prints (if the service is available in your country/region), save the images to their PC, and other tasks. For more information, see share your images in Help. NOTE: You must be connected to the Internet to use the HP Instant Share feature. Backup and Restore Click this tab to create backup discs of all the images on your PC or to restore images (either from a backup disc or from an automatically created digital negative). Pictures to Go Click this tab to send photos to a mapped drive (such as a flash memory card or USB flash drive), or to synchronize photos on an HP iPaq. You can utilize the date, keyword, and album organization information to choose which photos to send, or choose the photos manually. Deleting the keep current option for synchronizing with an iPaq automatically updates the photos on the device every time it synchronizes. For more information on using HP Image Zone Plus, click the Help link in the control area (B) of the program window. 38 Getting Started Guide
-
 1
1 -
2
-
3
-
4
-
5
-
6
-
7
-
8
-
9
-
10
-
11
-
12
-
13
-
14
-
15
-
16
-
17
-
18
-
19
-
20
-
21
-
22
-
23
-
24
-
25
-
26
-
27
-
28
-
29
-
30
-
31
-
32
-
33
-
34
-
35
-
36
-
37
-
38
-
 39
39 -
 40
40 -
 41
41 -
 42
42 -
 43
43 -
 44
44 -
 45
45 -
 46
46 -
 47
47 -
 48
48 -
 49
49 -
50
-
51
-
52
-
53
-
54
-
55
-
56
-
57
-
58
-
59
-
60
-
61
-
62
-
63
-
64
-
65
-
66
-
67
-
68
-
69
-
70
-
71
-
72
-
73
-
74
-
75
-
76
-
77
-
78
-
79
-
80
-
81
-
82
-
83
-
84
-
85
-
86
-
87
-
88
-
89
-
90
-
91
-
92
-
93
-
94
-
95
-
96
-
97
-
98
-
99
-
100
-
101
-
102
-
103
-
104
-
105
-
106
-
107
-
108
-
109
-
110
-
111
-
112
-
113
-
114
 |
 |