HP LaserJet 5000 HP LaserJet 5000, 5000 N, and 5000 GN Printers - Quick Refere - Page 14
Printing Tasks - 9
 |
View all HP LaserJet 5000 manuals
Add to My Manuals
Save this manual to your list of manuals |
Page 14 highlights
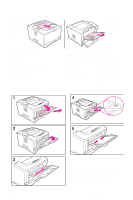
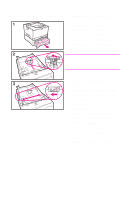
A BA 4 Tilt the blue rear guide toward the front of the tray to detach it. 5 Align the rear guide with the desired paper size. With the guide angled slightly toward the front of the tray, insert the two front tabs (A) into the appropriate holes. Push the guide upright, snapping the center tab (B) into place. The guide must always be placed correctly in the tray (even for 11 x 17 or A3 paper). 6 Adjust the side guides to the proper size. Continued on the next page. EN Printing Tasks - 9
-
 1
1 -
2
-
3
-
4
-
5
-
6
-
7
-
8
-
 9
9 -
 10
10 -
 11
11 -
 12
12 -
 13
13 -
 14
14 -
 15
15 -
 16
16 -
 17
17 -
 18
18 -
 19
19 -
20
-
21
-
22
-
23
-
24
-
25
-
26
-
27
-
28
-
29
-
30
-
31
-
32
-
33
-
34
-
35
-
36
-
37
-
38
 |
 |

Printing Tasks - 9
EN
4
Tilt the blue rear guide toward
the front of the tray to detach it.
5
Align the rear guide with the
desired paper size. With the
guide angled slightly toward the
front of the tray, insert the two
front tabs (A) into the
appropriate holes. Push the
guide upright, snapping the
center tab (B) into place.
The guide must always be
placed correctly in the tray (even
for 11 x 17 or A3 paper).
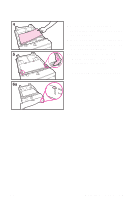
6
Adjust the side guides to the
proper size.
Continued on the next page.
A
B
A