HP LaserJet Enterprise M604 User Guide 1 - Page 117
Connect the power cord to the product., product. Close the rear output bin.
 |
View all HP LaserJet Enterprise M604 manuals
Add to My Manuals
Save this manual to your list of manuals |
Page 117 highlights
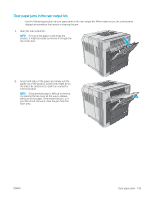
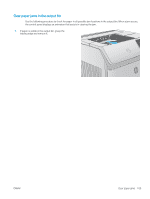
9. Replace the rear output bin. Insert the right hingepin into the hole inside the product. Push inward on the left hinge, and slide it into the hole inside the product. Close the rear output bin. 10. Connect the power cord to the product. ENWW Clear paper jams 107
-
 1
1 -
2
-
3
-
4
-
5
-
6
-
7
-
8
-
9
-
10
-
11
-
12
-
13
-
14
-
15
-
16
-
17
-
18
-
19
-
20
-
21
-
22
-
23
-
24
-
25
-
26
-
27
-
28
-
29
-
30
-
31
-
32
-
33
-
34
-
35
-
36
-
37
-
38
-
39
-
40
-
41
-
42
-
43
-
44
-
45
-
46
-
47
-
48
-
49
-
50
-
51
-
52
-
53
-
54
-
55
-
56
-
57
-
58
-
59
-
60
-
61
-
62
-
63
-
64
-
65
-
66
-
67
-
68
-
69
-
70
-
71
-
72
-
73
-
74
-
75
-
76
-
77
-
78
-
79
-
80
-
81
-
82
-
83
-
84
-
85
-
86
-
87
-
88
-
89
-
90
-
91
-
92
-
93
-
94
-
95
-
96
-
97
-
98
-
99
-
100
-
101
-
102
-
103
-
104
-
105
-
106
-
107
-
108
-
109
-
110
-
111
-
 112
112 -
 113
113 -
 114
114 -
 115
115 -
 116
116 -
 117
117 -
 118
118 -
 119
119 -
 120
120 -
 121
121 -
 122
122 -
123
-
124
-
125
-
126
-
127
-
128
-
129
-
130
-
131
-
132
-
133
-
134
-
135
-
136
-
137
-
138
-
139
-
140
 |
 |

9.
Replace the rear output bin. Insert the right hinge-
pin into the hole inside the product. Push inward on
the left hinge, and slide it into the hole inside the
product. Close the rear output bin.
10.
Connect the power cord to the product.
ENWW
Clear paper jams
107