HP LaserJet P2010 Service Manual - Page 26
Connect the printer to the network, Install the printer software for the network printer
 |
View all HP LaserJet P2010 manuals
Add to My Manuals
Save this manual to your list of manuals |
Page 26 highlights
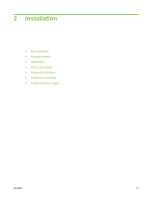
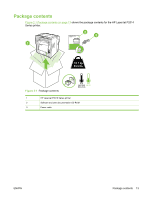
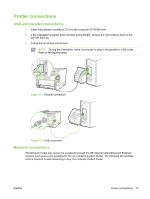
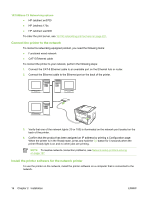
10/100Base-TX Networking options ● HP Jetdirect en3700 ● HP Jetdirect 175x ● HP Jetdirect ew2400 To order the print server, see 10/100 networking print servers on page 227. Connect the printer to the network To connect a networking-equipped product, you need the following items: ● Functional wired network ● CAT-5 Ethernet cable To connect the printer to your network, perform the following steps: 1. Connect the CAT-5 Ethernet cable to an available port on the Ethernet hub or router. 2. Connect the Ethernet cable to the Ethernet port on the back of the printer. 3. Verify that one of the network lights (10 or 100) is illuminated on the network port located on the back of the printer. 4. Confirm that the product has been assigned an IP address by printing a Configuration page: When the printer is in the Ready state, press and hold the Go button for 5 seconds when the printer Ready light is on and no other jobs are printing. NOTE: To resolve network connection problems, see Network-setup problem-solving on page 157. Install the printer software for the network printer To use the printer on the network, install the printer software on a computer that is connected to the network. 16 Chapter 2 Installation ENWW
-
 1
1 -
2
-
3
-
4
-
5
-
6
-
7
-
8
-
9
-
10
-
11
-
12
-
13
-
14
-
15
-
16
-
17
-
18
-
19
-
20
-
 21
21 -
 22
22 -
 23
23 -
 24
24 -
 25
25 -
 26
26 -
 27
27 -
 28
28 -
 29
29 -
 30
30 -
 31
31 -
32
-
33
-
34
-
35
-
36
-
37
-
38
-
39
-
40
-
41
-
42
-
43
-
44
-
45
-
46
-
47
-
48
-
49
-
50
-
51
-
52
-
53
-
54
-
55
-
56
-
57
-
58
-
59
-
60
-
61
-
62
-
63
-
64
-
65
-
66
-
67
-
68
-
69
-
70
-
71
-
72
-
73
-
74
-
75
-
76
-
77
-
78
-
79
-
80
-
81
-
82
-
83
-
84
-
85
-
86
-
87
-
88
-
89
-
90
-
91
-
92
-
93
-
94
-
95
-
96
-
97
-
98
-
99
-
100
-
101
-
102
-
103
-
104
-
105
-
106
-
107
-
108
-
109
-
110
-
111
-
112
-
113
-
114
-
115
-
116
-
117
-
118
-
119
-
120
-
121
-
122
-
123
-
124
-
125
-
126
-
127
-
128
-
129
-
130
-
131
-
132
-
133
-
134
-
135
-
136
-
137
-
138
-
139
-
140
-
141
-
142
-
143
-
144
-
145
-
146
-
147
-
148
-
149
-
150
-
151
-
152
-
153
-
154
-
155
-
156
-
157
-
158
-
159
-
160
-
161
-
162
-
163
-
164
-
165
-
166
-
167
-
168
-
169
-
170
-
171
-
172
-
173
-
174
-
175
-
176
-
177
-
178
-
179
-
180
-
181
-
182
-
183
-
184
-
185
-
186
-
187
-
188
-
189
-
190
-
191
-
192
-
193
-
194
-
195
-
196
-
197
-
198
-
199
-
200
-
201
-
202
-
203
-
204
-
205
-
206
-
207
-
208
-
209
-
210
-
211
-
212
-
213
-
214
-
215
-
216
-
217
-
218
-
219
-
220
-
221
-
222
-
223
-
224
-
225
-
226
-
227
-
228
-
229
-
230
-
231
-
232
-
233
-
234
-
235
-
236
-
237
-
238
-
239
-
240
-
241
-
242
-
243
-
244
-
245
-
246
-
247
-
248
-
249
-
250
-
251
-
252
-
253
-
254
-
255
-
256
-
257
-
258
-
259
-
260
-
261
-
262
-
263
-
264
-
265
-
266
-
267
-
268
 |
 |