HP Latex 110 Users Guide - Page 120
Cannot insert a printhead
 |
View all HP Latex 110 manuals
Add to My Manuals
Save this manual to your list of manuals |
Page 120 highlights
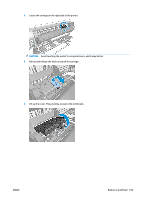
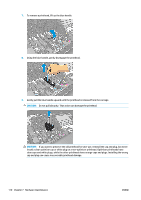
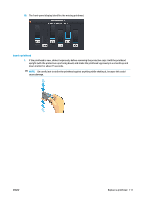
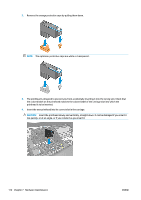
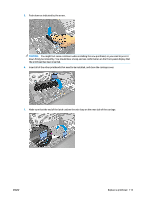
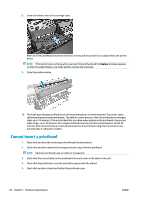
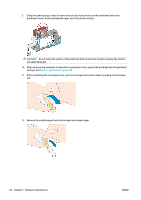
8. Lower the latch to rest on the carriage cover. When all of the printheads have been inserted correctly and the printer has accepted them, the printer beeps. NOTE: If the printer does not beep when you insert the printhead and the Replace message appears on the front-panel display, you might need to reinsert the printhead. 9. Close the printer window. 10. The front-panel display confirms that all of the printheads are correctly inserted. The printer starts checking and preparing the printheads. The default routine process, when all printheads are changed, takes up to 18 minutes. If the printer identifies a problem when preparing the printheads, the process takes longer, up to 30 minutes. For a single printhead insertion, the time varies between 10 and 20 minutes. After all printheads are checked and prepared, the printhead realignment procedure runs automatically if substrate is loaded. Cannot insert a printhead 1. Check that you have the correct type of printhead (model number). 2. Check that you have removed the orange protective caps from the printhead. NOTE: Optimizer printhead caps are white or transparent. 3. Check that the colored label on the printhead is the same color as the label on the slot. 4. Check that the printhead is correctly oriented (compare with the others). 5. Check that you have closed and latched the printhead cover. 114 Chapter 7 Hardware maintenance ENWW
-
 1
1 -
2
-
3
-
4
-
5
-
6
-
7
-
8
-
9
-
10
-
11
-
12
-
13
-
14
-
15
-
16
-
17
-
18
-
19
-
20
-
21
-
22
-
23
-
24
-
25
-
26
-
27
-
28
-
29
-
30
-
31
-
32
-
33
-
34
-
35
-
36
-
37
-
38
-
39
-
40
-
41
-
42
-
43
-
44
-
45
-
46
-
47
-
48
-
49
-
50
-
51
-
52
-
53
-
54
-
55
-
56
-
57
-
58
-
59
-
60
-
61
-
62
-
63
-
64
-
65
-
66
-
67
-
68
-
69
-
70
-
71
-
72
-
73
-
74
-
75
-
76
-
77
-
78
-
79
-
80
-
81
-
82
-
83
-
84
-
85
-
86
-
87
-
88
-
89
-
90
-
91
-
92
-
93
-
94
-
95
-
96
-
97
-
98
-
99
-
100
-
101
-
102
-
103
-
104
-
105
-
106
-
107
-
108
-
109
-
110
-
111
-
112
-
113
-
114
-
 115
115 -
 116
116 -
 117
117 -
 118
118 -
 119
119 -
 120
120 -
 121
121 -
 122
122 -
 123
123 -
 124
124 -
 125
125 -
126
-
127
-
128
-
129
-
130
-
131
-
132
-
133
-
134
-
135
-
136
-
137
-
138
-
139
-
140
-
141
-
142
-
143
-
144
-
145
-
146
-
147
-
148
-
149
-
150
-
151
-
152
-
153
-
154
-
155
-
156
-
157
-
158
-
159
-
160
 |
 |
