HP Latex 110 Users Guide - Page 54
None of these, I will choose it later, If you are loading transparent substrate without opaque borders
 |
View all HP Latex 110 manuals
Add to My Manuals
Save this manual to your list of manuals |
Page 54 highlights
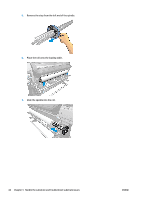
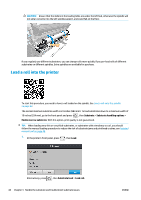
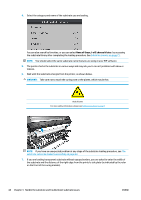
4. Select the category and name of the substrate you are loading. You can also search by favorites, or you can select None of these, I will choose it later: by accessing the substrate library after completing the loading procedure. See Substrate presets on page 71. NOTE: You should select the same substrate name that you are using in your RIP software. 5. The printer checks the substrate in various ways and may ask you to correct problems with skew or tension. 6. Wait until the substrate emerges from the printer, as shown below. WARNING! Take care not to touch the curing zone or the platen, which may be hot. Risk of burns For more safety information, please see Safety precautions on page 3 NOTE: If you have an unexpected problem at any stage of the substrate loading procedure, see The substrate cannot be loaded successfully on page 63. 7. If you are loading transparent substrate without opaque borders, you are asked to enter the width of the substrate and the distance of the right edge from the printer's side plate (as indicated by the ruler on the front of the curing module). 48 Chapter 3 Handle the substrate and troubleshoot substrate issues ENWW
-
 1
1 -
2
-
3
-
4
-
5
-
6
-
7
-
8
-
9
-
10
-
11
-
12
-
13
-
14
-
15
-
16
-
17
-
18
-
19
-
20
-
21
-
22
-
23
-
24
-
25
-
26
-
27
-
28
-
29
-
30
-
31
-
32
-
33
-
34
-
35
-
36
-
37
-
38
-
39
-
40
-
41
-
42
-
43
-
44
-
45
-
46
-
47
-
48
-
 49
49 -
 50
50 -
 51
51 -
 52
52 -
 53
53 -
 54
54 -
 55
55 -
 56
56 -
 57
57 -
 58
58 -
 59
59 -
60
-
61
-
62
-
63
-
64
-
65
-
66
-
67
-
68
-
69
-
70
-
71
-
72
-
73
-
74
-
75
-
76
-
77
-
78
-
79
-
80
-
81
-
82
-
83
-
84
-
85
-
86
-
87
-
88
-
89
-
90
-
91
-
92
-
93
-
94
-
95
-
96
-
97
-
98
-
99
-
100
-
101
-
102
-
103
-
104
-
105
-
106
-
107
-
108
-
109
-
110
-
111
-
112
-
113
-
114
-
115
-
116
-
117
-
118
-
119
-
120
-
121
-
122
-
123
-
124
-
125
-
126
-
127
-
128
-
129
-
130
-
131
-
132
-
133
-
134
-
135
-
136
-
137
-
138
-
139
-
140
-
141
-
142
-
143
-
144
-
145
-
146
-
147
-
148
-
149
-
150
-
151
-
152
-
153
-
154
-
155
-
156
-
157
-
158
-
159
-
160
 |
 |
