| Section |
Page |
| Device basics |
13 |
| Device comparison |
14 |
| Features comparison |
15 |
| Walkaround |
18 |
| Accessories and supplies |
19 |
| Interface ports |
20 |
| Locking and unlocking optional accessories |
21 |
| Device software |
22 |
| Supported operating systems |
22 |
| Supported printer drivers |
22 |
| Select the correct printer driver |
23 |
| Universal printer drivers |
23 |
| Driver Autoconfiguration |
23 |
| Update Now |
24 |
| HP Driver Preconfiguration |
24 |
| Priority for print settings |
24 |
| Open the printer drivers |
25 |
| Software for Macintosh computers |
26 |
| Remove software from Macintosh operating systems |
26 |
| Utilities |
27 |
| HP Web Jetadmin |
27 |
| Embedded Web server |
27 |
| HP Easy Printer Care software |
28 |
| Supported operating systems |
28 |
| Supported browsers |
28 |
| Other components and utilities |
28 |
| Control Panel |
29 |
| Use the control panel |
30 |
| Control-panel layout |
30 |
| Home screen |
31 |
| Buttons on the touchscreen |
32 |
| Control-panel help system |
32 |
| Navigate the Administration menu |
33 |
| Information menu |
34 |
| Default Job Options menu |
35 |
| Default Options for Originals |
35 |
| Default Copy Options |
36 |
| Default Fax Options |
37 |
| Default E-mail Options |
38 |
| Default Send to Folder Options |
39 |
| Default Print Options |
40 |
| Time/Scheduling menu |
41 |
| Management menu |
43 |
| Initial Setup menu |
44 |
| Networking and I/O |
44 |
| Fax Setup |
52 |
| E-mail Setup |
55 |
| Send Setup menu |
55 |
| Device Behavior menu |
56 |
| Print Quality menu |
61 |
| Troubleshooting menu |
63 |
| Resets menu |
67 |
| Service menu |
68 |
| Input/output (I/O) |
69 |
| USB configuration |
70 |
| Network configuration |
71 |
| Configure TCP/IPv4 parameters |
71 |
| Set an IP address |
71 |
| Set the subnet mask |
72 |
| Set the default gateway |
72 |
| Configure TCP/IPv6 parameters |
73 |
| Disable network protocols (optional) |
73 |
| Disable IPX/SPX |
73 |
| Disable AppleTalk |
74 |
| Disable DLC/LLC |
74 |
| HP Jetdirect EIO print servers |
74 |
| Media and trays |
75 |
| General media specifications |
76 |
| General guidelines for media |
77 |
| Paper to avoid |
77 |
| Paper that can damage the device |
77 |
| General media specifications |
78 |
| Media considerations |
79 |
| Envelopes |
79 |
| Envelopes with double side seams |
79 |
| Envelopes with adhesive strips or flaps |
80 |
| Envelope margins |
80 |
| Envelope storage |
80 |
| Labels |
80 |
| Label construction |
81 |
| Transparencies |
81 |
| Card stock and heavy media |
81 |
| Card stock construction |
81 |
| Card stock guidelines |
82 |
| Letterhead and preprinted forms |
82 |
| Select the correct fuser mode |
82 |
| Select print media |
84 |
| Printing and paper-storage environment |
89 |
| Load media |
90 |
| Load the flatbed scanner |
90 |
| Load the ADF |
90 |
| Load tray1 |
90 |
| Load trays 2, 3, 4 and 5 |
91 |
| Load special media |
95 |
| Load envelopes |
95 |
| Load labels |
96 |
| Load transparencies |
97 |
| Load letterhead, prepunched, or preprinted paper |
97 |
| Load paper that has a special finish |
98 |
| Load small sizes, custom sizes, or heavy paper |
99 |
| Weight and sizes |
99 |
| Guidelines for heavy paper |
99 |
| Guidelines for custom-size paper |
100 |
| Additional guidelines for small or narrow paper |
100 |
| Control print jobs |
101 |
| Select output bins |
102 |
| Select an output location |
102 |
| 3‑bin mailbox output bins |
102 |
| Selecting face-up or face-down output for copy jobs |
102 |
| Use device features |
105 |
| Use the stapler |
106 |
| Configure the printer driver to recognize the optional stapler |
106 |
| Staple media |
106 |
| Load staples |
108 |
| Use job storage features |
110 |
| Gain access to the job storage features |
110 |
| Use the proof and hold feature |
110 |
| Create a proof and hold job |
110 |
| Print the remaining copies of a proof and hold job |
111 |
| Delete a proof and hold job |
111 |
| Use the private job feature |
112 |
| Create a private job |
112 |
| Print a private job |
112 |
| Delete a private job |
112 |
| Use the QuickCopy feature |
113 |
| Create a QuickCopy job |
113 |
| Print additional copies of a QuickCopy job |
113 |
| Delete a QuickCopy job |
113 |
| Use the stored job feature |
114 |
| Create a stored copy job |
114 |
| Create a stored print job |
114 |
| Print a stored job |
114 |
| Delete a stored job |
115 |
| Print |
117 |
| Use features in the Windows printer driver |
118 |
| Create and use quick sets |
118 |
| Use watermarks |
119 |
| Resize documents |
119 |
| Set a custom paper size from the printer driver |
120 |
| Use different paper and printing covers |
120 |
| Print a blank first page |
120 |
| Print multiple pages on one sheet of paper |
121 |
| Print on both sides of the paper |
122 |
| Use automatic duplex printing |
122 |
| Print on both sides manually |
123 |
| Layout options for printing on both sides |
123 |
| Use the Services tab |
124 |
| Use features in the Macintosh printer driver |
125 |
| Create and use presets |
125 |
| Print a cover page |
126 |
| Print multiple pages on one sheet of paper |
126 |
| Print on both sides of the paper |
127 |
| Cancel a print job |
128 |
| Stop the current print job from the control panel |
128 |
| Stop the current print job from the software program |
128 |
| Copy |
129 |
| Use the Copy screen |
130 |
| Set the default copy options |
131 |
| Basic copy instructions |
132 |
| Copy from the scanner glass |
132 |
| Copy from the document feeder |
132 |
| Adjust the copy settings |
133 |
| Copy two-sided documents |
134 |
| Copying two-sided documents manually |
134 |
| Copy two-sided documents automatically (duplex models only) |
134 |
| Copy mixed-size originals |
136 |
| Change the copy-collation setting |
137 |
| Copy photos and books |
138 |
| Combine copy jobs by using Job Build |
139 |
| Cancel a copy job |
140 |
| Scan and send to e-mail |
141 |
| Configure e-mail settings |
142 |
| Supported protocols |
142 |
| Configure e-mail server settings |
142 |
| Find gateways |
143 |
| Find the SMTP gateway from the device control panel |
143 |
| Find the SMTP gateway from an e-mail program |
143 |
| Use the Send E-mail screen |
144 |
| Perform basic e-mail functions |
145 |
| Load documents |
145 |
| Send documents |
145 |
| Send a document |
145 |
| Use the auto-complete function |
146 |
| Use the address book |
147 |
| Create a recipient list |
147 |
| Use the local address book |
147 |
| Add e-mail addresses to the local address book |
148 |
| Delete e-mail addresses from the local address book |
148 |
| Change e‑mail settings for the current job |
149 |
| Scan to a folder |
150 |
| Scan to a workflow destination |
151 |
| Fax |
153 |
| Analog fax |
154 |
| Install the fax accessory |
154 |
| Connect the fax accessory to a phone line |
156 |
| Configure and use the fax features |
157 |
| Digital fax |
158 |
| Manage and maintain the device |
159 |
| Use information pages |
160 |
| Configure e-mail alerts |
162 |
| HPEasy Printer Care software |
163 |
| Open the HP Easy Printer Care software |
163 |
| HP Easy Printer Care software sections |
163 |
| Use the embedded Web server |
165 |
| Open the embedded Web server by using a network connection |
165 |
| Embedded Web server sections |
165 |
| Use HP Web Jetadmin software |
168 |
| Use the HPPrinter Utility for Macintosh |
169 |
| Open the HP Printer Utility |
169 |
| HP Printer Utility features |
169 |
| Manage supplies |
171 |
| Supplies life expectancy |
171 |
| Change the print cartridge |
171 |
| Manage the print cartridge |
171 |
| Print-cartridge storage |
171 |
| Use genuine HP print cartridges |
171 |
| HP policy on non-HP print cartridges |
172 |
| Print-cartridge authentication |
172 |
| HP fraud hotline and Web site |
172 |
| Clean the device |
173 |
| Clean the exterior |
173 |
| Clean the scanner glass |
173 |
| Clean the scanner lid backing |
174 |
| Clean the paper path |
174 |
| Clean the document feeder |
174 |
| Clean the document feeder delivery system |
175 |
| Clean the document feeder-rollers |
176 |
| Calibrate the scanner |
178 |
| Problem solving |
179 |
| Problem-solving checklist |
180 |
| Factors that affect performance |
180 |
| Problem-solving flowchart |
181 |
| Solve general device problems |
186 |
| Control-panel message types |
189 |
| Control-panel messages |
190 |
| Common causes of jams |
200 |
| Clear jams |
201 |
| Clear jams from the top-cover and print-cartridge areas |
202 |
| Clear jams from the optional envelope-feeder area |
204 |
| Clear jams from the tray1 area |
206 |
| Clear jams from the tray2, 3, 4, or 5 areas |
207 |
| Clear jams from the optional duplexer |
209 |
| Clear jams from the output areas |
210 |
| Clear jams from the fuser |
211 |
| Clear jams from the document feeder |
214 |
| Solve repeated jams |
215 |
| Paper-path test |
216 |
| Clear staple jams |
217 |
| Solve print-quality problems |
219 |
| Print-quality problems associated with media |
219 |
| Print-quality problems associated with the environment |
219 |
| Print-quality problems associated with jams |
219 |
| Image defect examples |
219 |
| Light print (partial page) |
221 |
| Light print (entire page) |
221 |
| Specks |
221 |
| Dropouts |
222 |
| Lines |
222 |
| Gray background |
223 |
| Toner smear |
223 |
| Loose toner |
224 |
| Repeating defects |
224 |
| Repeating image |
224 |
| Misformed characters |
225 |
| Page skew |
225 |
| Curl or wave |
226 |
| Wrinkles or creases |
226 |
| Vertical white lines |
227 |
| Tire tracks |
227 |
| White spots on black |
227 |
| Scattered lines |
228 |
| Blurred print |
228 |
| Random image repetition |
229 |
| Solve network printing problems |
230 |
| Solve copy problems |
231 |
| Prevent copy problems |
231 |
| Image problems |
231 |
| Media-handling problems |
232 |
| Performance problems |
234 |
| Solve fax problems |
235 |
| Solve sending problems |
235 |
| Solve receiving problems |
236 |
| Solve e-mail problems |
238 |
| Validate the SMTP gateway address |
238 |
| Validate the LDAP gateway address |
238 |
| Solve common Windows problems |
239 |
| Solve common Macintosh problems |
240 |
| Solve Linux problems |
243 |
| Solve PostScript problems |
244 |
| General problems |
244 |
| Accessories and consumables |
245 |
| Order parts, accessories, and supplies |
246 |
| Order directly from HP |
246 |
| Order through service or support providers |
246 |
| Order directly through the embedded Web server (for printers that are connected to a network) |
246 |
| Order directly through the HP Easy Printer Care software |
246 |
| Part numbers |
247 |
| Accessories |
247 |
| Print cartridges |
247 |
| Maintenance kits |
248 |
| Memory |
248 |
| Cables and interfaces |
248 |
| Print media |
248 |
| Service and support |
251 |
| Hewlett-Packard limited warranty statement |
251 |
| Print cartridge limited warranty statement |
252 |
| Customer Self Repair Warranty Service |
253 |
| HP Customer Care |
254 |
| Online Services |
254 |
| Telephone support |
254 |
| Software utilities, drivers, and electronic information |
254 |
| HP direct ordering for accessories or supplies |
254 |
| HP service information |
254 |
| HP service agreements |
254 |
| HP Easy Printer Care software |
255 |
| HP support and information for Macintosh computers |
255 |
| HP maintenance agreements |
256 |
| On-site service agreements |
256 |
| Next-day on-site service |
256 |
| Weekly (volume) on-site service |
256 |
| Repacking the device |
256 |
| Extended warranty |
257 |
| Specifications |
259 |
| Physical specifications |
260 |
| Electrical specifications |
260 |
| Acoustic specifications |
261 |
| Operating environment |
262 |
| Regulatory information |
263 |
| FCC regulations |
264 |
| Environmental product stewardship program |
265 |
| Protecting the environment |
265 |
| Ozone production |
265 |
| Power consumption |
265 |
| Toner consumption |
265 |
| Paper use |
265 |
| Plastics |
265 |
| HP LaserJet print supplies |
266 |
| HP print supplies returns and recycling program information |
266 |
| Paper |
266 |
| Material restrictions |
267 |
| Disposal of waste equipment by users in private households in the European Union |
267 |
| Material Safety Data Sheet (MSDS) |
268 |
| For more information |
268 |
| Telecom statement |
269 |
| Declaration of conformity |
270 |
| Safety statements |
271 |
| Laser safety |
271 |
| Canadian DOC regulations |
271 |
| VCCI statement (Japan) |
271 |
| Power cord statement (Japan) |
271 |
| EMI statement (Korea) |
271 |
| Laser statement for Finland |
271 |
| Working with memory and print server cards |
273 |
| Overview |
274 |
| Adding printer memory |
275 |
| Installing printer memory |
275 |
| Checking DIMM installation |
278 |
| Save resources (permanent resources) |
279 |
| Enabling memory for Windows |
280 |
| Using HPJetdirect print server cards |
281 |
| Install an HP Jetdirect print server card |
281 |
| Remove an HP Jetdirect print server card |
282 |
 1
1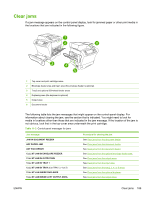 201
201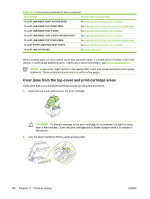 202
202 203
203 204
204 205
205 206
206 207
207 208
208 209
209 210
210 211
211

