HP Officejet Pro 8100 User Guide - Page 81
Clear jams, Clear paper jams
 |
View all HP Officejet Pro 8100 manuals
Add to My Manuals
Save this manual to your list of manuals |
Page 81 highlights
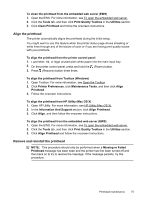
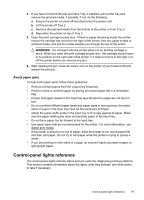
5. Make sure the latch handle is raised, and then reinsert the printhead. 6. Carefully lower the latch handle. NOTE: Make sure you lower the latch handle before reinserting the ink cartridges. Leaving the latch handle raised can result in incorrectly seated ink cartridges and problems printing. The latch must remain down in order to correctly install the ink cartridges. 7. Close the ink-cartridge access door and the top cover. Clear jams Occasionally, media becomes jammed during a job. Try the following remedies before you attempt to clear the jam. • Make sure that you are printing with media that meets specifications. For more information, see Media specifications. • Make sure that you are printing with media that is not wrinkled, folded, or damaged. • Make sure that the printer is clean. For more information, see Maintain the printer. • Make sure that the trays are loaded correctly and are not too full. For more information, see Load media. This section contains the following topics: • Clear paper jams • Avoid paper jams Clear paper jams If the paper was loaded in the input tray, you might need to clear the paper jam from the duplexer. Clear jams 77
-
 1
1 -
2
-
3
-
4
-
5
-
6
-
7
-
8
-
9
-
10
-
11
-
12
-
13
-
14
-
15
-
16
-
17
-
18
-
19
-
20
-
21
-
22
-
23
-
24
-
25
-
26
-
27
-
28
-
29
-
30
-
31
-
32
-
33
-
34
-
35
-
36
-
37
-
38
-
39
-
40
-
41
-
42
-
43
-
44
-
45
-
46
-
47
-
48
-
49
-
50
-
51
-
52
-
53
-
54
-
55
-
56
-
57
-
58
-
59
-
60
-
61
-
62
-
63
-
64
-
65
-
66
-
67
-
68
-
69
-
70
-
71
-
72
-
73
-
74
-
75
-
 76
76 -
 77
77 -
 78
78 -
 79
79 -
 80
80 -
 81
81 -
 82
82 -
 83
83 -
 84
84 -
 85
85 -
 86
86 -
87
-
88
-
89
-
90
-
91
-
92
-
93
-
94
-
95
-
96
-
97
-
98
-
99
-
100
-
101
-
102
-
103
-
104
-
105
-
106
-
107
-
108
-
109
-
110
-
111
-
112
-
113
-
114
-
115
-
116
-
117
-
118
-
119
-
120
-
121
-
122
-
123
-
124
-
125
-
126
-
127
-
128
-
129
-
130
-
131
-
132
-
133
-
134
-
135
-
136
-
137
-
138
-
139
-
140
-
141
-
142
-
143
-
144
-
145
-
146
 |
 |
