HP Officejet Pro 8500A Getting Started Guide - Page 6
Requirements, Finding e-mail settings - a910a
 |
View all HP Officejet Pro 8500A manuals
Add to My Manuals
Save this manual to your list of manuals |
Page 6 highlights
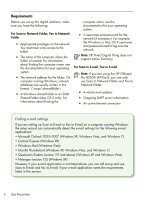
Requirements Before you set up the digital solutions, make sure you have the following: For Scan to Network Folder, Fax to Network Folder • Appropriate privileges on the network. You must have write access to the folder. • The name of the computer where the folder is located. For information about finding the computer name, see the documentation for your operating system. • The network address for the folder. On computer running Windows, network addresses are usually written in this format: \\mypc\sharedfolder\ • A Windows shared folder or an SMB Shared Folder (Mac OS X only). For information about finding the computer name, see the documentation for your operating system. • A username and password for the network (if necessary). For example, the Windows or Mac OS X username and password used to log onto the network. Note: HP Direct Digital Filing does not support Active Directory. For Scan to E-mail, Fax to E-mail Note: If you are using the HP Officejet Pro 8500A (A910a-f), you can only use Scan to Network Folder and Fax to Network Folder. • A valid e-mail address • Outgoing SMTP server information • An active Internet connection Finding e-mail settings If you are setting up Scan to E-mail or Fax to E-mail on a computer running Windows, the setup wizard can automatically detect the e-mail settings for the following e-mail applications: • Microsoft Outlook 2003-2007 (Windows XP, Windows Vista, and Windows 7) • Outlook Express (Windows XP) • Windows Mail (Windows Vista) • Mozilla Thunderbird (Windows XP, Windows Vista, and Windows 7) • Qualcomm Eudora (version 7.0 and above) (Windows XP and Windows Vista) • Netscape (version 7.0) (Windows XP) However, if your e-mail application is not listed above, you can still set up and use Scan to E-mail and Fax to E-mail if your e-mail application meets the requirements listed in this section. 4 Use the printer
-
 1
1 -
 2
2 -
 3
3 -
 4
4 -
 5
5 -
 6
6 -
 7
7 -
 8
8 -
 9
9 -
 10
10 -
 11
11 -
 12
12 -
13
-
14
-
15
-
16
-
17
-
18
-
19
-
20
-
21
-
22
-
23
-
24
-
25
-
26
-
27
-
28
-
29
-
30
-
31
-
32
-
33
-
34
-
35
-
36
-
37
-
38
-
39
-
40
-
41
-
42
-
43
-
44
-
45
-
46
-
47
-
48
-
49
-
50
-
51
-
52
-
53
-
54
-
55
-
56
-
57
-
58
-
59
-
60
-
61
-
62
-
63
-
64
-
65
-
66
-
67
-
68
 |
 |