HP Pavilion dv6-6000 HP Pavilion dv6 Notebook PC - Maintenance and Service Gui - Page 96
Fan/heat sink assembly see
 |
View all HP Pavilion dv6-6000 manuals
Add to My Manuals
Save this manual to your list of manuals |
Page 96 highlights
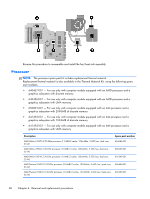
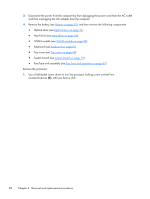
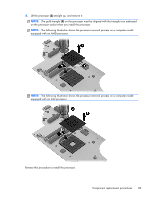
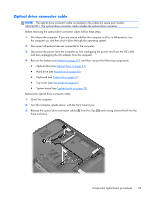
3. Disconnect the power from the computer by first unplugging the power cord from the AC outlet and then unplugging the AC adapter from the computer. 4. Remove the battery (see Battery on page 50), and then remove the following components: ● Optical drive (see Optical drive on page 51) ● Hard drive (see Hard drive on page 54) ● WLAN module (see WLAN module on page 58) ● Keyboard (see Keyboard on page 61) ● Top cover (see Top cover on page 65) ● System board (see System board on page 78) ● Fan/heat sink assembly (see Fan/heat sink assembly on page 82) Remove the processor: 1. Use a flat-bladed screw driver to turn the processor locking screw one-half turn counterclockwise (1), until you hear a click. 88 Chapter 4 Removal and replacement procedures
-
 1
1 -
2
-
3
-
4
-
5
-
6
-
7
-
8
-
9
-
10
-
11
-
12
-
13
-
14
-
15
-
16
-
17
-
18
-
19
-
20
-
21
-
22
-
23
-
24
-
25
-
26
-
27
-
28
-
29
-
30
-
31
-
32
-
33
-
34
-
35
-
36
-
37
-
38
-
39
-
40
-
41
-
42
-
43
-
44
-
45
-
46
-
47
-
48
-
49
-
50
-
51
-
52
-
53
-
54
-
55
-
56
-
57
-
58
-
59
-
60
-
61
-
62
-
63
-
64
-
65
-
66
-
67
-
68
-
69
-
70
-
71
-
72
-
73
-
74
-
75
-
76
-
77
-
78
-
79
-
80
-
81
-
82
-
83
-
84
-
85
-
86
-
87
-
88
-
89
-
90
-
 91
91 -
 92
92 -
 93
93 -
 94
94 -
 95
95 -
 96
96 -
 97
97 -
 98
98 -
 99
99 -
 100
100 -
 101
101 -
102
-
103
-
104
-
105
-
106
-
107
-
108
-
109
-
110
-
111
-
112
-
113
-
114
-
115
-
116
-
117
-
118
-
119
-
120
-
121
-
122
-
123
-
124
-
125
-
126
-
127
-
128
-
129
-
130
-
131
-
132
-
133
-
134
-
135
-
136
-
137
-
138
 |
 |
