HP ProBook 4525s Installing SATA Drivers on HP Notebook PCs - White Paper - Page 5
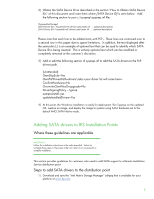
Adding SATA Drivers to an Installation CD, Where these guidelines are applicable - xp drivers
 |
View all HP ProBook 4525s manuals
Add to My Manuals
Save this manual to your list of manuals |
Page 5 highlights
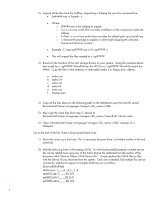
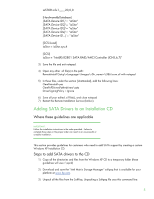
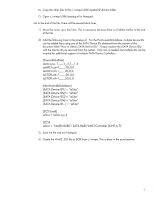
iaSTOR.inf=1,,,,,,,20,0,0 [HardwareIdsDatabase] [SATA Device ID1] = "iaStor" [SATA Device ID2] = "iaStor" [SATA Device ID3] = "iaStor" [SATA Device ID4] = "iaStor" [SATA Device ID...] = "iaStor" [SCSI.Load] iaStor = iaStor.sys,4 [SCSI] iaStor = "Intel(R) 82801 SATA RAID/AHCI Controller (ICH5,6,7)" 3) Save the file and exit notepad. 4) Open any other .sif file(s) in the path: RemoteInstall\Setup\\Images\\i386\xxxx.sif with notepad 5) In these files, under the section [Unattended], add the following lines: OemPreinstall=yes OemPnPDriversPath=drivers\sata DriverSigningPolicy = Ignore 6) Save all your edited .sif file(s), and close notepad 7) Restart the Remote Installation Service (binlsvc). Adding SATA Drivers to an Installation CD Where these guidelines are applicable IMPORTANT: Follow the installation instructions in the order provided. Failure to complete these steps in the proper order can result in an unsuccessful or unstable installation. This section provides guidelines for customers who need to add SATA support by creating a custom Windows XP Installation CD. Steps to add SATA drivers to the CD 1) Copy all the directories and files from the Windows XP CD to a temporary folder (these guidelines will use c:\xpcd) 2) Download and save the "Intel Matrix Storage Manager" softpaq that is available for your platform at www.hp.com. 3) Unpack all the files from the SoftPaq. Unpacking a Softpaq file uses this command line: 5
-
 1
1 -
 2
2 -
 3
3 -
 4
4 -
 5
5 -
 6
6 -
 7
7 -
 8
8 -
 9
9 -
 10
10 -
 11
11 -
12
-
13
-
14
-
15
-
16
-
17
-
18
-
19
-
20
 |
 |