HP Surestore 15 Slot with DLT7000 HP SureStore DLT Tape Library Models 4115w/4 - Page 27
Clip Nuts Back Rails
 |
View all HP Surestore 15 Slot with DLT7000 manuals
Add to My Manuals
Save this manual to your list of manuals |
Page 27 highlights
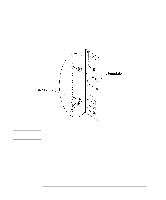
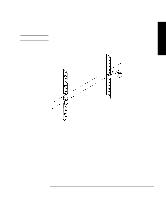
NOTE Figure 1-7 Installing the Tape Library Step 4: Mount the Library in a Rack (optional) 2. Attach two clip nuts to each of the back rails so that the slides will be level when attached to the rails. Count the holes on the front and back rails to ensure the slides will be level. Clip Nuts (Back Rails) Installation 1-13
-
 1
1 -
2
-
3
-
4
-
5
-
6
-
7
-
8
-
9
-
10
-
11
-
12
-
13
-
14
-
15
-
16
-
17
-
18
-
19
-
20
-
21
-
 22
22 -
 23
23 -
 24
24 -
 25
25 -
 26
26 -
 27
27 -
 28
28 -
 29
29 -
 30
30 -
 31
31 -
 32
32 -
33
-
34
-
35
-
36
-
37
-
38
-
39
-
40
-
41
-
42
-
43
-
44
-
45
-
46
-
47
-
48
-
49
-
50
-
51
-
52
-
53
-
54
-
55
-
56
-
57
-
58
-
59
-
60
-
61
-
62
-
63
-
64
-
65
-
66
-
67
-
68
-
69
-
70
-
71
-
72
-
73
-
74
-
75
-
76
-
77
-
78
-
79
-
80
-
81
-
82
-
83
-
84
-
85
-
86
-
87
-
88
-
89
-
90
-
91
-
92
-
93
-
94
-
95
-
96
-
97
-
98
-
99
-
100
-
101
-
102
-
103
-
104
-
105
-
106
-
107
-
108
-
109
-
110
-
111
-
112
-
113
-
114
-
115
-
116
-
117
-
118
-
119
-
120
-
121
-
122
-
123
-
124
-
125
-
126
-
127
-
128
-
129
-
130
-
131
-
132
-
133
-
134
-
135
-
136
 |
 |

1-13
Installing the Tape Library
Step 4: Mount the Library in a Rack (optional)
Installation
2.
Attach two clip nuts to each of the back rails so that the slides will be level when
attached to the rails.
NOTE
Count the holes on the front and back rails to ensure the slides will be level.
Figure 1-7
Clip Nuts (Back Rails)