HP Surestore 15 Slot with DLT7000 HP SureStore DLT Tape Library Models 4115w/4 - Page 31
Place the Library in the Rack
 |
View all HP Surestore 15 Slot with DLT7000 manuals
Add to My Manuals
Save this manual to your list of manuals |
Page 31 highlights
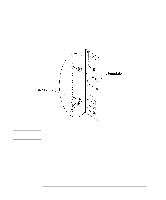
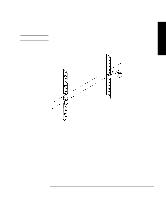
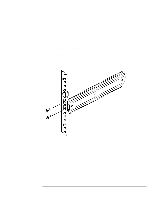
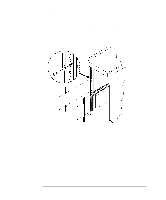
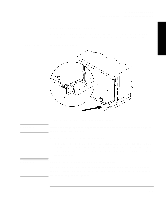
Figure 1-11 Installing the Tape Library Step 4: Mount the Library in a Rack (optional) Place the Library in the Rack 1. Attach the cable strain relief bracket to the library rear panel below the SCSI connectors using one 6-32 x 3/8 pan phlp, with internal lockwasher screw. Strain Relief Bracket Installation WARNING WARNING 2. Ensure that the rack's anti-tip rails are extended. Failure to extend the rack's anti-tip rail could result in personal injury and/or damage to the tape library. 3. Remove the keys from the library handle. 4. Important - two people needed: Lift the library onto the slides and back slightly into the rack using the side handles. Make sure the handles sit securely on the slides and that the front holes in the library line up with the second hole from the front on the slides. Do not attempt to move the tape library by yourself. The tape library weighs approximately 100 pounds (45 kilograms). To avoid personal injury and/or damage to the tape library, a minimum of two people are needed to move the library. 1-17
-
 1
1 -
2
-
3
-
4
-
5
-
6
-
7
-
8
-
9
-
10
-
11
-
12
-
13
-
14
-
15
-
16
-
17
-
18
-
19
-
20
-
21
-
22
-
23
-
24
-
25
-
 26
26 -
 27
27 -
 28
28 -
 29
29 -
 30
30 -
 31
31 -
 32
32 -
 33
33 -
 34
34 -
 35
35 -
 36
36 -
37
-
38
-
39
-
40
-
41
-
42
-
43
-
44
-
45
-
46
-
47
-
48
-
49
-
50
-
51
-
52
-
53
-
54
-
55
-
56
-
57
-
58
-
59
-
60
-
61
-
62
-
63
-
64
-
65
-
66
-
67
-
68
-
69
-
70
-
71
-
72
-
73
-
74
-
75
-
76
-
77
-
78
-
79
-
80
-
81
-
82
-
83
-
84
-
85
-
86
-
87
-
88
-
89
-
90
-
91
-
92
-
93
-
94
-
95
-
96
-
97
-
98
-
99
-
100
-
101
-
102
-
103
-
104
-
105
-
106
-
107
-
108
-
109
-
110
-
111
-
112
-
113
-
114
-
115
-
116
-
117
-
118
-
119
-
120
-
121
-
122
-
123
-
124
-
125
-
126
-
127
-
128
-
129
-
130
-
131
-
132
-
133
-
134
-
135
-
136
 |
 |
