HP XM600 hp kayak xm600, installing and replacing hardware parts in your pc wo
HP XM600 - Kayak - 128 MB RAM Manual
 |
View all HP XM600 manuals
Add to My Manuals
Save this manual to your list of manuals |
HP XM600 manual content summary:
- HP XM600 | hp kayak xm600, installing and replacing hardware parts in your pc wo - Page 1
information about installing accessories and replacing hardware parts in your PC Workstation. HP UltraFlow Airflow Guide Power Supply Unit Rear Fan Spare mounting rails (not shown) for: your dealer for an up-to-date list of supported devices or check the HP web site: http://www.hp.com/go/kayak. - HP XM600 | hp kayak xm600, installing and replacing hardware parts in your pc wo - Page 2
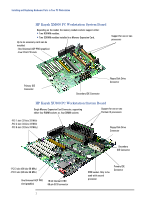
Support for one or two processors Primary IDE Connector Secondary IDE Connector Floppy Disk Drive Connector HP Kayak XU800 PC Workstation System Board Single Memory Expansion Card Connector, supporting SCSI connector 2 VRM socket. Only to be used with second processor Primary IDE Connector - HP XM600 | hp kayak xm600, installing and replacing hardware parts in your pc wo - Page 3
Section. 1 Switch off the display and computer. Disconnect all power cables and any LAN or telecommunications cables. 2 Unscrew the two thumb screws located at the back of the PC Workstation. 3 Standing at the back of the PC Workstation, slide the cover towards you until it clicks into place - HP XM600 | hp kayak xm600, installing and replacing hardware parts in your pc wo - Page 4
Parts in Your PC Workstation Removing and Replacing Standing at the back of the PC, lower the cover onto the chassis (aligning the guide rail on the bottom inside edge of the cover with the bottom edge of the PC chassis). 4 Shut the cover ensuring that the guides on the top of the cover slide - HP XM600 | hp kayak xm600, installing and replacing hardware parts in your pc wo - Page 5
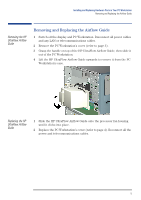
HP UltraFlow Airflow Guide upwards to remove it from the PC Workstation's case. Replacing the HP UltraFlow Airflow Guide 1 Slide the HP UltraFlow Airflow Guide onto the processor fan housing until it clicks into place. 2 Replace the PC Workstation's cover (refer to page 4). Reconnect all the power - HP XM600 | hp kayak xm600, installing and replacing hardware parts in your pc wo - Page 6
off the display and PC Workstation. Disconnect all power cables and any LAN or telecommunications cables. 2 Remove the PC Workstation's cover (refer to page 3 for instructions). 3 Remove the HP UltraFlow Airflow Guide (refer to page 5). 4 If you intend to: a Remove a Processor: Press the retention - HP XM600 | hp kayak xm600, installing and replacing hardware parts in your pc wo - Page 7
A VRM is not required on the HP Kayak XM600 PC Workstation. 3 Replace the HP UltraFlow Airflow Guide (refer to page 5). 4 Replace the PC Workstation's cover (refer to page 4). Reconnect all the power and telecommunications cables. The processor type and speed is automatically recognized by the BIOS - HP XM600 | hp kayak xm600, installing and replacing hardware parts in your pc wo - Page 8
PC Workstation Removing, Replacing and Upgrading Memory on HP Kayak XM600 Models Shipped with SDRAM Removing, Replacing and Upgrading Memory on HP Kayak XM600 Models Shipped with SDRAM Upgrading SDRAM Memory SDRAM models of the HP Kayak XM600 are supplied with a Memory Expansion Card supporting - HP XM600 | hp kayak xm600, installing and replacing hardware parts in your pc wo - Page 9
a continuity module. Removing the Memory Expansion Card 1 Switch off the display and PC Workstation. Disconnect all power cables and any LAN or telecommunications cables. 2 Remove the PC Workstation's cover (refer to page 3 for instructions). 3 Remove the HP UltraFlow Airflow Guide (refer to page - HP XM600 | hp kayak xm600, installing and replacing hardware parts in your pc wo - Page 10
Hardware Parts in Your PC Workstation Removing, Replacing and Upgrading Memory on HP Kayak XM600 Models Shipped with SDRAM Replacing the Memory Expansion Card 6 Release the retaining screw located on the Memory Expansion Card. Then remove the screw from accessory card slot. 7 Open the two - HP XM600 | hp kayak xm600, installing and replacing hardware parts in your pc wo - Page 11
PC Workstation Removing, Replacing and Upgrading Memory on HP Kayak XM600 Models Shipped with RDRAM Removing, Replacing and Upgrading Memory on HP Kayak XM600 Models Shipped with RDRAM Upgrading RDRAM Memory RDRAM models of the HP Kayak XM600 PC Workstation support one or two RAMBUS Direct RAM - HP XM600 | hp kayak xm600, installing and replacing hardware parts in your pc wo - Page 12
Hardware Parts in Your PC Workstation Removing, Replacing and Upgrading Memory on HP Kayak XM600 Models Shipped with RDRAM 8 Check the HP Summary Screen to verify the new configuration (refer to "Viewing the HP Summary Screen" in the Section on "Setting Up and Using Your PC Workstation"). 12 - HP XM600 | hp kayak xm600, installing and replacing hardware parts in your pc wo - Page 13
Installing and Replacing Hardware Parts in Your PC Workstation Memory Upgrades on the HP Kayak XU800 Memory Upgrades on the HP Kayak XU800 NOTE There is a single Memory Expansion Card connector on the system board that supports a Memory Expansion Card installed with either RIMM or DIMM sockets. - HP XM600 | hp kayak xm600, installing and replacing hardware parts in your pc wo - Page 14
the Memory Expansion Card Removing the Memory Expansion Card 1 Switch off the display and PC Workstation. Disconnect all power cables and any LAN or telecommunications cables. 2 Remove the PC Workstation's cover (refer to page 3 for instructions). 3 Remove the HP UltraFlow Airflow Guide (refer - HP XM600 | hp kayak xm600, installing and replacing hardware parts in your pc wo - Page 15
in Your PC Workstation Memory Upgrades on the HP Kayak XU800 Replacing the Memory Expansion Card 8 Remove memory modules and any continuity modules from the old Memory Expansion Card, then install them in the same positions on the new Memory Expansion Card. 1 Install the Memory Expansion Card so - HP XM600 | hp kayak xm600, installing and replacing hardware parts in your pc wo - Page 16
Memory Upgrades on the HP Kayak XU800 Installing or Replacing a Memory Module NOTE 1 Switch off the display and PC Workstation. Disconnect all power cables and any LAN or telecommunications cables. 2 Remove the PC Workstation's cover (refer to page 3). 3 Remove the HP UltraFlow Airflow Guide - HP XM600 | hp kayak xm600, installing and replacing hardware parts in your pc wo - Page 17
(refer to page 4). Reconnect all cables and power cords. HP Kayak XM600 Upgrades The HP Kayak XM600 has five 32-bit 33 MHz, 5 V PCI accessory card slots and one Universal AGP PRO slot on the system board. HP Kayak XU800 Upgrades There are five PCI accessory card slots: • Three 32-bit 33 MHz PCI - HP XM600 | hp kayak xm600, installing and replacing hardware parts in your pc wo - Page 18
Installing and Replacing Hardware Parts in Your PC Workstation Removing and Replacing a PCI Accessory Card The following table shows the various PCI card installations for the different PCI slots on the HP Kayak XU800: PCI Card 5 V 3.3 V Universal (3.3 V or 5 V compatible) PCI Slot Slots 1, 2 - HP XM600 | hp kayak xm600, installing and replacing hardware parts in your pc wo - Page 19
CD-ROM drive, CD-RW drive, or tape drive, you need to connect it to power and data cables. The data cables and connectors provided are shown below. There are three data cables inside your PC Workstation. Two of these are for IDE devices. The following table explains which data connectors you should - HP XM600 | hp kayak xm600, installing and replacing hardware parts in your pc wo - Page 20
Parts in Your PC Workstation Installing Mass Storage Devices Before Installing an IDE Hard Disk • The ATA IDE cable supports two IDE devices guide to check jumper settings or if there is a special installation procedure to follow. HP Kayak XM600 Cables and Connectors Primary IDE cable supports - HP XM600 | hp kayak xm600, installing and replacing hardware parts in your pc wo - Page 21
Workstation Installing Mass Storage Devices HP Kayak XU800 Cables and Connectors Secondary IDE cable for access devices such as CD-ROM Drives, Zip Drives or Hard Disk Drives Primary IDE cable supports CD-ROM Drives 16-bit SCSI Terminator connector located on the system board (behind the processor - HP XM600 | hp kayak xm600, installing and replacing hardware parts in your pc wo - Page 22
for HP Kayak XM600 and XU800 PCs Power Cable for 3.5-inch Floppy Disk Drive Power Cables for Hard Disk Drives, Zip Drives, Tape Drives, CD-RW, CD-ROM Drives and DVD drives Additional Guide Rails Attached on the side of the front access cage (inside the PC Workstation), additional guide rails - HP XM600 | hp kayak xm600, installing and replacing hardware parts in your pc wo - Page 23
PC Workstation. Disconnect all power cables and any LAN or telecommunications cables. 2 Remove the PC Workstation's cover (refer to page 3 for instructions). 3 Disconnect the data and power the two short blue guide rails by gently prying them off the hard disk drive. These guide rails will be - HP XM600 | hp kayak xm600, installing and replacing hardware parts in your pc wo - Page 24
connectors facing towards you and positioned at the bottom), and the guide rail "R" on the righthand side of the hard disk drive. Devices", on page 19. 5 Replace the PC Workstation's cover (refer to page 4). Reconnect all the power and telecommunications cables. 6 Turn to page 30 to complete - HP XM600 | hp kayak xm600, installing and replacing hardware parts in your pc wo - Page 25
and PC Workstation. Disconnect all power cables and any LAN or telecommunications cables. 2 Remove the PC Workstation's cover (refer to page 3 for instructions). 3 If the primary hard disk drive is installed in the top shelf, disconnect the data and power cables. 4 Add the short blue guide rails - HP XM600 | hp kayak xm600, installing and replacing hardware parts in your pc wo - Page 26
in the Front Access Cage 1 Switch off the display and PC Workstation. Disconnect all power cables and any LAN or telecommunications cables. 2 Remove the PC Workstation's cover and front upper bezel (refer to page 3 for instructions). 3 Depending on the accessory to be installed, either: a Remove the - HP XM600 | hp kayak xm600, installing and replacing hardware parts in your pc wo - Page 27
and Replacing Hardware Parts in Your PC Workstation Installing an Accessory in the Front Access Cage 5 Align the guide rails on both sides of the drive with the internal shelf guides and then slide the drive until it clicks into position. ™ š 6 Connect the power and data cables to the installed - HP XM600 | hp kayak xm600, installing and replacing hardware parts in your pc wo - Page 28
Drive (or DVD-Drive) 1 Switch off the display and PC Workstation. Disconnect all power cables and any LAN or telecommunications cables. 2 Remove the PC Workstation's cover and front upper bezel (refer to page 3 for instructions). 3 Disconnect the power and data cables from the old drive. 4 Place one - HP XM600 | hp kayak xm600, installing and replacing hardware parts in your pc wo - Page 29
PC Workstation. Disconnect all power cables and any LAN or telecommunications cables. 2 Remove the PC Workstation's cover and front upper bezel (refer to page 3 for these instructions). 3 Disconnect the power two short green guide rails by gently prying them off the drive. These guide rails will be - HP XM600 | hp kayak xm600, installing and replacing hardware parts in your pc wo - Page 30
Configuration Utility... is displayed during the PC Workstation's start-up routine. 3 Verify or modify the configuration of your new SCSI hard disk drive. For more information on configuring a SCSI hard disk drive, refer to the SCSI Administrator's Guide available on HP's web site at http://www - HP XM600 | hp kayak xm600, installing and replacing hardware parts in your pc wo - Page 31
Hewlett-Packard does not support power supply upgrades. This information is provided to help you replace a defective power supply unit. For your safety, only replace with a power supply unit provided by HP support services. Removing the Power Supply Unit 1 Switch off the display and PC Workstation - HP XM600 | hp kayak xm600, installing and replacing hardware parts in your pc wo - Page 32
PC Workstation Replacing the Power Supply Unit Installing the Power Supply Unit 1 Insert the new power supply unit. 2 Secure it in position using the three screws that you removed in steps 6 and 7. 3 Reconnect all internal power supply connectors. 4 Replace the HP UltraFlow Airflow Guide (refer - HP XM600 | hp kayak xm600, installing and replacing hardware parts in your pc wo - Page 33
instructions). 4 To ease installation, place your PC Workstation on its side with the system board facing upwards. 5 Remove the PC chassis retaining bar. 6 Disconnect any cables attached to the system board. 7 Remove the main memory (on some models, remove the Memory Expansion Card), processor and - HP XM600 | hp kayak xm600, installing and replacing hardware parts in your pc wo - Page 34
9 Replace the PC Workstation's cover (refer to page 4). Reconnect all the power and telecommunications cables. 10 After installing the system board, you need to update your BIOS. NOTE The latest BIOS for your PC and instructions on updating the BIOS are available from: www.hp.com/go/kayaksupport - HP XM600 | hp kayak xm600, installing and replacing hardware parts in your pc wo - Page 35
Fan Replacing the Rear Fan 1 Switch off the display and PC Workstation. Disconnect all power cables and any LAN or telecommunications cables. 2 Remove the PC Workstation's cover (refer to page 3 for instructions). 3 Remove the HP UltraFlow Airflow Guide (refer to page 5). 4 From the rear of the - HP XM600 | hp kayak xm600, installing and replacing hardware parts in your pc wo - Page 36
between the power supply unit and processor. 3 Align the processor fan clips with their corresponding sockets. 4 Gently push the rear fan towards the rear panel connectors, until it clicks into place. 5 Replace the HP UltraFlow Airflow Guide (refer to page 5). 6 Replace the PC Workstation's cover - HP XM600 | hp kayak xm600, installing and replacing hardware parts in your pc wo - Page 37
on its side with the system board facing upwards. 5 Remove the PC chassis retaining bar. 6 For Kayak XU800 PC Workstations, remove the Memory Expansion Card. If required, refer to page 14 for instructions. 7 Remove the screw from the front of the chassis. 8 Unclip the three clips on the - HP XM600 | hp kayak xm600, installing and replacing hardware parts in your pc wo - Page 38
and speaker cables to their connectors located on the system board. 4 For HP Kayak XU800 PC Workstations, replace the Memory Expansion Card and secure it in place with the retaining screw. If required, refer to page 14 for instructions. 5 Replace the screw on the front of the chassis. 6 Replace the - HP XM600 | hp kayak xm600, installing and replacing hardware parts in your pc wo - Page 39
Parts in Your PC Workstation System Board Switches System Board Switches HP Kayak XM600 PC Workstation There are ten system power-on. OFF disables this option. 7 OFF Enables normal modes. ON enables the BIOS recovery mode at next boot. 8 OFF Retains CMOS memory. ON clears CMOS memory - HP XM600 | hp kayak xm600, installing and replacing hardware parts in your pc wo - Page 40
Replacing Hardware Parts in Your PC Workstation System Board Switches HP Kayak XU800 PC Workstation There are ten system board switches Retains CMOS memory. DOWN clears CMOS memory at next boot. 5 UP Reserved 5-6. Do Not change Default Settings 6 DOWN 7 DOWN Enables keyboard power-on. UP - HP XM600 | hp kayak xm600, installing and replacing hardware parts in your pc wo - Page 41
them, or to the dealer from whom you purchased your PC Workstation, or to HP, so that they can be either recycled or disposed of in PC stores. To change the battery: 1 Disconnect the PC Workstation's power supply cord and any connection to a telecommunications network. 1 Remove the PC Workstation
-
 1
1 -
 2
2 -
 3
3 -
 4
4 -
 5
5 -
 6
6 -
 7
7 -
8
-
9
-
10
-
11
-
12
-
13
-
14
-
15
-
16
-
17
-
18
-
19
-
20
-
21
-
22
-
23
-
24
-
25
-
26
-
27
-
28
-
29
-
30
-
31
-
32
-
33
-
34
-
35
-
36
-
37
-
38
-
39
-
40
-
41
 |
 |
Installing and Replacing Hardware
Parts in Your PC Workstation
This chapter provides information about installing accessories and
replacing hardware parts in your PC Workstation.
Contact your dealer for an up-to-date list of supported devices or check the
HP web site:
.
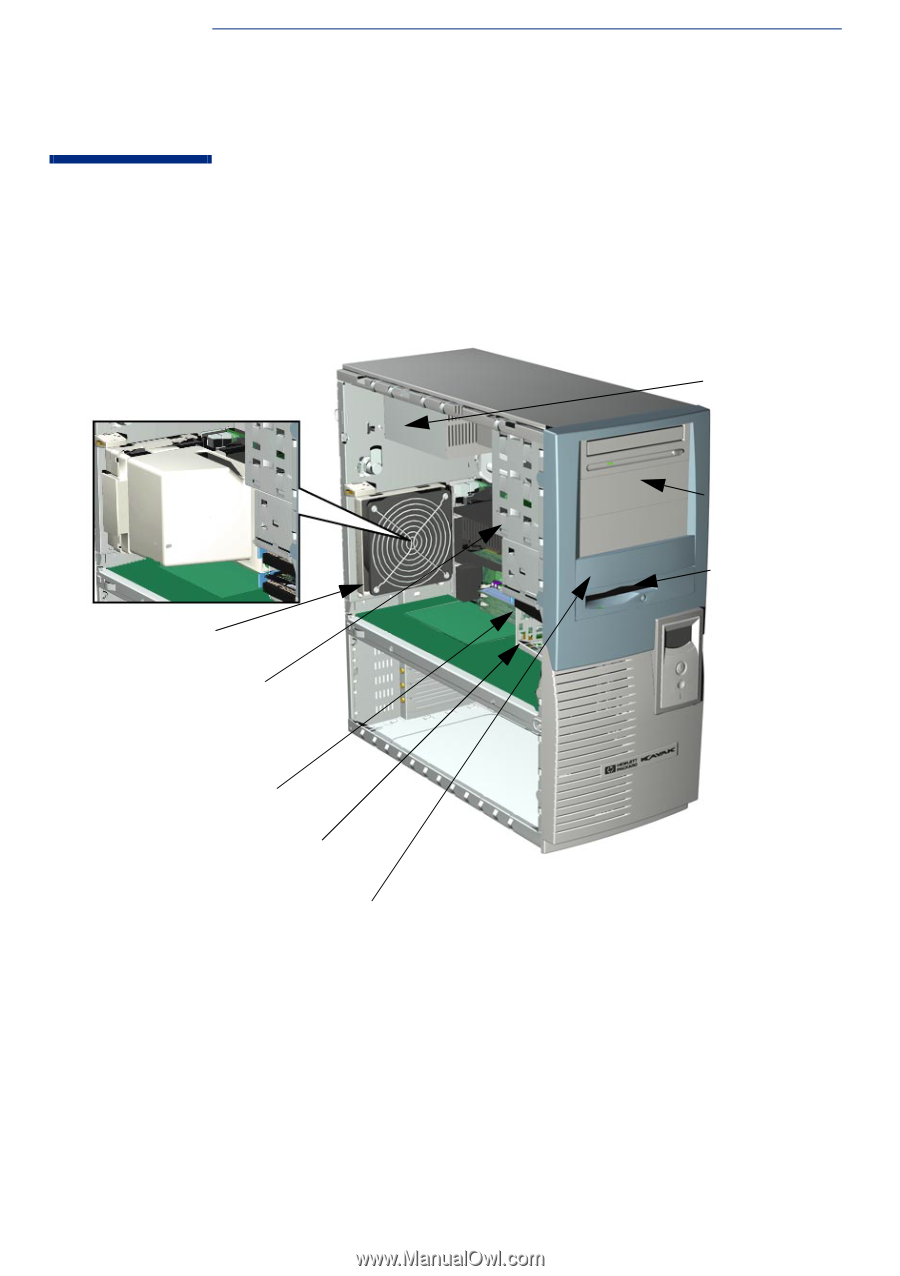
HP UltraFlow Airflow Guide
Front Access
Drives, for
- three 5.25-inch
drive shelves
- two 3.5-inch
shelves including
a 1.44 MB floppy
disk drive
Second 3.5-inch shelf for zip drive
or second floppy disk drive
Power Supply Unit
Rear Fan
Primary Hard Disk
Drive Shelf
Secondary Hard
Disk Drive Shelf
Spare mounting rails (not shown) for:
- 3.5-inch (short green) devices
(for example, zip drive),
- 5.25-inch (long green) devices,
- 3.5-inch (short blue) hard disk drives