HP XM600 hp kayak xm600, installing and replacing hardware parts in your pc wo - Page 10
Replacing the, Memory Expansion, completely
 |
View all HP XM600 manuals
Add to My Manuals
Save this manual to your list of manuals |
Page 10 highlights
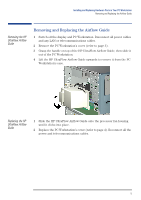
Installing and Replacing Hardware Parts in Your PC Workstation Removing, Replacing and Upgrading Memory on HP Kayak XM600 Models Shipped with SDRAM Replacing the Memory Expansion Card 6 Release the retaining screw located on the Memory Expansion Card. Then remove the screw from accessory card slot. 7 Open the two retaining clips on the system board to release the Memory Expansion Card, then remove it from the connector. 8 Remove memory modules from the old Memory Expansion Card, then install them on the new Memory Expansion Card. 1 Install the Memory Expansion Card so that the memory modules face the processor. 2 With the two retaining clips on the system board open, press the Memory Expansion Card completely into its socket. Push inwards the two latches on the memory socket to secure the Memory Expansion Card in place. RIMM0 and RIMM1 sockets MUST contain a continuity module 3 Tighten the retaining screw on the Memory Expansion Card and replace the screw on the accessory card slot. 4 Replace the retaining bar and secure it in place with the retaining screw. 5 Return the PC Workstation to its upright position. 6 Replace the HP UltraFlow Airflow Guide (refer to page 5). 7 Replace the PC Workstation's cover (refer to page 4). Reconnect all the power and telecommunications cables. 10
-
 1
1 -
2
-
3
-
4
-
 5
5 -
 6
6 -
 7
7 -
 8
8 -
 9
9 -
 10
10 -
 11
11 -
 12
12 -
 13
13 -
 14
14 -
 15
15 -
16
-
17
-
18
-
19
-
20
-
21
-
22
-
23
-
24
-
25
-
26
-
27
-
28
-
29
-
30
-
31
-
32
-
33
-
34
-
35
-
36
-
37
-
38
-
39
-
40
-
41
 |
 |
