HP d640 HP D640 High-Volume Printer - User Manual (Printer and Accessories), C - Page 153
Installing Upper Roller Assembly
 |
View all HP d640 manuals
Add to My Manuals
Save this manual to your list of manuals |
Page 153 highlights
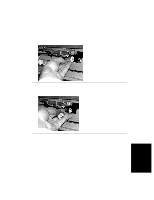
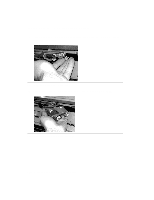
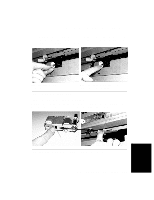
Printer Pick Roller Kit - Replacing the Tray Pick Rollers 4. Install the new upper pick roller assembly over the shaft. See Figure 4-51. Figure 4-51 Installing Upper Roller Assembly 5. Push the upper roller assembly all the way onto the shaft. You may have to jiggle the assembly a little as you push it to seat it correctly. 6. Snap the blue plastic clip into place. It fits over a groove on the end of the shaft to secure the upper roller assembly. If you don't see this groove, the assembly may not be completely seated all the way onto the shaft. See Figure 4-52. Figure 4-52 Installing Upper Roller Clip 4-40 Ordering and Replacing Consumables
-
 1
1 -
2
-
3
-
4
-
5
-
6
-
7
-
8
-
9
-
10
-
11
-
12
-
13
-
14
-
15
-
16
-
17
-
18
-
19
-
20
-
21
-
22
-
23
-
24
-
25
-
26
-
27
-
28
-
29
-
30
-
31
-
32
-
33
-
34
-
35
-
36
-
37
-
38
-
39
-
40
-
41
-
42
-
43
-
44
-
45
-
46
-
47
-
48
-
49
-
50
-
51
-
52
-
53
-
54
-
55
-
56
-
57
-
58
-
59
-
60
-
61
-
62
-
63
-
64
-
65
-
66
-
67
-
68
-
69
-
70
-
71
-
72
-
73
-
74
-
75
-
76
-
77
-
78
-
79
-
80
-
81
-
82
-
83
-
84
-
85
-
86
-
87
-
88
-
89
-
90
-
91
-
92
-
93
-
94
-
95
-
96
-
97
-
98
-
99
-
100
-
101
-
102
-
103
-
104
-
105
-
106
-
107
-
108
-
109
-
110
-
111
-
112
-
113
-
114
-
115
-
116
-
117
-
118
-
119
-
120
-
121
-
122
-
123
-
124
-
125
-
126
-
127
-
128
-
129
-
130
-
131
-
132
-
133
-
134
-
135
-
136
-
137
-
138
-
139
-
140
-
141
-
142
-
143
-
144
-
145
-
146
-
147
-
 148
148 -
 149
149 -
 150
150 -
 151
151 -
 152
152 -
 153
153 -
 154
154 -
 155
155 -
 156
156 -
 157
157 -
 158
158 -
159
-
160
-
161
-
162
-
163
-
164
-
165
-
166
-
167
-
168
-
169
-
170
-
171
-
172
-
173
-
174
-
175
-
176
-
177
-
178
-
179
-
180
-
181
-
182
-
183
-
184
-
185
-
186
-
187
-
188
-
189
-
190
-
191
-
192
-
193
-
194
-
195
-
196
-
197
-
198
-
199
-
200
-
201
-
202
-
203
-
204
-
205
-
206
-
207
-
208
-
209
-
210
-
211
-
212
-
213
-
214
-
215
-
216
-
217
-
218
-
219
-
220
-
221
-
222
-
223
-
224
-
225
-
226
-
227
-
228
-
229
-
230
-
231
-
232
-
233
-
234
-
235
-
236
-
237
-
238
-
239
-
240
-
241
-
242
-
243
-
244
-
245
-
246
-
247
-
248
-
249
-
250
-
251
-
252
-
253
-
254
-
255
-
256
-
257
-
258
-
259
-
260
-
261
-
262
-
263
-
264
-
265
-
266
-
267
-
268
-
269
-
270
-
271
-
272
-
273
-
274
-
275
-
276
-
277
-
278
-
279
-
280
-
281
-
282
-
283
-
284
-
285
-
286
-
287
-
288
-
289
-
290
-
291
-
292
-
293
 |
 |

Printer Pick Roller Kit - Replacing the Tray Pick Rollers
4-40
Ordering and Replacing Consumables
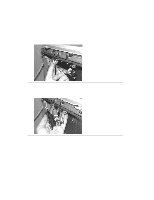
4.
Install the new upper pick roller assembly over the shaft. See Figure
4-51.
Figure 4-51
Installing Upper Roller Assembly
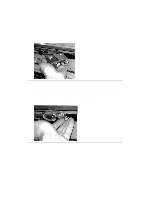
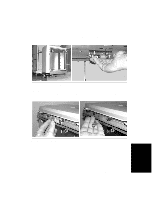
5.
Push the upper roller assembly all the way onto the shaft. You may have to jiggle the
assembly a little as you push it to seat it correctly.
6.
Snap the blue plastic clip into place. It fits over a groove on the end of the shaft to secure
the upper roller assembly. If you don’t see this groove, the assembly may not be
completely seated all the way onto the shaft. See Figure 4-52.
Figure 4-52
Installing Upper Roller Clip