HP d640 HP D640 High-Volume Printer - User Manual (Printer and Accessories), C - Page 27
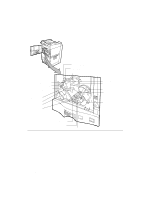
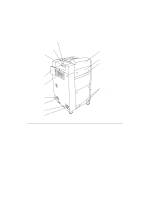
Behind the Front Door, Fuser Locking knob
 |
View all HP d640 manuals
Add to My Manuals
Save this manual to your list of manuals |
Page 27 highlights
About Your Printer Getting to Know the Printer Behind the Front Door When you open the front door of the printer, you see the printer's internal components, shown in Figure 1-5 and described below. • Fuser: Applies heat and pressure, which melts the toner and adheres it to the paper. • Drum unit: Contains the precharger, photoconductor drum, and cleaner. • Transfer guide: Contains the transfer unit, which moves the print image from the drum to the paper. • Fuser Locking knob: Secures the fuser in the printer chassis. • Cleaning roller: Applies silicone oil and cleans the fuser roller. • Drum unit locking knob: Secures the drum. • Precharger Cleaner: Helps keep the drum surface free of stray toner. • Decurler roller knob: Used to clear paper jams in the immediate area. • Duplex roller knob: Used to clear paper jams in the duplex paper path (during double- sided printing). • Knob 1: Used to clear paper jams as the paper exits the paper trays and enters the drum area. • Knob 2: Used to clear paper jams as the paper exits the paper trays and enters the drum area. • Handle 3: Lowers the transfer guide to clear paper jams in the drum area. • Decurler lever: Provides access to paper in the decurler area to clear paper jams. • Lever b1: Secures the internal printing components in the paper path. • Lever 4: Releases tension on paper in the fuser area to clear paper jams. • Lever 5: Provides access to paper in the reverser area to clear paper jams. • Lever 6: Provides access to paper in the duplexer area to clear paper jams. About Your Printer 1-11
-
 1
1 -
2
-
3
-
4
-
5
-
6
-
7
-
8
-
9
-
10
-
11
-
12
-
13
-
14
-
15
-
16
-
17
-
18
-
19
-
20
-
21
-
 22
22 -
 23
23 -
 24
24 -
 25
25 -
 26
26 -
 27
27 -
 28
28 -
 29
29 -
 30
30 -
 31
31 -
 32
32 -
33
-
34
-
35
-
36
-
37
-
38
-
39
-
40
-
41
-
42
-
43
-
44
-
45
-
46
-
47
-
48
-
49
-
50
-
51
-
52
-
53
-
54
-
55
-
56
-
57
-
58
-
59
-
60
-
61
-
62
-
63
-
64
-
65
-
66
-
67
-
68
-
69
-
70
-
71
-
72
-
73
-
74
-
75
-
76
-
77
-
78
-
79
-
80
-
81
-
82
-
83
-
84
-
85
-
86
-
87
-
88
-
89
-
90
-
91
-
92
-
93
-
94
-
95
-
96
-
97
-
98
-
99
-
100
-
101
-
102
-
103
-
104
-
105
-
106
-
107
-
108
-
109
-
110
-
111
-
112
-
113
-
114
-
115
-
116
-
117
-
118
-
119
-
120
-
121
-
122
-
123
-
124
-
125
-
126
-
127
-
128
-
129
-
130
-
131
-
132
-
133
-
134
-
135
-
136
-
137
-
138
-
139
-
140
-
141
-
142
-
143
-
144
-
145
-
146
-
147
-
148
-
149
-
150
-
151
-
152
-
153
-
154
-
155
-
156
-
157
-
158
-
159
-
160
-
161
-
162
-
163
-
164
-
165
-
166
-
167
-
168
-
169
-
170
-
171
-
172
-
173
-
174
-
175
-
176
-
177
-
178
-
179
-
180
-
181
-
182
-
183
-
184
-
185
-
186
-
187
-
188
-
189
-
190
-
191
-
192
-
193
-
194
-
195
-
196
-
197
-
198
-
199
-
200
-
201
-
202
-
203
-
204
-
205
-
206
-
207
-
208
-
209
-
210
-
211
-
212
-
213
-
214
-
215
-
216
-
217
-
218
-
219
-
220
-
221
-
222
-
223
-
224
-
225
-
226
-
227
-
228
-
229
-
230
-
231
-
232
-
233
-
234
-
235
-
236
-
237
-
238
-
239
-
240
-
241
-
242
-
243
-
244
-
245
-
246
-
247
-
248
-
249
-
250
-
251
-
252
-
253
-
254
-
255
-
256
-
257
-
258
-
259
-
260
-
261
-
262
-
263
-
264
-
265
-
266
-
267
-
268
-
269
-
270
-
271
-
272
-
273
-
274
-
275
-
276
-
277
-
278
-
279
-
280
-
281
-
282
-
283
-
284
-
285
-
286
-
287
-
288
-
289
-
290
-
291
-
292
-
293
 |
 |
