Hoover F7450100 Manual
Hoover F7450100 Manual
 |
View all Hoover F7450100 manuals
Add to My Manuals
Save this manual to your list of manuals |
Hoover F7450100 manual content summary:
- Hoover F7450100 | Manual - Page 1
All rights reserved. #56518217 ID100262-R1 Guide d'utilisation Instructions d'utilisation et d'entretien www.hoover.com www.hoover.com Owner's Manual Operating and Servicing Instructions Español - página E1 IMPORTANT : LIRE CES INSTRUCTIONS ATTENTIVEMENT AVANT D'UTILISER L'ASPIRATEUR. Vous avez - Hoover F7450100 | Manual - Page 2
store. 2 Important Safeguards 3 Cleaner Assembly...5 How To Use...7 Cleaner Description 7 The Tanks...8 How to Clean...10 Tools...13 Maintenance...17 Nozzle...17 Brushes...17 Valve...18 Storage...18 Lubrication...18 Troubleshooting...19 Helpful Reminders 19 Service...20 Cleaning Products...21 - Hoover F7450100 | Manual - Page 3
as it should, has been dropped, damaged, left outdoors, or dropped into water, take it to an Authorized Hoover® Warranty Service Dealer. • Close supervision is necessary when any appliance is used by or near children. Do not allow carpet cleaner to be used as a toy or to run unattended at any time - Hoover F7450100 | Manual - Page 4
branché. Grounding Instructions This appliance qualified electrician or service person if you with the appliance - if it will not fit the outlet, have a carpet cleaner. They may damage the machine. • Keep hair, loose clothing, fingers, feet and all parts of body away from openings and moving parts - Hoover F7450100 | Manual - Page 5
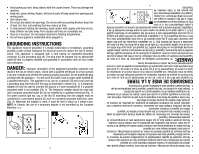
on select models only. Accessories not included with your model may be purchased separately by visiting hoover.com. NOTE: Phillips screwdriver needed for assembly. A B E I D F H C G 1.1 Carpet Upholstery Cleaner Bare floor cleaner PreCleaner 1. Cleaner ASSEMBLY Carton contents - Hoover F7450100 | Manual - Page 6
hose/cord hook 1.9 Snap hook onto cleaner. 1.9 1.8 Push up on handle to latch it to cleaner. Check tank to make sure it is secure. 1.7 Push top of tank and tank handle while supporting back of cleaner with other hand. 1.6 Position bottom of tank onto cleaner. 1.6 1.7 1.8 Replace upper tank - Hoover F7450100 | Manual - Page 7
on data plate on bottom of cleaner. This cleaner is intended for household use. *Accessories not included with your model may be purchased separately by visiting www.hoover.com, or your local HOOVER® service center. Handle release pedal A 2.3 2.5 7 Actual model may vary from images shown - Hoover F7450100 | Manual - Page 8
handle while supporting the back of the unit with your other hand. ! CAUTION ! Do not fill with water above 140°F (60°C). 2.9 - 2.10 Fill detergent container (F) with Hoover® Carpet/Upholstery Detergent. Replace container cap and tighten. 2.11 Position bottom of tank onto cleaner using one hand - Hoover F7450100 | Manual - Page 9
votre aspirateur SteamVac®. B A N'utiliser que le détergent SteamVac® Oxy de HOOVER® pour ce water. If irritation persists, call a physician. Certain oxygenated-type cleaners, such as OxiClean* and TuffOxi** will damage your SteamVac® detergent container (A), Clean Water Tank (B) or Dirty Water - Hoover F7450100 | Manual - Page 10
Actual model may vary from images shown. 10 Before you begin cleaning a. Vacuum thoroughly - For carpet, use a HOOVER® vacuum cleaner with an agitator for best results. Vacuum upholstery with a vacuum cleaner with cleaning tool attachments. Use a crevice tool to reach into tufts and folds. Do not - Hoover F7450100 | Manual - Page 11
. 11 Actual model may vary from images shown. 3.1/3.1a 3.2a AUTO WASH RINSE Cleaning Carpet Read "Before You Begin Cleaning" instructions above. Fill Clean Water Tank according to instructions for Figs. 2.9. Fill detergent container with Hoover® detergent according to instructions for Figs - Hoover F7450100 | Manual - Page 12
solution can completely remove all spots, they can be treated by following the instructions provided by the manufacturer of the carpet, upholstery, or hard floor surface being cleaned. Do not use the SteamVac® cleaner to pick up flammable or combustible liquids or chemicals. When finished, follow - Hoover F7450100 | Manual - Page 13
bas et vers l'extérieur. Pour le replacer, effectuer cette étape à l'inverse. upholstery. For some models, the brushes scrubbing action on small carpet areas, carpeted A A. SpinScrub® Hand Tool (Available on select models only) has rotating brushes parts, unplug cleaner. 4.1 A 4.2 4. TOOLS 13 - Hoover F7450100 | Manual - Page 14
sur la gâchette. 4.8 Le porte accessoires peut être retiré et accroché sur un cintre pour le rangement, ou replacé sur l'aspirateur. 4.7 4.8 After Using Tool Drain suction hose by turning cleaner ON and holding nozzle up for several minutes. Do not press trigger. ! CAUTION ! To reduce the risk of - Hoover F7450100 | Manual - Page 15
. 4.1 and 4.2. Place handle in upright position. Agitator brushes will not rotate while handle is in upright position. Fill clean water tank according to instructions for Figs. 2.9 to 2.11. Fill detergent container with HOOVER® detergent according to instructions for Fig. 2.11. Attach tool to end of - Hoover F7450100 | Manual - Page 16
the cleaning code on your upholstery. Use your cleaner only on upholstery marked "W" or "W/S". Attach hose and solution tube as instructed in Figs. 4.1 to 4.2. Place handle in upright position. Agitator brushes will not rotate while handle is in upright position. Fill Clean Water Tank according to - Hoover F7450100 | Manual - Page 17
water. A 5.4 A B D B brushes: How to Change and Clean Your cleaner is equipped with removable brushes. Follow these directions for changing brush assemblies or for easy cleaning. ! CAUTION ! To reduce the risk of injury from moving parts, unplug cleaner before servicing Replacer le instructions - Hoover F7450100 | Manual - Page 18
Actual model may vary from images shown. 18 valve: Déblocage Retirer le ré Replace on cleaner. • Empty Dirty Water Tank, rinse tank and lid thoroughly with clean water and let air dry. Allow brushes and underside of carpet cleaner to air dry thoroughly before storing carpet cleaner on a carpeted - Hoover F7450100 | Manual - Page 19
Make sure lid is on securely. 4. Fill Clean Water Tank 1. Make sure tank is securely locked in position. Cleaner won't run. 1. Not firmly plugged in. POSSIBLE SOLUTION 1. Plug unit in firmly. PROBLEM POSSIBLE CAUSE 6. TROUBLESHOOTING If a minor problem occurs, it usually can be solved quite - Hoover F7450100 | Manual - Page 20
Hoover® service and genuine Hoover® parts, locate the nearest Authorized Hoover® Warranty Service Dealer (Depot) by: • Checking the Yellow Pages under "Vacuum Cleaners" or "Household". • Visit our website at hoover.com (U.S. Customers) or hoover.ca (Canadian customers). Follow the service - Hoover F7450100 | Manual - Page 21
wipes, and spot cleaners available at Hoover.com and retailers nationwide. Hoover® FloorMate® 1 Allergens: pollen, pet dander, dirt, and dust. 2 When cleaning a hard surface, the Hoover® hard surface attachment below must be used (optional if not included): 5 Brush Hoover® part # 48417008. 3 When - Hoover F7450100 | Manual - Page 22
household use and in accordance with the Owner's Manual, your HOOVER® product is warranted against original defects in material and workmanship for a full one year from date of purchase (the "Warranty Period"). During the Warranty Period, Hoover® will provide labor and parts, at no cost to you, to - Hoover F7450100 | Manual - Page 23
MANUAL DEL PROPIETARIO Instrucciones de Funcionamiento y Servicio www.hoover.com IMPORTANTE: LEA ATENTAMENTE ANTES DE ENSAMBLAR Y USAR. ¿Tiene alguna pregunta o inquietud? Para obtener asistencia, llame al Servicio de atención al cliente al 1-800 944 - Hoover F7450100 | Manual - Page 24
de compra a este Manual del propietario. Para obtener el servicio de garantía de su producto HOOVER® puede requerirse la verificaci 800-944-9200 para escuchar un mensaje indicando la dirección de los vendedores autorizados Hoover® (sólo en ee. Uu.) O para hablar con un representante de atención - Hoover F7450100 | Manual - Page 25
el uso y el mantenimiento de su producto HOOVER® se realicen en condiciones de uso doméstico normales y según el Manual del usuario, el producto estará garantizado contra TIPO O NATURALEZA CON RESPECTO AL PROPIETARIO O A CUALQUIER PARTE QUE REALICE UN RECLAMO A TRAVÉS DEL PROPIETARIO, YA SEA - Hoover F7450100 | Manual - Page 26
los dedos, los pies y todas las partes del cuerpo fuera de las aberturas y Hoover® SteamVac® de Hoover® 2 Fórmula para manchas ocasionadas por mascotas de la gama Platinum Collection® de Hoover MaxExtractTM Dual V® de Hoover® MaxExtractTM Dual V® todo terreno de Hoover - Hoover F7450100 | Manual - Page 27
(B) con detergente de HOOVER®. • 6.2 Fije la tapa del tanque de recuperación antes de limpiar. • Vacíe el tanque de parte inferior de la aspiradora). NO DEVUELVA ESTE PRODUCTO A LA TIENDA. 1. ENSAMBLADO DE LA ASPIRADORA Contenido de la caja 1.1 Carpet Upholstery Cleaner Bare floor cleaner - Hoover F7450100 | Manual - Page 28
11 C B Guarde los accesorios 1.15 Guarde los accesorios en la parte posterior de la limpiadora, como se muestra. 1.15 6. Solución bien recuperación no está colocada colocada. correctamente. 4. El tanque de agua está vacío, 4. Llene el tanque de agua. pero queda detergente. El agua limpia no - Hoover F7450100 | Manual - Page 29
• Vacíe el tanque de recuperación, enjuague bien el tanque y la tapa con agua limpia y deje secar al aire. Deje secar al aire los cepillos y la parte de incluidos con su modelo pueden comprarse por separado, visitando www.hoover. com. Interruptor para encender/apagar Para encender la aspiradora, - Hoover F7450100 | Manual - Page 30
modo SpinScrub® Su aspiradora Steam Vac™ tiene dos posiciones de parte posterior de la unidad con la otra mano. 2.7 2.8 E D C 2.9 2.10 F 2.11 IMPORTANTE Use únicamente detergentes para aspiradoras SteamVac™ HOOVER®. Estos están especialmente formulados para uso con su aspiradora SteamVac - Hoover F7450100 | Manual - Page 31
Empuje el mango hacia arriba una vez que el tanque esté colocado en la parte posterior de la unidad para trabarlo a ésta. Revise el tanque para asegurarse de recuperación (C) de su aspiradora SteamVac™. Use únicamente detergente para aspiradoras Steam- Vac™ Oxy HOOVER® para este fin. B * - Hoover F7450100 | Manual - Page 32
para detergente con Detergente para alfombras/tapizados HOOVER® de acuerdo con las instrucciones de posible que la máquina deba colocarse en la parte superior de las escaleras para limpiar la mitad superior seca antes de volver a usar el accesorio. Vacíe el tanque de recuperación cuando el sonido del - Hoover F7450100 | Manual - Page 33
en la Fig. 2.9. 3.3 Llene el contenedor para detergente con detergente Hoover® de acuerdo con las instrucciones de las Fig. 2.10 y 2.11 hasta que se observe poca agua que pase por la tapa del tanque de agua sucia). Vacíe el tanque de agua sucia cuando el sonido del motor se vuelva más agudo y haya - Hoover F7450100 | Manual - Page 34
Su aparato SteamVac® de HOOVER® también las correderas de metal o los acabados de madera no manchen la alfombra. Vacíe los tanques, enjuague con agua limpia y deje secar al aire. Enjuague de la rejilla del filtro que se encuentra en la parte inferior de la aspiradora de la siguiente manera. 3.4
-
 1
1 -
 2
2 -
 3
3 -
 4
4 -
 5
5 -
 6
6 -
 7
7 -
8
-
9
-
10
-
11
-
12
-
13
-
14
-
15
-
16
-
17
-
18
-
19
-
20
-
21
-
22
-
23
-
24
-
25
-
26
-
27
-
28
-
29
-
30
-
31
-
32
-
33
-
34
 |
 |
www.hoover.com
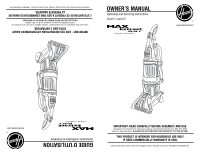
OWNER’S MANUAL
Operating and Servicing Instructions
©2010 Techtronic Floor Care Technology Limited. All rights reserved. #56518217 ID100262-R1
IMPORTANT: READ CAREFULLY BEFORE ASSEMBLY AND USE.
Questions or concerns? For assistance, please call Customer Service at 1-800-944-9200
Mon-Fri 8am-7pm EST.
PLEASE DO NOT RETURN THIS PRODUCT TO THE STORE.
THIS PRODUCT IS INTENDED FOR HOUSEHOLD USE ONLY.
IF USED COMMERCIALLY WARRANTY IS VOID.
IMPORTANT : LIRE CES INSTRUCTIONS ATTENTIVEMENT AVANT
D’UTILISER L’ASPIRATEUR.
Vous avez des questions ou des inquiétudes? Veuillez appeler le service à la clientèle au
1 800 9449200 du lundi au vendredi, de 8 h à 19 h (HNE).
VEUILLEZ NE PAS RETOURNER CE PRODUIT AU MAGASIN.
www.hoover.com
GUIDE D’UTILISATION
Instructions d’utilisation et d’entretien
©2010 Techtronic Floor Care Technology Limited. Tous droits réservés. #56518217 ID100262-R1
L’UTILISATION DE CE PRODUIT À DES FINS COMMERCIALES INVALIDE
LA PRÉSENTE GARANTIE.
Español - página E1