Hoover S3670 Manual - Page 3
Assembling cleaner - windtunnel
 |
UPC - 073502029046
View all Hoover S3670 manuals
Add to My Manuals
Save this manual to your list of manuals |
Page 3 highlights
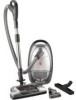
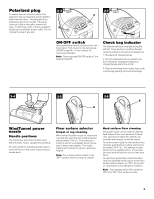
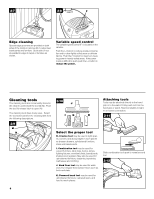
1. Assembling cleaner This cleaner was inspected and packaged carefully before being shipped from the factory. If you should happen to need assistance during assembly or operation, call 1-800-944-9200 for an automated referral of authorized service outlet locations (U.S. only) OR 1-800-263-6376 to speak with a representative in our Consumer Response Center Mon-Fri 8AM-7PM EST. OR Visit us online at www.hoover.com to find the service outlet nearest you (click on the "Service" button). Carton contents 1-1 A B C E D F Unpack cleaner from carton and identify the parts shown. Remove and dispose of cardboard packing. A. Canister cleaner with tools B. WindTunnel™ powered nozzle C. Extra paper bag (one bag is installed in cleaner) D. Telescopic wand and hose E. Powered Hand Tool F. Hard Floor Tool Connect hose, wands and nozzle 1-2 1-3 1-4 C G D F B Connect hose With hose toward rear of cleaner, push hose connector into opening in bag lid. Note: The flexible hose contains electrical wires for connection to the power nozzle and should not be used if damaged. The wires should not be seen through the outer skin. Attach nozzle and wand The wand with the storage clip connects to the power nozzle. Attach it to power nozzle by fitting button projection (B) on wand into nozzle connector (C) opening. Be sure nozzle is locked in place. To release, press down on wand release pedal (D) and remove wand. To attach the hose to the telescopic wand, Push the hand grip (G) down onto wand so that the locking latch of the release button (F) locks the hand grip into place. Continued ➟ 3
-
 1
1 -
 2
2 -
 3
3 -
 4
4 -
 5
5 -
 6
6 -
 7
7 -
 8
8 -
 9
9 -
10
-
11
-
12
-
13
-
14
-
15
-
16
-
17
-
18
-
19
-
20
-
21
-
22
-
23
-
24
-
25
-
26
-
27
-
28
-
29
 |
 |
