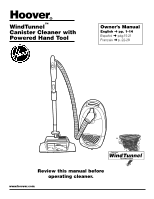
Hoover S3670 Manual - Page 4
How to use - bag
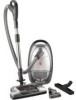 |
UPC - 073502029046
View all Hoover S3670 manuals
Add to My Manuals
Save this manual to your list of manuals |
Page 4 highlights
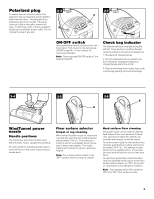
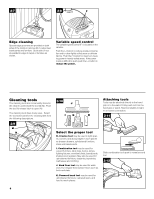
2. How to use Cleaner description 2-1 7 6 5 19 18 14 9 12 3 4 2 1 10 15 11 13 17 8 16 The assembled cleaner will look like the drawing. 1. WindTunnel™ carpet and floor power nozzle: Automatically adjusts to . different carpet pile heights. 2. Headlight 3.Wand release pedal: Locks and releases telescopic wand from power nozzle. 4.Wand storage clip: Located on the backside of the telescopic wand, place cleaner on its end and hook clip onto bot-. tom of cleaner. 5.Wand/release latch: Used to lock/ unlock hand grip. 6.Hand grip 7. Brushroll ON/OFF switch: Located on the hand grip for convenient cleaner operation. 8.Variable speed control: Allows user to manually select cleaner speed on this canister. 9. Dusting brush/furniture nozzle 10. Crevice tool 11. Hard floor tool 12. Powered hand tool 13. Cord rewind pedal: Step on pedal to rewind cord for storage. Hold plug until cord is rewound. 14. Tool lid latch: Push the release latch. 15. Bag lid latch: Lift to open bag lid. 16. ON/OFF pedal: Conveniently located on top of cleaner. 17. Check bag indicator: Shows red when paper bag should be checked for fullness. 18. Hose connector 19. Carrying handle Operate cleaner only at voltage specified on data plate on bottom of cleaner. This cleaner is intended for household use. Not intended for commercial use in any household or for any other commercial purpose. IMPORTANT: Thermal protector An internal thermal protector has been used in your cleaner to prevent overheating if a large item or clog gets caught in the nozzle or at the opening of the bag. When the blockage is not removed, the thermal protector will trip and cleaner will stop running. If this happens, turn cleaner OFF and disconnect cleaner from electrical outlet. Then disconnect nozzle and remove obstruction. Within 30 minutes the thermal protector will cool and automatically reset and cleaning may resume. If cleaner does not operate, allow addi- tional time for thermal protector to reset. Note: The canister must remain unplugged during the 30 minute cooling period. 4
-
 1
1 -
 2
2 -
 3
3 -
 4
4 -
 5
5 -
 6
6 -
 7
7 -
 8
8 -
 9
9 -
 10
10 -
11
-
12
-
13
-
14
-
15
-
16
-
17
-
18
-
19
-
20
-
21
-
22
-
23
-
24
-
25
-
26
-
27
-
28
-
29
 |
 |
