Hoover U8187 Manual
Hoover U8187 Manual
 |
View all Hoover U8187 manuals
Add to My Manuals
Save this manual to your list of manuals |
Hoover U8187 manual content summary:
- Hoover U8187 | Manual - Page 1
and Servicing Instructions www.hoover.com Please review this manual before operating your Hoover® product. ©2008 Healthy Gain Investments, Ltd. All rights reserved. #56511C69. 2/08 Guide d'utilisation Instructions d'utilisation et d'entretien www.hoover.com Lire attentivement ce guide avant - Hoover U8187 | Manual - Page 2
registration card included with your cleaner. Hint: Attach your sales receipt to this owner's manual. Verification of date of purchase may be required for warranty service of your HOOVER product. Serial Number Serial Number Pour obtenir de l'assistance : Visiter notre site Web à l'adresse www - Hoover U8187 | Manual - Page 3
and all parts of body away from openings, rotating agitator and other moving parts. • Do it to a Hoover Sales and Service Center or Authorized Hoover Warranty Service Dealer (Depot vacuum cleaner only for its intended use as described in the instructions. Use only attachments recommended by Hoover - Hoover U8187 | Manual - Page 4
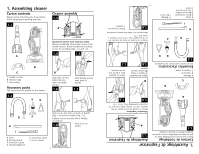
Figs. 1-6 and 1-7). 1. Assembling cleaner Carton contents Empty carton. Find the parts shown below before disposing of packing materials. 1.1 Cleaner assembly 1.3 A D arrière de la poignée (fig. 1-6) et sur le support à tuyau (fig. 1-7). Bien serrer les vis à l'aide d'un tournevis cruciforme. 1.8 Placer - Hoover U8187 | Manual - Page 5
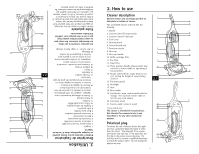
commercial use in any This cleaner is intended for household use. *some models only. 20 18 21. Crevice wand: stores in wand. 21 20 tapis à nettoyer. 15. Protège meubles 16. Ampoule 15 2.1 17. Tuyau 18. Support à tuyau 19. Crochets pour le cordon : enrouler le cordon sur les crochets pour - Hoover U8187 | Manual - Page 6
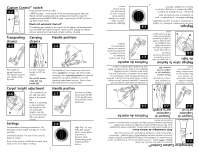
6 Note: If the cleaner is difficult to push, turn knob to the next higher setting. Low/Hard Surface: for bare floors and all types of carpet For maximum cleaning performance, the following carpet height settings are recommended. 2.8 HEIG Settings HT ADJUSTM High Pile: for very deep pile - Hoover U8187 | Manual - Page 7
7 D E Select proper tool A. Dusting brush may be used for carved furniture, table tops, books, lamps, lighting fixtures, venetian blinds, baseboards, shutters, and registers. B. Furniture nozzle may be used for upholstered furniture, draperies, mattresses, clothing, automobile interiors, and - Hoover U8187 | Manual - Page 8
8 Push cover down to secure in place. To reattach, align hinges of cover with slots on sides of tool storage area. 2.15 The tool cover is designed with a "breakaway" feature which allows it to snap free if it is pushed open too far. How to attach tool cover Push Custom Control™ switch to OFF - Hoover U8187 | Manual - Page 9
. Appuyer fermement jusqu'à ce que le vide poussière soit bien enclenché. C B F D 3.1 A E The dirt cup assembly consists of the following parts: Lid (A) Dirt Cup (B) Pre-filter (C) HEPA Cartridge Filter (D) Dirt Opening (E) Handle (F) While the cleaner is in operation, the pre- filter screen - Hoover U8187 | Manual - Page 10
into cup until a light snap is felt. Gently pull up on assembly to ensure that it is seated properly in the cup. Ensure that no part of prefilter screen extends above top edge of dirt cup. Ensemble du filtre Le filtre à cartouche HEPA et le préfiltre sont pratiquement autonettoyants. Tapoter - Hoover U8187 | Manual - Page 11
this filter, ask for HOOVER part No. 40110009 or service 38766028. Do not operate bag before debris reaches the bottom of the bag collar. If more dirt than this accumulates, your cleaner will not operate effectively. Note: All new carpet has loose fibers which can fill the bag quickly while vacuuming - Hoover U8187 | Manual - Page 12
agitator. To maintain cleaning effectiveness, have brush roll replaced if brushes do not touch card. What to buy When purchasing a new agitator, ask for HOOVER part No. 48414137. 12 The agitator brush roll When to replace 3.21 Install bulb - Pull old bulb straight out of socket. Push new bulb - Hoover U8187 | Manual - Page 13
13 Belt replacement The belt on your Hoover cleaner causes the brush roll to rotate and is important for the effective operation of your cleaner. The brush roll belt is designed to last a long time and does not normally need replacement. The belt is located under the hood of the cleaner and should - Hoover U8187 | Manual - Page 14
agitator brushes are worn, the brush roll should be replaced. Ask for HOOVER part No. 48414150. Powered hand tool Agitator brush roll replacement A new belt can be installed at your nearest Hoover Sales and Service Center. If the belt is cracked, gouged or broken, it should be replaced. lift off - Hoover U8187 | Manual - Page 15
cleaner. The addition of lubricant could cause damage. Therefore, do not add lubricant to any bearings. Replace belt When replacing belt, ask for HOOVER part No. 38528037. 1. Remove bottom plate, belt guard and brush roll as described in Figs. 3-27 through 3-29. 2. Grasp turbine (E) and pull firmly - Hoover U8187 | Manual - Page 16
faire réparer votre aspirateur (voir la section « Service »). 4. Dépannage Consulter le tableau cidessous pour ré brush roll Broken or worn belt Replace belt Agitator is obstructed. Clear CAUSE POSSIBLE SOLUTION 4. If you have a problem If a minor problem occurs, it usually can be solved quite - Hoover U8187 | Manual - Page 17
ère afin de vérifier le conduit (A). 3. Éliminer l'obstruction dans le conduit à poussière. Broken or worn belt Low cleaner suction Replace belt Check items under "Cleaner won't pick up". PROBLEM Cleaner hard to push Cleaning tools won't pick up Visible dirt leaking through final filter Dirt - Hoover U8187 | Manual - Page 18
, Phone: 1-800-263-6376. In Canada, contact Hoover Canada, Etobicoke, Ontario M8W 3R9, Phone: 1-800-263-6376 Mon-Fri 8AM-7PM EST. Always identify your cleaner by the complete model number when requesting information or ordering parts. (The model number appears on the back of the cleaner.) B. Si - Hoover U8187 | Manual - Page 19
parts and accessory items may be purchased from your Authorized Hoover Dealer, Leading Retailers, Hoover Sales & Service Centers, on-line at www.hoover.com, or by completing this order form. Mail orders limited to U.S. residents only. In Canada, please call 1-800-263-6376 OR on-line at hoover - Hoover U8187 | Manual - Page 20
HEPA Filtration Type Y Disposable Filter Bags Allergen Filtration Type Y Disposable Filter Bags Final Filter Headlight Bulb Extension Wand Furniture Nozzle Crevice Tool -Short Agitator Crevice Wand -Long Dusting Brush Extra Reach Hose Powered Hand Tool Part No. 40140201 4010801Y 4010100Y 40110009 - Hoover U8187 | Manual - Page 21
envíela por correo a: Hoover, Inc. 7005 Cochran Road • Glenwillow, Ohio • 44139 Attn: Sales & Service Center Descripción del artículo Fecha Recibida Manual del Propietario Instrucciones de operación y servicio www.hoover.com Revise este manual antes de hacer funcionar su Hoover® producto. - Hoover U8187 | Manual - Page 22
compra a este manual del propietario. Para obtener el servicio de garantía de compra de su producto HOOVER, es posible de datos, que se encuentra en la parte posterior de la aspiradora. Enchufe la aspiradora a: Hoover, Inc. 7005 Cochran Road • Glenwillow, Ohio • 44139 Attn: Sales & Service Center - Hoover U8187 | Manual - Page 23
con Hoover Canada, Etobicoke, Ontario M8W 3R9, teléfono: 1-800-263-6376, de lunes a viernes, de 8 a.m. a 7 p.m., hora del Este. Siempre identifique su aspiradora por el número de modelo completo al solicitar información o realizar pedidos de piezas. (El número de modelo se encuentra en la parte - Hoover U8187 | Manual - Page 24
1.2 EG B Encaje las lengüetas del sujetador para la manguera (B) en los agujeros de la sección del mango. 1.6 Deslice la sección del mango sobre la parte posterior del mango. 1.7 D H I D. Manguera E. Escobilla para polvo F. Boquilla para muebles Empuje los tornillos dentro de los agujeros de la - Hoover U8187 | Manual - Page 25
Protector térmico 2. Modo de uso Su aspiradora tiene incorporado un protector térmico para impedir el sobrecalentamiento. 3. Consulte la sección "Eliminación de obstrucciones". Descripción de la aspiradora Cuando el protector térmico se activa, el 4. Cuando el motor se enfría, el protector - Hoover U8187 | Manual - Page 26
Reemplace la correa Para reemplazar la correa, solicite la pieza n.° 38528037 de HOOVER. 1. Retire la placa inferior, el protector de la correa y el , se deberá reemplazar. La correa se puede ver a través de la parte superior de la boquilla o retirando la placa inferior y el protector de la correa - Hoover U8187 | Manual - Page 27
una correa nueva en nuestro Centro de Ventas y Servicio de Hoover más cercano. Accesorio de mano turboaccionado Reemplazo del rodillo de de llegar al borde, empuje el mango hacia abajo. Esto levantará la boquilla (parte delantera de la aspiradora) e impedirá que la alfombra se pegue a la aspiradora - Hoover U8187 | Manual - Page 28
para asegurarse de que rote libremente. Vuelva a colocar la placa inferior y los tornillos (7). Reemplazo de la correa La correa de su aspiradora Hoover hace que el rodillo de escobillas gire y es importante para el funcionamiento efectivo de su aspiradora. La correa del rodillo de escobillas ha - Hoover U8187 | Manual - Page 29
lados, debajo de la tapa de la lente, como se muestra. Vuelva a colocar el tornillo y el emblema HOOVER®. Voltee la aspiradora y vuelva a colocar los dos tornillos que se encuentran en la parte inferior de la aspiradora, como se muestra en la Fig. 3-16. Rodillo de escobillas del agitador 3.21 Cu - Hoover U8187 | Manual - Page 30
únicamente bolsas de filtro desechables tipo Y con filtración HEPA de HOOVER® genuinas. Cómo cambiar la bolsa de filtro 3.12 Cómo retirar con fuerza el cuello de la bolsa (A) sobre el tubo (B ). Acomode la parte superior de la bolsa de filtro dentro del contenedor. Vuelva a colocar la tapa
-
 1
1 -
 2
2 -
 3
3 -
 4
4 -
 5
5 -
 6
6 -
 7
7 -
8
-
9
-
10
-
11
-
12
-
13
-
14
-
15
-
16
-
17
-
18
-
19
-
20
-
21
-
22
-
23
-
24
-
25
-
26
-
27
-
28
-
29
-
30
 |
 |

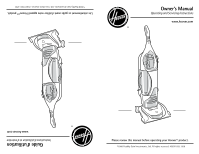
Please review this manual before operating your Hoover® product.
www.hoover.com
Owner’s Manual
Operating and Servicing Instructions
©2008 Healthy Gain Investments, Ltd. All rights reserved. #56511
C
69. 2/08
Lire attentivement ce guide avant d’utiliser votre appareil Hoover
MD
produit.
www.hoover.com
Guide d’utilisation
Instructions d’utilisation et d’entretien
©2008 Healthy Gain Investments, Ltd. Tous droits réservés. #56511
C
69. 2/08