Hoover U8187 Manual - Page 8
Extra reach hose, Stair cleaning, How to attach tool cover, Tuyau à longue portée, Extra Reach,
 |
View all Hoover U8187 manuals
Add to My Manuals
Save this manual to your list of manuals |
Page 8 highlights
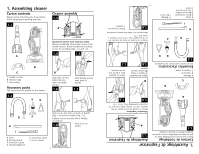
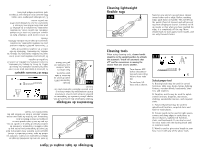
8 Push cover down to secure in place. To reattach, align hinges of cover with slots on sides of tool storage area. 2.15 The tool cover is designed with a "breakaway" feature which allows it to snap free if it is pushed open too far. How to attach tool cover Push Custom Control™ switch to OFF position. Align end of extra reach hose with projections (C) over slots (D) on end of attached hose. Slide hose into slots and twist hose to lock it in place. (To detach hose, reverse procedure.) Attach wands or tools to the other end of hose. Installation de la rallonge et des accessoires 2.12 A B Fixer l'accessoire ou la rallonge au tuyau (A) en l'enfonçant solidement dans le tuyau. Fixer la deuxième rallonge ou l'accessoire à la rallonge (B) en l'enfonçant solidement dans la rallonge. Tourner légèrement la rallonge ou l'accessoire pour serrer ou desserrer la connexion. Tuyau à longue portée Extra ReachMC (vendu séparément s'il n'est pas compris avec votre aspirateur) 2.13 C D Nettoyage des accessoires Pour nettoyer le tuyau et l'accessoire portatif à turbine, essuyer la saleté avec un chiffon trempé dans un détergent doux. Rincer avec un chiffon humide. Ne pas plonger l'accessoire portatif à turbine dans l'eau. Les accessoires peuvent être lavés à l'eau tiède avec un détergent. Rincer, puis laisser sécher à l'air libre avant de les réutiliser. Nettoyage des escaliers 2.14 Use the hose and powered hand tool or furniture nozzle for stair cleaning. CAUTION: To prevent the cleaner from falling, always place it at the bottom of the stairs. With handle in upright position, clean from bottom to top. C D 2.13 Extra reach hose (available at additional cost if not included with your cleaner) Attach tool or wand to the hose (A) by pushing it firmly into hose. Attach second wand or tool to wand (B) by pushing it firmly onto the wand. Twist wand or tool slightly to tighten or loosen the connection. How to clean tools To clean the hose and the powered hand tool, wipe off dirt with a cloth dampened in a mild detergent. Rinse with a damp cloth. Do not submerge powered hand tool in water. Cleaning tools may be washed in warm water with a detergent. Rinse and air dry before using. Stair cleaning 2.14 A B Mettre l'interrupteur Custom ControlMC à la position d'arrêt (OFF). Aligner l'extrémité du tuyau à longue portée comportant les boutons saillants (C) sur les encoches (D) du conduit à poussière. Faire glisser les boutons dans les encoches et tourner le tuyau pour le verrouiller en place. (Pour retirer le tuyau, faire l'inverse.) Fixer les rallonges ou les accessoires à l'autre extrémité du tuyau. Pour nettoyer les escaliers, utiliser le tuyau et l'accessoire portatif à turbine. MISE EN GARDE : Afin d'empêcher l'appareil de tomber, toujours placer l'appareil au bas de l'escalier. Mettre le manche en position verticale, et nettoyer en commençant par le bas de l'escalier. Fixation du couvercle à accessoire 2.15 Le couvercle à accessoire est doté d'un mécanisme de dégagement qui lui permet de se détacher s'il est ouvert trop grand. Pour le fixer de nouveau, aligner les charnières du couvercle sur les encoches sur les côtés du compartiment de rangement des accessoires. Appuyer fermement sur le couvercle à accessoire pour le fixer en place. 8 Attach wand and tools 2.12
-
 1
1 -
2
-
 3
3 -
 4
4 -
 5
5 -
 6
6 -
 7
7 -
 8
8 -
 9
9 -
 10
10 -
 11
11 -
 12
12 -
 13
13 -
14
-
15
-
16
-
17
-
18
-
19
-
20
-
21
-
22
-
23
-
24
-
25
-
26
-
27
-
28
-
29
-
30
 |
 |
