Hoover WH20100 Manual
Hoover WH20100 Manual
 |
UPC - 073502033401
View all Hoover WH20100 manuals
Add to My Manuals
Save this manual to your list of manuals |
Hoover WH20100 manual content summary:
- Hoover WH20100 | Manual - Page 1
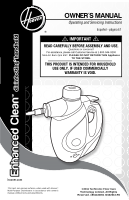
TM enhanced Clean disinfecting* handheld owner's Manual Operating and Servicing Instructions Español - página E1 ! IMPORTANT ! READ CAREFULLY BEFORE ASSEMBLY AND USE. Questions or concerns? For assistance, please call Customer Service at 1-800-944-9200 Mon-Fri 8am-7pm EST. PLEASE DO NOT RETURN THIS - Hoover WH20100 | Manual - Page 2
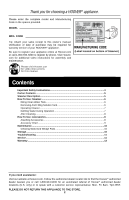
. Manufacturing code (Label located on bottom of Steamer) Please visit Hoover.com for video instructions for this cleaner. Contents Important Safety Instructions 3 Carton Contents...5 Steamer Description 5 How To Use: Steamer 6 Filling Clean Water Tank 6 Removing And Filling Solution Tank - Hoover WH20100 | Manual - Page 3
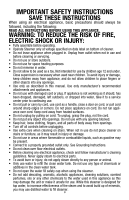
. • Connect to a properly grounded outlet only. See Grounding Instructions. • Do not clean over floor electrical outlets. • Before cleaning any electrical appliance, check and follow manufacturer's cleaning guidelines. Never apply steam to electrical parts. • To avoid burn or injury, do not apply - Hoover WH20100 | Manual - Page 4
steamer sufficient time to cool prior to removing the microfiber pad. • Before cleaning the steamer, unplug the power cord from the electrical outlet and clean Instructions electrician or service person if expose machine to freezing temperatures. • With steam activated, do not allow appliance to spray - Hoover WH20100 | Manual - Page 5
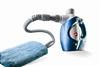
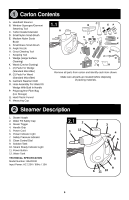
A. Handheld Steamer B. Window Squeegee/Garment Steaming Tool C. Turbo Nozzle Extension D. Small Nylon Scrub Brush E. Medium Nylon Scrub Brush F. Small Brass Scrub Brush G. Angle Nozzle H. Grout Cleaning Tool I. Scraping Tool J. Wedge (Large Surface Cleaning) K. Wand (Crevice Dusting) L. (2) Pads For - Hoover WH20100 | Manual - Page 6
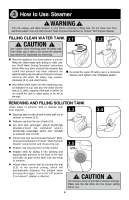
! WARNING ! Turn off, unplug, and allow steamer to cool before servicing or filling tank. Do not clean over floor electrical outlets. Use only with Hoover® Multi-Purpose Disinfectant or Hoover® All-Purpose Cleaner. Filling clean water tank ! CAUTION ! Use caution when removing water fill safety - Hoover WH20100 | Manual - Page 7
, check the "troubleshooting" section for more details. „„ The steam cleaner should take between 3-6 minutes to heat up to steam temperatures, which will be indicated when the green "steam ready" indicator illuminates. WARNING Do not operate unit ! without water in clean water tank. To - Hoover WH20100 | Manual - Page 8
Steam Nozzle on Handheld Steamer Steam Nozzle on Handheld Steam Cleaner (4.2). Align the orientation marks and rotate clockwise until hose assembly is in locked position and secure. B „„ To remove assembly, slide release button at the base of Hose away from steamer Microfiber pad and secure with the - Hoover WH20100 | Manual - Page 9
Brass Scrub Brush Angle Nozzle REQUIRED EXTENSION FOR USE NOZZLE STEAM HOSE EXTENSION NOZZLE X X X X X Grout Cleaning X Tool Scraping Tool X Wedge (Large Surface Cleaning) with pads Wand (Crevice Dusting) with pads Garment X Steamer Cloth Hose Assembly For Wand Or Wedge With Built - Hoover WH20100 | Manual - Page 10
down before performing any maintenance or troubleshooting checks. IMPORTANT Never use bleach or fabric softener when washing the microfiber cleaning pad. 6 Storage „„ After the steamer is used, turn power off and then unplug the power cord. „„ Press down the steam trigger to release all pressure - Hoover WH20100 | Manual - Page 11
TROUBLESHOOTING GUIDE AS A FIRST STEP TO RESOLVE ANY PROBLEMS YOU MAY BE EXPERIENCING. All servicing should be done by an authorized service representative. ! WARNING ! To reduce risk of personal injury - unplug steamer before servicing and allow to cool. PROBLEM POSSIBLE REASON Reduced steam - Hoover WH20100 | Manual - Page 12
the Owner's Manual, your HOOVER® appliance and Warranty Period, Hoover® will provide labor and parts, at no cost services), pads, accessory tools and attachments, improper maintenance of the appliance, damage due to misuse, acts of God, nature, vandalism or other acts beyond the control of Hoover - Hoover WH20100 | Manual - Page 13
TM enhanced Clean disinfecting* handheld Manual del ProPietario Instrucciones de Funcionamiento y Servicio ! IMPORTANT ! IMPORTANTE: LEA USO DOMÉSTICO. EL USO COMERCIAL DE ESTE PRODUCTO ANULA LA GARANTÍA. hoover.com *En superficies duras y no porosas, cuando se utiliza ©2011 Techtronic Floor Care - Hoover WH20100 | Manual - Page 14
su recibo de compra a este Manual del propietario. Para obtener el servicio de garantía de su producto HOOVER® puede requerirse la verificación de Hoover.com para obtener instrucciones adicionales en video para el armado y el mantenimiento. Código de fabricación (Etiqueta ubicada en la parte - Hoover WH20100 | Manual - Page 15
objetos en ninguna abertura. • Use el producto sólo como se describe en este manual. Use sólo los accesorios y productos recomendados por el fabricante. • No use este Before cleaning any electrical appliance, check and follow manufacturer's cleaning guidelines. Never apply steam to electrical parts. - Hoover WH20100 | Manual - Page 16
• No utilice el limpiador a vapor en un espacio cerrado lleno de vapor proveniente de pintura con base de aceite, solventes de pintura, algunas sustancias antipolilla, polvo inflamable u otros vapores explosivos o tóxicos. • Mientras esté en uso, nunca invierta el aparato ni lo utilice sobre su - Hoover WH20100 | Manual - Page 17
seguridad 8. Dial selector de control de limpieza 9. Tanque de solución 10. Luz indicadora de vapor listo 11. Botón de encendido ESPECIFICACIÓN TÉCNICA Número de modelo: WH20100 Potencia de entrada: 120V c.a./ 60Hz / 10A 2.1 2 1 12 7 3 4 5 8 9 6 11 10 E5 - Hoover WH20100 | Manual - Page 18
el tanque fuera del limpiador a vapor, como se indica (3.3). „„ Quite la tapa de la parte superior del tanque (3.4). „„ NO MEZCLE EL DESINFECTANTE MULTIPURPOSE de HOOVER® NI EL LIMPIADOR MULTIPURPOSE DE HOOVER® CON NINGUNA OTRA SOLUCIÓN DE LIMPIEZA. „„ Llene el tanque con el desinfectante multiprop - Hoover WH20100 | Manual - Page 19
. „„ Llene el tanque de solución con el desinfectante multipropósito de Hoover® Multi-Purpose, como se indica en la sección "Para quitar y llenar No llene el tanque en exceso, para permitir que quede espacio en la parte superior). „„ Vuelva a colocar la tapa de seguridad del llenado de agua - Hoover WH20100 | Manual - Page 20
3.9 que el limpiador a vapor se ha enfriado. Después de 10 minutos, si el indicador de presión de seguridad no ha descendido por completo, libere la presión de A vapor residual presionando el gatillo y luego empujando suavemente el indicador de presión de seguridad. Haga girar lentamente la tapa - Hoover WH20100 | Manual - Page 21
CUADRO DE ACCESORIOS: EXTENSIONES Y USO ! PRECAUCIÓN ! Antes de limpiar cualquier aparato eléctrico, consulte y siga las pautas de limpieza del fabricante. Nunca aplique vapor a piezas eléctricas. ACCESORIOS EXTENSIÓN NECESARIA PARA USO USO SUGERIDO EXTENSIÓN DE BOQUILLA TURBO BOQUILLA DE - Hoover WH20100 | Manual - Page 22
5 Mantenimiento No contiene piezas que el usuario pueda reparar. No intente repararlo por su cuenta. Cualquier servicio de mantenimiento que requiera desarmar el artefacto, que no sea la limpieza, debe ser ejecutado por un técnico calificado en reparación de electrodomésticos. Toda tarea de - Hoover WH20100 | Manual - Page 23
centros autorizados de servicio, llame al 1-800-944-9200. No envíe su aspiradora a Hoover®, Inc., Company en Glenwillow para realizar el servicio. Esto sólo provocará demoras. Si se especifica en la etiqueta de datos en la parte inferior de la unidad.) NO DEVUELVA ESTE PRODUCTO A LA TIENDA. E11 - Hoover WH20100 | Manual - Page 24
TM enhanced Clean disinfecting* handheld owner's Manual Operating and Servicing Instructions Español - página E1 ! IMPORTANT ! READ CAREFULLY BEFORE ASSEMBLY AND USE. Questions or concerns? For assistance, please call Customer Service at 1-800-944-9200 Mon-Fri 8am-7pm EST. PLEASE DO NOT RETURN THIS - Hoover WH20100 | Manual - Page 25
normal en una casa de familia según las instrucciones del Manual del Pçpropietario, su aparato HOOVER® y conjunto de manguera están garantizados contra defectos originales en TIPO O NATURALEZA CON RESPECTO AL PROPIETARIO O A CUALQUIER PARTE QUE REALICE UN RECLAMO A TRAVÉS DEL PROPIETARIO, YA SEA - Hoover WH20100 | Manual - Page 26
TM enhanced Clean disinfecting* handheld Guide d'utilisation Instructions d'utilisation et d'entretien ! IMPORTANT ! LIRE CES INSTRUCTIONS ATTENTIVEMENT AVANT D'UTILISER L'ASPIRATEUR. Vous avez des questions ou des inquiétudes? Veuillez appeler le service à la clientèle au 1 800 9449200 du lundi au - Hoover WH20100 | Manual - Page 27
recommandé de joindre votre reçu de caisse au guide de l'utilisateur, car une vérification de la date bas du nettoyeur vapeur) Visiter Hoover.com pour obtenir des instructions vidéo à propos de cet Seulement) ou pour parler à un représentant du service à la clientèle (de 8 h à 19 h, hne, du - Hoover WH20100 | Manual - Page 28
Durant l'utilisation d'un appareil électrique, toujours respecter les précautions élémentaires, y compris les suivantes : LIRE TOUTES LES INSTRUCTIONS AVANT D'UTILISER CET APPAREIL. AVERTISSEMENT: AFIN DE RÉDUIRE AU MINIMUM LES RISQUES D'INCENDIE, DE CHOC ÉLECTRIQUE OU DE BLESSURES : • Assembler - Hoover WH20100 | Manual - Page 29
contient des produits chimiques reconnus par l'État de la Californie comme pouvant causer le cancer ou, entraîner des malformations congénitales ou d'autres troubles de la reproduction. Consignes de mise à la terre Cet appareil doit être mis à la terre. En cas de défectuosité ou de bris, la mise - Hoover WH20100 | Manual - Page 30
réglage du nettoyage 9. Réservoir à solution 10. Voyant indiquant que la vapeur est prête 11. Interrupteur 12. Réservoir FICHE TECHNIQUE Numéro de modèle : WH20100 Alimentation électrique : AC 120V / 60Hz / 10A 2.1 2 1 12 7 3 4 5 8 6 11 10 9 5 - Hoover WH20100 | Manual - Page 31
. Use only with Hoover® Multi-Purpose Disinfectant or Hoover® All-Purpose Cleaner. REMPLIR LE RÉSERVOIR pendant ou après l'utilisation, consulter les instructions « Remplissage de l'eau en cours il ne doit pas être entièrement plein). „„ Replacer le capuchon de sécurité du réservoir dans le sens - Hoover WH20100 | Manual - Page 32
eau résiduelle pour éviter le débordement, insérer l'entonnoir et ajouter 300 ml d'eau propre dans la tasse à mesurer. Verser l'eau dans le réservoir (3.7). „„ Replacer le capuchon de sécurité du réservoir dans le sens horaire et le tourner jusqu'à ce qu'il soit entièrement vissé. après nettoyage - Hoover WH20100 | Manual - Page 33
de l'attachepression. Consulter le « Tableau des accessoires » à la page 8 pour connaître l'utilisation suggérée. Consulter la section « Entretien » à la page 10 pour connaître les instructions de nettoyage. 8 - Hoover WH20100 | Manual - Page 34
nettoyeur vapeur pour vêtements Raccord-tuyau pour coin ou lance avec poignée intégrée RALLONGE REQUISE POUR UTILISATION RALLONGE STEAM POUR LA NOZZLE BUSE TUYAU X X X X X X X X X X X UTILISATION SUGGÉRÉE Sert à l'application directe de la vapeur, mais principalement comme rallonge pour - Hoover WH20100 | Manual - Page 35
facilement et être retiré.Dévisser complètement le capuchon (3.5). „„ Vider l'eau résiduelle du réservoir et nettoyer la surface externe à l'aide d'un linge sec. Replacer le capuchon de sécurité du réservoir dans le sens horaire et le tourner jusqu'à ce qu'il soit entièrement vissé. Les laisser - Hoover WH20100 | Manual - Page 36
jaunes à la rubrique « Aspirateurs domestiques ». OU • Visiter notre site Web www.hoover.com (aux États-Unis) ou www.hoover.ca (au Canada). Cliquer sur le lien « Service à la clientèle » pour connaître l'adresse du Centre de service le plus près de chez vous. • Composer le 1-800-944-9200 pour - Hoover WH20100 | Manual - Page 37
domestiques, comme il est stipulé dans le Guide de l'utilisateur, contre les défauts de service garanti, téléphoner au 1-800-944-9200, du lun. au ven. de 8 h à 19 h (HNE). Au Canada, communiquer avec Hoover ou à tout acte ou négligence de la part du propriétaire de l'appareil; toute utilisation dans
-
 1
1 -
 2
2 -
 3
3 -
 4
4 -
 5
5 -
 6
6 -
 7
7 -
8
-
9
-
10
-
11
-
12
-
13
-
14
-
15
-
16
-
17
-
18
-
19
-
20
-
21
-
22
-
23
-
24
-
25
-
26
-
27
-
28
-
29
-
30
-
31
-
32
-
33
-
34
-
35
-
36
-
37
 |
 |
OWNER'S MANUAL
Operating and Servicing Instructions
Español - página E1
©2011 Techtronic Floor Care
Technology Limited. All Rights
Reserved. #961145001 ID102313-R0
THIS PRODUCT IS INTENDED FOR HOUSEHOLD
USE ONLY. IF USED COMMERCIALLY
WARRANTY IS VOID.
READ CAREFULLY BEFORE ASSEMBLY AND USE.
Questions or concerns?
For assistance, please call Customer Service at 1-800-944-9200
Mon-Fri 8am-7pm EST.
PLEASE DO NOT RETURN THIS Appliance
TO THE STORE.
IMPORTANT
!
!
hoover.com
*On hard, non porous surfaces, when used with Hoover
®
Multi-Purpose Disinfectant in accordance with owner’s
manual, without tools and attachments.
disinfecting
*
handheld
Enhanced Clean
TM